

If you’d like to find out all about tile edge trim, you’ve come to the right place!
This is Steve with SKG Renovations. In this post I will be providing you with an assortment of tile edging options and some helpful installation strategies.
And it gets better!
I will also go through a real life installation example to show you how it’s done by a professional.
And if you’d rather get some super valuable tile installation tips, check out my Shower Tile Installation post.
Ok, let’s get into it!
Summary of Topics:
Please use the links below to skip to any section that interests you.
Alternative to Bullnose Tile
Ceramic Tile Edge Trim Profiles
Metal & Plastic Trim Profiles
Tile Edge Trim Finishes
Trim Depth
Outside Tile Corner Trim
Square Joint or Mitre Joint on Tile Trims?
An Easier Alternative to Shower Niche Trim?
Inside Tile Corner Trim
Inside Corner Dilemma
Product Types
There are four main types of tile edge trim that can be used to finish the perimeter of your tiling installations.
These include stone trims, porcelain or ceramic trim tiles, as well as plastic and metal trims.
These come in various configurations depending on the product and their use, but the metal tile trims (metal tile edging) and stone trims are the most popular.
Alternative to Bullnose Tile
If you are not excited about using a standard tile edge trim profile, you can use real or engineered stone instead. This is one of the fastest growing tile edge trim ideas, quickly displacing the standard tile edging options.
Capping a shower pony wall or framing the inside of a shower niche with polished stone creates a beautiful high end finish, and also provides a great alternative to bullnose tile.
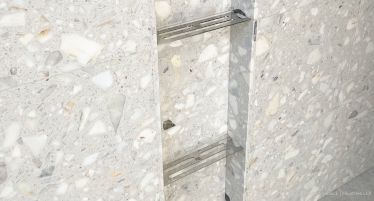
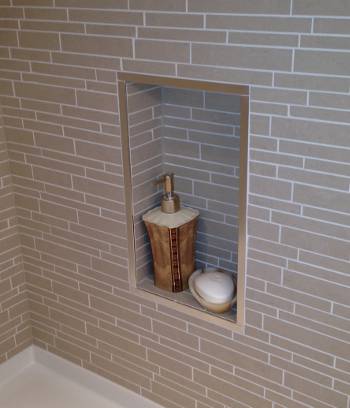
Most of these installations will utilize a marble tile, because these tiles looks great on your shower wall and the tile edges can be exposed for a very nice look.
Marble tiles are almost exclusively used in this situation because they are very popular and also relatively soft, so the edges can be polished with relative ease. Only a few minutes of wet sanding is required to create a fine polished, professional appearance. The image below shows a shower niche trimmed out with marble tiles.
You can also use stone material from a local stone fabricator if you can get your hands on some. This material is usually used for kitchen and bathroom counter tops so it’s quite thick (a choice of either 2cm or 3cm thickness). This is a great option for those who prefer the more bold look of a thicker stone.
This option can be relatively cheap if you can find a fabricator willing to give you a few small pieces. This may not be as difficult as you think because small pieces are a real pain to store for these guys… and they have lots of these laying around after every job that will eventually be disposed of.
This tile trim strategy is becoming much more popular because it creates a very compelling seamless look and is easier to install than other trims. It can also produce a beautiful modern or classic finish depending on your choice of stone.
Ceramic Tile Edge Trim Profiles

Ceramic tile edge trim profiles can have a finished square edge, or more commonly a larger radius bullnose edge.
These types of tile edging were common in modern designs during the 1980’s and early 90’s but are no longer popular in todays modern bathroom designs.
There are some unique modern trim tiles available today, but they are usually special order items and generally quite expensive.
In contrast, it is quite common to see these tiles in more traditional design schemes these days.
The attached image shows a ceramic trim tile being used very nicely around a tiled shower niche in a traditional bathroom design.
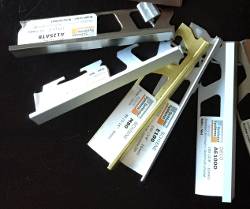
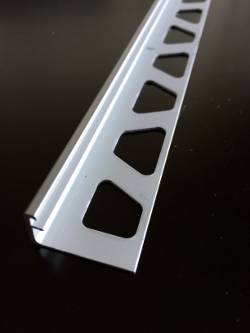
Metal and Plastic Tile Edge Trims
Metal tile trims and plastic tile edge trims come in several profile shapes and colors, but plastic is the least popular of this group because they do not stand up well to abrasion.
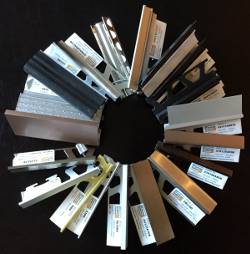
The metal tile edging is by-far the most common trims used in most mid-cost and higher end renovations (image of sample trim wheel).
They are ideal for high abrasion areas such as floors, but have also become a standard in most shower wall tiling installations.
They are available in the widest range of finishes and profile styles, but the profile with the very narrow top edge is the most popular (for example, Schluter Jolly).
There are a large selection of Shluter profiles available. You can see them all on the Schluter Systems website.
Most home stores carry Schluter profiles but you can usually only get the Jolly profile without special ordering them. There are a few more Schluter profile options readily available online.
Tile Edge Trim Finishes
If you’ve decided to install a metal tile edge trim, and you’ve picked the type and style you want, then it’s time to choose the finish.
You should be prepared to select your trim finish well in advance of your tiling project because some finishes are special order items.
You should also be prepared for a wide variation in price. Some of the less popular finishes can easily be twice (or more) the cost of a more common finish.
The general rule when picking a tile edge trim finish is to try your best to match the trim with your bathroom fixture finishes, although there are some exceptions.
Generally when choosing your finish, you should keep in mind that tile edge trim should be an attractive compliment to your bathroom design, but not a stand-out feature.
Trim Depth
It is not always obvious what depth you should select for your metal tile trim, even when you have your tile and trim in hand at the home improvement store.
It is a good strategy to err on the plus side for your trim depth to avoid the terror when you see the tile edge protruding above the trim during installation.
To choose a trim depth that is 1/16” to 1/8″ deeper than your tile is standard in the industry. A DIY’er should stick with a the 1/8″ deeper trim option to give themselves a bit more of a safety margin.
Because the bonding portion of the trim sits beneath the tile (the cross hatched flange seen in the image), it is important to allow enough mortar beneath the tile to allow it to bond to the trim, and the trim to bond to the tile backer board.
Squeezing all the mortar out between your tile and trim mounting flange reduces bond strength significantly so DON’T DO IT!
Another thing to be aware of if you are installing only ceramic tile, is that many people have the tendency to choose their tile edge trim depth based on the thinner outside edge of the ceramic tiles they are using.
This will get you into trouble when you have to match the thicker cut edge against the trim in a staggered tile layout.
If you are installing a waterproofing membrane after you secure your tile edge trim in place, you must also remember to accommodate the membrane thickness in your choice of trim depth.
Remember that you can always add a little extra mortar to raise the tile to meet the trim depth, but you are totally stuffed if you choose a trim depth that is too shallow.
Trim Depth Example

The example image shows two different tiles installed with a 1/2″ trim.
The darker tile is porcelain with a thickness of almost 3/8″ and the surrounding tile is ceramic with a 1/4″ thickness.
The ceramic tile has lots of room beneath, requiring 1/8″ thick layer of buildup material beneath to allow it to match the porcelain tile and trim.
However, the trim is a perfect depth for the porcelain tile. This 3/8″ tile requires an extra 1/8″ of depth for trim & tile to match evenly, due to the extra thickness added by the waterproofing membrane, and an allowance for some mortar beneath.
Outside Tile Corner Trim
When it comes to shower tiling, you may never need to worry about outside tile corner trims for your tile work unless you are installing a tiled shower niche or tiling a pony wall or shower bench.
To clarify, outside tile corner trims used exclusively for the corner where two of your tiled surfaces meet at 90 degrees.
These days it is most common to use a metal tile edge trim for these corners but as I mentioned previously, another great alternative tile edging option is natural or engineered stone.
With stone you can relieve yourself of the burden. Leave the cutting, edge finishing and installing to your stone fabricator instead.
Just keep in mind that stone is expensive and requires a skilled stone fabricator to cut & polish them.
Square Joint or Mitre Joint on Tile Trims?
If you choose a metal tile edge trim, it must be installed with skill and precision.
This trim piece is usually quite visible and you don’t want someone’s shoddy work to be on display in your new shower remodel.
Firstly, if you want this installation to go smoothly, you should follow the strategies I have covered in the sections above.
The challenging part will be matching the four corners evenly, with no gaps.
You have two choices: Meet the two pieces of trim in the four corners with a square joint, or use a miter joint (45 degree joint).
The first option is clearly the easiest and offers the highest chance of success (see image), but it does not look as professional as a perfect miter joint.
Another important condition is that you can only achieve a decent square joint when the top of the trim is flat. This can be achieved quite satisfactorily with Schluter Shiene or Jolly.
With other more complex profiles, a miter joint will be required.
If you decide on miter joints for your shower niche outside trim, it’s always safest to get a skilled and experienced tiling professional to do this work.
An Easy Alternative to Shower Niche Trim?

If you want another alternative to installing a shower niche trim and avoid the outside corner installation problem altogether, you can always install a finished shower niche with a built in tile edge trim.
This look isn’t for everyone but if you like the metallic look of a finished shower niche, it can sure save you a lot of work and also eliminate the risk of leaks.
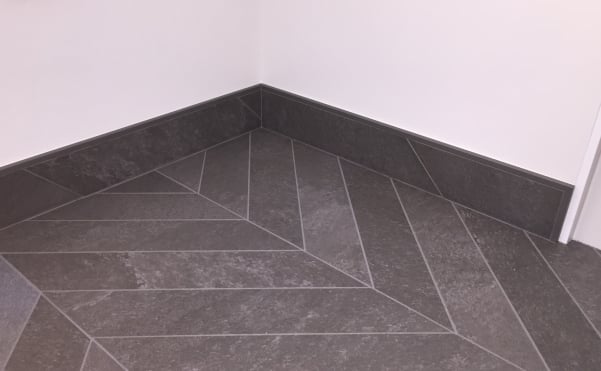
Straight Edge Trim or Square Edge Trim?
Most of the standard trims that you’ll see these days are considered straight edge tile trims. These have a very thin top profile which has always been the preferred look for most people until recently.
Square edge tile trims (or box edge trims) are a bit more obvious because of their box shape and wider top profile. This more bold look has been gaining popularity recently.
Square edge trims have been around for a long while but style preferences have changed recently to bring these trims more to forefront.
Most tiling contractors have tended to avoid these trims simply because you need to cut a perfect miter joint in the corners for these joints to look nice. And this is pretty difficult to do well unless you use a miter saw with a steel cutting wheel.
I have always liked the look of square edge profiles and I suggest them regularly to my clients. The Schluter Quadec profile is a good example of this type of trim. I used this for trimming out the baseboards in a bathroom remodel I did recently (see below).
Inside Tile Corner Trim
Finishing inside corners is an important part of every shower tiling project, but it is also the most ignored when it comes to tile edging.
There are some challenges to these inside corners and some elegant products and strategies available to meet these challenges.
There are also some very useful and interesting tile edge trims that are not routinely used in modern bathrooms and showers but are also worth considering.
Inside Corner Dilemma
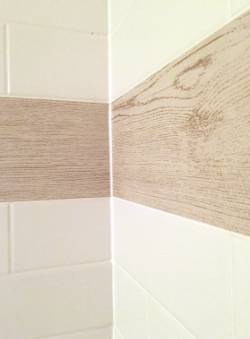
If you are like most tiling contractors, you will have some issues with finishing inside corners on wall tile installations.
When wall tiles meet at a corner, you have a choice of tiling right up against the adjacent tile and rely on a white silicon bead to seal the corner (see image). Or you can cut the tile to create a grout line on one of the two walls.
The former strategy is the most common mostly because it is simply the easiest of the two.
A grout line in the corner tends to interrupt the visual flow of tile from one wall to the other, and is not generally considered to be a good look.
Although these are the most common strategies, you can also install some great inside corner trims here to give your tile installation a high-end look. These are extremely uncommon because they are a bit pricey, but I really like this look (see section below).
Other Interesting Trims
The inside corner tile edge trim (also called a cove trim) provides a professional finished look and is one of the most under appreciated tile edge trim ideas, in my opinion.
The benefits of this trim are an attractive metallic or colored finish compared with the standard grout or silicon corner.
It also has a smooth radius making it easier to clean and provides two grout lines, allowing the corner to be completely sealed.
A baseboard trim is also available for installation outside of the shower if your floor & wall tile meet. It has a very thin top profile and various bold metallic finishes, great for minimalist designs.
There are also some very nice tile edge border profile trims designed to be mounted within a section of wall tile to create a separation between two different tiles, or simply as a bold interruption in the your wall tile design.
There is even a wall profile trim with a shallow track down the middle for mounting a strip of 1″x1″ mosaic tiles. A very classy look.
Wrap Up
I hope that this article has provided you with some confidence (even mastery) in the area of tile edge trim. I have attempted to shown you a range of the most popular and interesting tile edge trims, along with a few useful hints to help you with installation.
If you have any thoughts you would like to share or any questions about this post, or the topic of tile edge trim in general, please leave a comment below.
This post is for information purposes only and should NOT be interpreted as professional advice. You should always consult a licensed local contractor before undertaking any remodelling work in your home. Click here for my full Personal / Professional Disclosure.


Hi Jay,
Thank you for your comment!
I don’t much like the plastic trim either… and I would never try to paint it.
On a few occasions, I’ve cut out the plastic trim and replaced it with a “box” style trim with no install leg.
An example of this “retrofit” style of trim would be Schluter Quadec-K
To remove the plastic trim I used a sharp utility knife and cut the trim as close to the adjacent wall as possible (parallel to the wall surface). You can place a thin stainless steel ruler against the wall, adjacent to the trim, and run the knife blade against it.
This will work well to guide the blade and protect the wall surface.
A sharp knife will cut through the plastic trim quite easily, but it requires a bit of effort, patience and care.
If you attempt this, you will need to be hyper vigilant. Always cut away from your body, and NEVER put your other hand in front of the blade for any reason.
These knives can do A LOT of damage to your flesh… believe me.
After removing the trim, I applied a bonding agent to the edge of the newly exposed grout, then adhered the trim to the edge of the grout (and to the wall) with epoxy. Use very little epoxy to make sure it doesn’t squeeze up between the grout & trim. Any tiny gaps between grout & trim can be filled with a color matched caulking like Mapei Keracaulk U.
Good luck!
Steve
Hi Keith,
Great piece above! Looking for some I recently moved into a new build and on the bathroom tiling, they’ve used white, plastic trims for the tile edging. My preference would have been a metal edging. I understand this can’t be changed without removing the tiles on either side of all the tile edging (it would be half the tiles in the bathroom). Do you have any recommendations on how to give the tile edging a new look? I’ve considered painting it a metallic colour but I know paint doesn’t adhere well to plastic.
Thanks
Hi JD,
Thank you for your comment!
If I understand you correctly, the glass panel is plumb, but the strip of tile adjacent to it (and consequently the tile trim) is not plumb.
If this is the case, I don’t know what kind of trim could conceal this mistake. If you could find a trim that would overlap the tile face and was very low profile, I suppose you could make it appear that the tile and trim are plumb, but I am not aware of any trim like this.
If the tile is ceramic, you could cut the tile just next to the trim to create a new plumb tile edge (using a circular saw or grinder with tile cutting blade), then attach a trim like Schluter Quadec-K.
This would be a difficult cut, especially at the floor and ceiling, but it could be done with some skill and patience.
I hope I understood what you were getting at. It’s always difficult without pictures.
Good luck!
Steve
Hi Steve. I have a question regarding covering up a shluter edge trim install that was put in crooked and became very apparent after shower glass was installed. The shower glass was put in level and makes the crooked shluter jump out. It has been suggested that I cover up the shluter trim with some type of an angle/corner trim to match the level slope of the glass going up the wall. Is this advisable? If so, are there any products you recommend? Thanks!
Hi Rachel,
Thank you for your comment! I’m happy that you like our shower niche shelves!
The mess on your Schluter trim is VERY common. It’s a fiddly job to tape off the trim before mudding or painting, so most contractor don’t do it… unfortunately.
I have cleaned up metal tile trims countless times. This is my method:
First cut a clean line between the wall and the trim, using a sharp utility knife. It does not have to be a deep cut; only very lightly scored to cut through the paint only.
This is an essential step, to separate the paint mess on your trim from the adjacent painted wall.
If you don’t do this, your wall paint will peal away along with the paint you are trying to remove from your trims.
Then you simply use a plastic implement (like a plastic putty knife) to scape the paint (or mud) off the trims.
Do not use a metal putty knife (or anything metal) to do this. The metal trims will scratch easily if a metal tool is used.
You can remove any left over bits with a moist rag (only moist, not wet).
Be careful with this because you don’t want any moisture to get into the margin between the trim and wall.
Please do not use a solvent for this job. It will only make a huge mess.
It will also likely stain your grout and damage the wall paint in the process.
Good luck!
Steve
Hello! Thank you for your detailed and informative content!! We got some of your shelves for our niches and they look awesome. Question… we are not yet done with the job but I’ve noticed a ton of paint / primer / joint compound / who knows what on our brand new schluter trim pieces (between tile wall and drywall)…. It looks extremely sloppy and unfortunately is what catches the eye immediately upon entering a brand new bathroom. What are our options here? I’m asking our contractor but value your thoughts here. Can this stuff be scraped clean? Im not understanding why this visible trim wasn’t taped before paint. Seems such a shame for an otherwise beautiful job.
Hi Karen,
Thank you for your comment!
I’m not sure I know exactly what you mean, but I can tell you that tile edge trim is only designed to conceal the tile edge in tile installations.
The “anchor leg” is designed to imbed into the mortar layer beneath the outside edge of the tile so any other kind of installation would not really be appropriate.
What you are probably looking for is some type of moulding to trim out the edge of your cabinets.
I would suggest that you ask a local contractor about it, or browse through the “Mouldings & Millwork” section at your local home improvement store to see if you can find something more appropriate for your application.
Good luck with your project!
Steve.
Thank you for the great information! My question is, do I need to use the metal trim edge underneath the cabinets? I plan to use it where the top edge and side edge of the tile will be seen but I’m not sure if it’s necessary for underneath the cabinets.
Thank you!
Karen
Thanks so much for talking about the benefits of tile edge trim and what it does. My parents are wanting to redo a bathroom in their house but can’t do it themselves. So they’ve been looking into finding a place that can help them retile and paint.
Hi Kathy,
Thank you for your comment!
The only curved trim that I have used are the Schluter products, and you already mentioned the Jolly.
Maybe you’ve already done this, but I would call every tile wholesaler and retailer that you can find in your area to see if they might have any in stock.
And make sure to ask about Schluter Schiene Radius as well as the Jolly Radius. It is even more rare to see these in stock, but you might get lucky.
Most retailers and wholesalers are not familiar with these trims so they may not have thought to suggest the Schiene when you asked about the Jolly.
I’m sorry I couldn’t be of more help.
Good luck with your project! It sounds like your round window is going to look pretty cool when your done tiling!
Steve
Hello,
I have a round window in my bathroom and I’d like to use a trim. I ordered the Schluter JOLLY-RADIUS EDGE TRIM 1/2″ ALUM MATTE BLK
Product Code: R/A125MGS
But it won’t be available until the end of the month. Can you offer any other suggestions for a flexible trim around a shower window? Thanks!
Hi Bill,
Thank you for your comment!
I know what you are saying about the metal trim. I don’t think that a metal trim would look good with an installation like this.
What I might suggest is to look for a large tile with same color & finish, cut it into 1/2″ to 3/4″ strips with a wet saw, and use these strips as your tile edging.
You should check with the company that makes your existing mosaic tiles first because they might already sell this type of stone trim. If not, they may have large tile versions using the same stone.
I think this might look super nice on each side of your mosaic stone tile installation.
Good luck!
Steve
Hi Steve,
I am installing “drystack” wall tile that is made up of small rectangular stones (1 3/16 X 3/8). The tiles will surround a recessed fireplace and run floor to ceiling (9′), with exposed sides.
The issue I am having is with the edge trim. The stones vary in depth from 1/4 inch to 1/2 inch and I’m not sure what the best solution would be. I’ve been looking at the metal Schluter edging but due to the varying depth of the stone, I’m unsure of the proper size to order.
I’m open to suggestions.
Thank you!
Hi Nicole,
Thank you for your comment.
Straight edge tile trim installations are by far the most common. These trims provide a thin top profile (when viewing the tile from directly in front). This more subtle look has always been preferred in the past. Square edge trims (or box edge trims) are basically box shaped, hence the name. They provide a more prominent top profile which people are obviously starting to appreciate because these trims are getting more popular. Check out my Tile Edge Trim post update to get a bit more info, along with an image of one of my recent installs using the Schluter Quadec profile.
Cheers,
Steve
Hi Steve,
Thanks for this article. I was wondering the difference between square edge and straight edge tile trim.
Thanks,
Nicole
Hi Richard,
Thank you for your comment!
Unfortunately, your description of the problem is not altogether clear to me. If you’d like to send me some photos ([email protected]) I could get a better idea what’s going on and give you my two bits.
Cheers,
Steve
I have a situation on a neo angle shower where two different tile thickness meet at the door frame, the thinner tile on the wall and the thicker tile on frame, meeting at 120 degrees. Do you think Quadec inside the door frame and miter the wall tile where it meets the quadec?
Hi Heather,
Thank you for your comment!
Definitely Grout. You can certainly use silicon if you prefer but it would actually create more work for you because you’d have to intentionally avoid grouting your trim line while grouting the rest of the tile.
Using silicon would also interrupt the continuity of the tiled surface because silicon will always have a different texture and color than the adjacent grout (even if you used color matching silicon).
Good luck with your project!
Steve
Hi Steve,
Just wondering do you use grout between trim edge and tile or silicone?
Thanks
Hi Diana,
Thank you for your comment!
I am not quite sure why you would install a Schluter movement joint profile around the perimeter if you also intend to install a regular BB moulding at the base of the wall. The floor tile is typically installed about 1/4″ away from the wall to allow for movement, so a movement joint profile would not be necessary here. And the baseboard moulding simply covers this gap.
I can see the logic in installing a movement joint profile between a tiled floor and an adjacent wood floor (if there was a structural seam beneath), but I don’t know any reason why you would install this at the floor/wall margin around the perimeter of your tiled floor.
Sorry if I misunderstood your question. Good Luck!
Steve.
Hello Steve,
I’m going to use a shluter moving joint profile for my new 12×24 tile floor around perimeter on a kitchen renovation.
I pulled up the base molding and behind is the original drywall no primer, paper off some areas, crumbled corners etc . You get the picture . Looks like work.. To not have base molding down.
Have you seen or recommend wood molding around the shluter profile? I believe I read something about base molding on shluter site but think it’s for their product. I want to use regular base molding. So not too commercial looking.
My crew has not put in shluter in that manner.
Thank you for all your great answers!
Hi Justine,
I hate to tell you this but I’m not really qualified to advise you on this. I have a lot of experience with shower tile installation and I have a few design biases of my own, but I’m no designer. A design blog would be a much better resource for you I think. Sorry I couldn’t help you out with this.
Steve.
Hello Steve!
I would like your opinion please regarding subway tile being installed in a kitchen. The space above the kitchen sink has a window with cabinets on either side. Would you recommend subway tile around the window all the way up to the ceiling, or taking the subway tile only up halfway to the sides of the window? Please let me know what would create a more professional, balanced look. Thanks so much!
Hi Michelle,
Thanks for your comment. I believe that i answered this question recently from another commenter. Here is a link:
https://redblockindustries.com/blog/shower-remodel/tile-edge-trim/#comment-558
Good luck!
Steve
Steve, I have just been introduced to the metal trim options and love it. However, I’m too late I’m afraid to adopt this option in our shower remodeling
My tile guy is here today to finish and I’m wondering what if anything I can do to trim the tile against the Sheetrock and niche
Hi Brittany,
I answered a similar question awhile back but unfortunately, I could not come up with any easy fix for this problem. A possible solution would be to buy a flush type of trim (like Schluter Jolly), carve out the grout and mortar from behind the tile edge you would like to cover, and slip the anchor leg of the trim behind the tile. This would NOT be an easy job and even if was done flawlessly (without damaging your tile or waterproofing membrane), it still may not be to your liking because the trim would stand a bit proud of the tile edge. Not a great look in my opinion.
Sorry I couldn’t be of more help. 🙁
Good Luck.
Steve
Hi Patrick,
Thank you for your comment!
I have not seen this kind of finishing before, but I don’t see any reason why you couldn’t do it. It’s entirely up to you what you how to finish this edge. The only problem you may run into is that the tiling/ mounting flange often protrudes slightly past the backer board surface when you get close to the tub. As such, you may not have the room behind the tile to install the trim (unless you use a thicker mortar bed).
I would suggest you get a friend to hold up some trim and tile above the tub flange so you can step back and see how it looks. Might be a nice finish.
Good luck!
Steve.
If my tile is already installed, is it possible to still install a trim without removing the newly installed tile? My contractor obviously didn’t know what he was doing, because he never mentioned the need for trim when he installed my shower tile. Now my niche has exposed edges of tile that I want to cover up. Any suggestions?
I am installing a bath and was wondering if there are any issues with instead of finishing the tile directly to the tub with a small gap for caulking like is normally done. I silicone a tile edging to the tub and use that as my finish. I would use this trip all the way to the sap around the tub and go to the floor. Is this something that you have seen done? Do you think it would look good?
Hi Paul,
Thank you for your question.
You could try to grout that gap but it may not work well because fresh grout will not bond well to dry, cured grout. Applying a liquid bonding agent such as a diluted Weldbond mixture would help but it’s a real hassle for such a small job.
I would instead consider applying a caulking that’s designed for this type of repair. The type I use is Mapei Keracaulk-U. Because it contains acrylic, it will bond better to a cured grout without the need for a bonding agent. You may have a little trouble finding the exact color you need if your grout is not Mapei brand, but it shouldn’t be too hard to find the right color from a competitive brand if you ask a tile wholesaler/ retailer.
Good luck with your fix!
Steve
We have the smallest gaps between some backsplash tiles and schluter profile due to slight imperfections in the tile cuts. Would you recommend running a thin bead of caulking down the inside line of the schluter to hide it or just grouting?
Hi Lionel,
Thank you for your comment.
It sounds like your situation is very typical. All you need to make sure of is that your tile edge trim depth matches the thickness of your tile plus a thin layer of thinset mortar beneath. If you are planning on using a 1/4″ notched trowel to apply your thinset (which is typical for most smaller sized tiles), the thinset depth (under the tile) will be around 1/8″ after you push your tile into mortar bed. That means that for a 1/4″ thick tile, you would only need a 3/8″ trim depth. This gives you plenty of room for your tile and thinset.
This is a very common trim depth so it should be super easy to find at your local home improvement store. Here is a link to all the Schluter tile edging, in case you don’t know what I mean.
https://www.schluter.com/schluter-us/en_US/Profiles/For-Floors/c/P-FF
Good Luck!
Steve
i need an edging for an outside corner that will receive a quarter-inch tile plus quarter-inch thinset, i want the tile to fit inside the edging to hide the cut edge of the tile
please call me 705-297-8776 or give me your number and i can call you
Hi Rifumo,
Thank you for your comment.
Tile edge trim is not compulsory, it only serves as an attractive way to finish the edges of your tile installations. You can install tile edge trim with virtually any tile type or thickness, in virtually any kind of tile installation scenario. Unless you are installing a marble tile that can be polished nicely on its edges, most people prefer the look of a metallic border trim piece, to the unfinished look of exposed tile edges. I have seen tiling contractors accumulate some grout on these unfinished edges and taper it to create a finished edge. I don’t happen to like this look, but this type of finishing detail is all about personal preference.
I hope you find a solution. Good luck!
Steve
Thank you for this great article that gives good options.
What I want to know is, my contractor has finished the whole building without installing the edges on all our floors and stairs. Is the installation of edge trims compulsory or is it dependent on the method of tiling used?
Hi Gopal,
I would actually suggest a Schluter product for any tile edging or transition. Most of their products come in profile heights up to 1-3/16″. If you want edging or a transition, they have both. You may not be able to get the right height at your local home store, but you should be able to order any of these from most tile wholesalers. Here is a link to Schluter USA.
https://www.schluter.com/schluter-us/en_US/Profiles/For-Floors/c/P-FF
Feel free to contact me again if I misunderstood your question. Good luck with your project!
Steve
Thank you for this article. We have a 2cm thick terrazzo tile (24×48″). We are trying to find a “schluter” like edge for transitions and to create a border in the lobby. Do you have any suggestions for tile this thick or any metal inset that you can come up with. I really appreciate your help. We have already bought the tile but nobody can figure out this part.
Hi Debbie,
A J channel trim would have to be removed if you wanted to install a new trim piece in its place.
Even if the mortar was still fresh, there would be no way to pry out the J channel because it’s pinched in between your upper and lower cabinets. The only way would be to remove the tiles adjacent to it and reinstall them with the new trim. This would be possible but it’s a messy and unpredictable job. If the mortar has set for even 1 day, it will be difficult, but doable.
You should discuss the risks with your contractor.
I hope that helps. Good luck!
Steve
Hi Eric,
Thank you for your comment.
It is a difficult job to remove the trim if the mortar has set up even for a few hours let alone the time it takes for me to respond to a comment 🙂
I’m thinking at this stage it will not be possible to remove the trim without damaging the tile.
My only suggestion would be to try to sand out the marks in the trim with very fine sand paper or emery cloth. This would be risky though. You would be creating a “brushed” finish if it worked out flawlessly. However, if the trim is anodized or electroplated, you may sand off the finish which could change the color dramatically. You could buy a spare piece of the same trim and experiment with it.
I wish I could be of more help. Good Luck!
Steve
Hi Steve, we just installed a tile backsplash, and used a brushed nickel j channel finish. But now I think I would like a tile trim finish instead. Can we put a tile trim, if they make it, over the existing J channel finish?
Thanks
Great article. We have just had a “professional” mark up a section of tile trim. Can it ever be extracted and replaced without tile breakage?
Thanks,
Eric
Hi Sue,
Thank you for your comment.
Yes, the trim is designed to be anchored in the thinset mortar under the outside edge of the tile. If you’re lucky, he may have left a void (no thinset) under the outside tile edge, so the trim piece could be tucked underneath later. I have seen this a few times before. Doesn’t really look great, but it’s possible.
He could also try to the carve out some of the mortar to make room for it before the mortar is fully set. That is also possible, but a lot of work.
I think the easiest option is to use Schluter Quadec K. It’s a square finishing trim with no flange attached. Here is a link:
https://www.schluter.com/schluter-us/en_US/Profiles/For-Walls/Edging-%26-Outside-Wall-Corners/Schluter%C2%AE-QUADEC-K/p/QUADEC_K
The only problem is that he will probably have to glue it in place with construction adhesive for it to stay in place over the long term. He will also have to tack it down while the glue dries which could be challenging if the wall is not perfectly flat.
Good luck, and let me know how it goes!
Steve.
Hi Steve, Great article! I have a tile guy who turns out to be a DIY person not so much a tile guy. The tile is up and he asked me last night to pick up some metal trim pieces for the edges. From what I have read, it is too late? The trim piece goes underneath the tile, correct?. Is there another type of trim piece that can be installed after the tile is up? It must be an edging not another tile as the tile is already out as far as possible. Thank you for your help and time.
Hi Jennifer,
Thank you for your comment.
To decide which trim depth is appropriate to use for your tiling job, you simply measure the edge thickness of the tile you will be installing and add about 1/16″ to allow for a mortar layer between tile and trim. You should also keep in mind that if you’re setting non-rectified (tapered edge) ceramic tiles in a staggered arrangement, there will always be a cut tile against the trim on every second row. In this case, the trim depth must accommodate the full thickness of the tile, rather than only the tapered edge thickness.
Only the plastic tile edge trims tend to discolor over time. The painted metal edge trims are very color stable in my experience. The metallic finishes will not likely discolor for decades (if ever).
You need not be worried about the exact slope (in degrees) of the base of your tiled shower niche. Since the depth of your niche will always be around 4″ deep, you only need about 1/16″ drop from the back of the niche to the front, to allow the water to drain.
Good luck with your project!
Steve
Are there different metal trims for a niche dependent on whether the tiles are rectified or non rectified? Best product which doesn’t yellow with time?
Taps are chrome.
What is the slope required in degrees of the base of the niche?
Hi DIYer,
Thanks for reading our post!
I am not sure if I’m understanding correctly, but I assume that you talking about the two vertical edges of a typical kitchen backsplash. It sounds like you are using a bullnose tile (instead of a metal trim) to finish the two vertical edges of your backsplash. It also sounds like you are setting your subway tile in the typical horizontal orientation so you are wondering if you should cut your bullnose pieces into 2 1/2″ pieces (approximately) so these pieces can line up with the short side of each subway tile. If I am correct with my assumption, I would just use the entire length of the trim (12″), plus the short piece (6.5″) to reach the bottom of the cabinet, as you suggested. You could also cut two 9 1/4″ pieces (approx.) to reach from the counter to the underside of the cabinets, just to create some symmetry. It is not standard to cut the bullnose trim into small pieces to match the edges of the tile (it might look a bit odd), but it really comes down to personal preference. Please let me know if I understood you correctly and maybe attach a pic. Good luck with your tiling project!
HINT: I would also suggest using Mapei Ultraflex grout. It’s way easier to clean because it’s pre-sealed.
Steve
When installing an edge bullnose trim on an under-counter kitchen backsplash (18.5″H), should I cut the trim into pieces the same height as the backsplash subway tile or just use the entire length of the trim (12″), plus a short piece (6.5″) to reach the bottom of the cabinet?
Hi Meagan,
Thanks for reading our post and for your question.
Typically no tile trim is installed between the tiled shower base and wall, at the ceiling, or at the inside corner (where the back and side walls meet). This installation technique is most common in showers these days. You are absolutely right that a trim is usually installed at the two outside edges of the shower wall tile and around the perimeter of the tiled shower niche.
There are trims that can be used in inside corners but they are rarely used and expensive, but quite beautiful. Here is a link to a Schluter cove shaped inside corner trim.
This post was very helpful! Thank you. Is any trim or transition needed between a shower base/pan and the tile used for the shower walls? What about where the tile meets the ceiling? It looks like we at least need it for the two outside edges of the shower, the shower niche and perhaps the two inner corners where two different tiles meet.