Planning Your DIY Walk-In Shower Build
Whether you're planning a DIY walk in shower as part of a larger bathroom remodel, or as an upgrade to your existing tub or
shower, you'll need to determine a few important things first.
If you're interested in changing the bathroom layout and moving your WIS to a new location, you'll need to determine
where all the water supply and drainage lines are. This is important whether you're planning to handle most of the
project yourself or hiring a contractor to do it.
Relocating plumbing can often be the most expensive part of a bathroom remodel, so it's important
to determine this early on in the planning process.
Assessing the structural capacity of the floor framing in the location of your new diy walk in shower is also an
important early step in the project.
All WIS's require that the pan be recessed in the subfloor sheeting so that the bathroom floor grade is flush with
the shower floor. As such, you need very rigid subfloor framing to reduce deflection, or there can be BIG problems
down the road - cracking grout lines, delaminating tile, water infiltration into the framing, rot, mold. I think you
get the picture (more detail on this below).
You may also want to get out your stud finder to mark out where all the wall studs are, just in case you want to
install a recessed wall niche for your shampoo, soap etc.
In addition to shower storage decisions, there's also a lot of design related decisions to be made like tile
selection, pan type/ brand, door type (or no door?), fixtures. You also need to think about preparing for the demo. Are you doing it yourself, or hiring a pro
to do it?
Because the planning stage is so important, I decided to write an entire post about it. So, if you want the whole
story, please check out my Planning a Bathroom Remodel post. You
can always come back here when you're done.
Job Site Safety and Dust Management
Safety:
First off, let me suggest that you hire a demolition company to do your bathroom / shower demolition instead of doing
it yourself.
I know that many of you gung-ho diy'rs out there will be ready to grab their sledgehammer and go nuts on the old
shower. In fact, you were probably looking forward to it... am I right?
However, bathroom demos can be very unpredictable and dangerous. I've personally experienced many injuries from past
bathroom demos until I started hiring experts to do it.
If you're interested in taking it on, I would suggest that you get ultra prepared by reading my Ultimate Demo Guide but let me go over some important basic rules
to get you started.
Start with a good pair of work coveralls (or equivalent) to cover all exposed skin. This is more important than you
might think. It only takes a light brush of your arm against a headless nail to ruin your whole day. Blood gushing
out like a horror show, and a panicked dash to the emergency for stiches.
But seriously, you can do a safe demo yourself if you cover up, get some good quality ear and eye protection, work
gloves, some basic demo tools, and follow a few simple guidelines.
You need to wear safety goggles at all times during your demo. You don't necessarily need full goggles, but
you should be aware that if there's any gap between the glasses and your face, debris will get in there, guaranteed.
Don't take any chances with your eyes. They are difficult to replace...--
Now I'm going to talk about ears... I've seen too many guys on the job site that adhere to the moto that "real men
don't wear earplugs". Suffice it to say that these guys are idiots, and it won't take long for them to pay the
price.
Your ears are critical to your personal and work life and can easily be damaged with even moderately high db's for a
short period of time. Explosive noise is very bad as well. My advice; take every possible measure to protect your
ears. You will eventually regret it if you don't.
My last bit of advice here is to always use tools (and leverage) to move, pry, or remove bits of material from walls
of floor. In other words, to avoid personal injury, you should make sure you utilize the right tools (power &
hand tools) to get things done, instead brute force.
Debris can move in strange and unpredictable ways when you're trying to remove it from walls or ceilings. It might be
a bit of steel mesh twisting the wrong way and injuring your wrist, or as bad as a chunk of drywall releasing
unpredictably, causing you to fall back against a sharp copper water line jutting out of the wall. Ouch.
So read my Ultimate Demo Guide, and be careful.
Dust Management:
During the demolition stage of your diy walk in shower project, dust can easily make it into the rest of your home,
unless you intentionally manage it.
Without the right approach, dust will get literally everywhere in your home; on your furniture, lamps, walls, and
most importantly, in yours' and your family's lungs. As such, you want to make sure all the dust gets
vented outside, not into the rest of your home.
Proper dust management can basically be summed up with one word, "depressurization". A big word, yes... but the
method is not complicated.
You'll obviously need an exhaust fan to vent the dusty air outside, and you'll need to cordon off the demo space by
keeping surrounding doors closed and covering any open connecting hallways with plastic sheeting.
But the key to keeping the dust out of your home is to ensure that the air you're using to supply your demo exhaust
fan ONLY comes from the dust free living area adjacent to the demo area (not from outside or anywhere else).
An adjoining room or hallway will work nicely as long as you create a single, relatively small hole to supply ALL of
air being evacuated out of the demo space via your dedicated demo fan.
I go over this whole procedure in detail in my Ultimate Demo Guide, so please check it out for more info.
How to Build a Walk in Shower, Step-by-Step
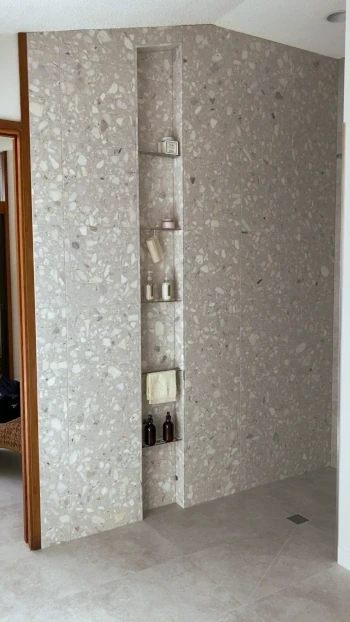
This walk in shower (curbless shower) project was part of a bathroom remodel I completed recently. I installed the
Wedi Fundo Ligno shower tray and used Wedi Building Board for the tile backer. This project also includes a custom
vertical, floor to ceiling niche with stainless steel shelves.
I've written another post to show you exactly how to build this custom storage niche, so please check it out if you want to include it in
you diy walk in shower project.
Step 1: Sub-Structure & Utilities Assessment
One of the most important considerations in your diy walk in shower project is the integrity of the floor framing
under it, and the location and accessibility of plumbing lines around it. This assessment may even change your plans
altogether if your remodel budget doesn't allow for the extra work that may be
required.
Sub-Structure
The importance of substructure rigidity under your WIS cannot be overstated. Most of the tiled shower pan problems I
come across are directly related to flexure of the framing beneath the pan/ tray.
In other words, if the framing beneath the pan flexes even a little bit, there will be problems. Problems like grout
line cracking, tile delamination, and cracking of the mortar base (if installed instead of a foam pan).
If there's no waterproofing membrane installed over the pan, this makes the above situation even worse.
Without any waterproofing, moisture can move down through the grout line cracks to the framing much more quickly and
easily. This means wet framing, mold, rot, more flexure, and the cycle continues until serious repair is required.
I will provide you some specific tips below, but if you're at all confused about how to do this, you should
definitely hire an experienced contractor, or structural engineer to assess the integrity of the framing beneath
your WIS pan.
Water Supply and Drainage
Moving water lines and drainage lines can be one of the most costly parts of your diy walk in shower project because
it often involves a lot of extra labor, and plumbers don't come cheap.
As you will see in the coming sections, I needed to do a relatively significant rerouting of both the water and
drainage lines in this diy walk in shower build, even though the new WIS was in exactly the same location as the old
bathtub.
So, in combination with the subfloor assessment, you should also get a plumber in to assess the practicality and
estimated cost of moving the water and drainage lines to accommodate your WIS plan. It will help a lot if you can
tell him/her where the existing utilities are located so be prepared with this info before calling anybody in for an
assessment.
Step 2: Demolish the Shower / Tub Area
First thing I always suggest to my clients is to hire a pro demo company to do the demolition. It's a delicate and
relatively dangerous process, so the money spent on getting someone qualified to do it is definitely worth
considering for your diy walk in shower build.
But if you decide to do the demo yourself, you should check out my Ultimate Demo Guide.
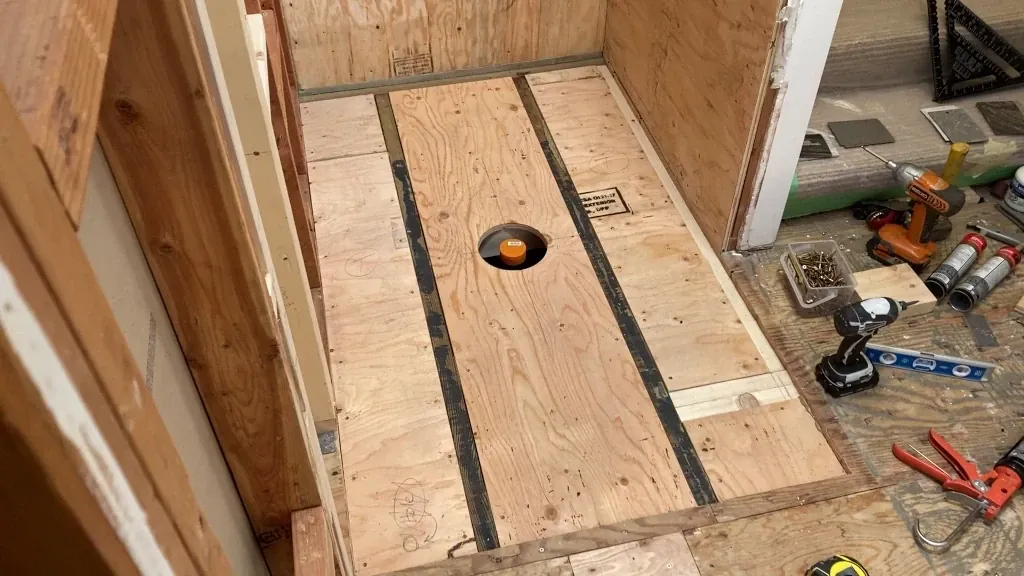
Cut out Subfloor
After the demo of the shower surround and flooring is complete and everything cleaned up, it's time to mark and cut
out the plywood subfloor where you will install the shower tray. The tray I will be installing is the Wedi Fundo Ligno, 36x60 inch, center drain.
To mark out the area that needs to be cut out, you can trace your actual shower tray/ pan if you're installing a foam
tray like me (see pic).
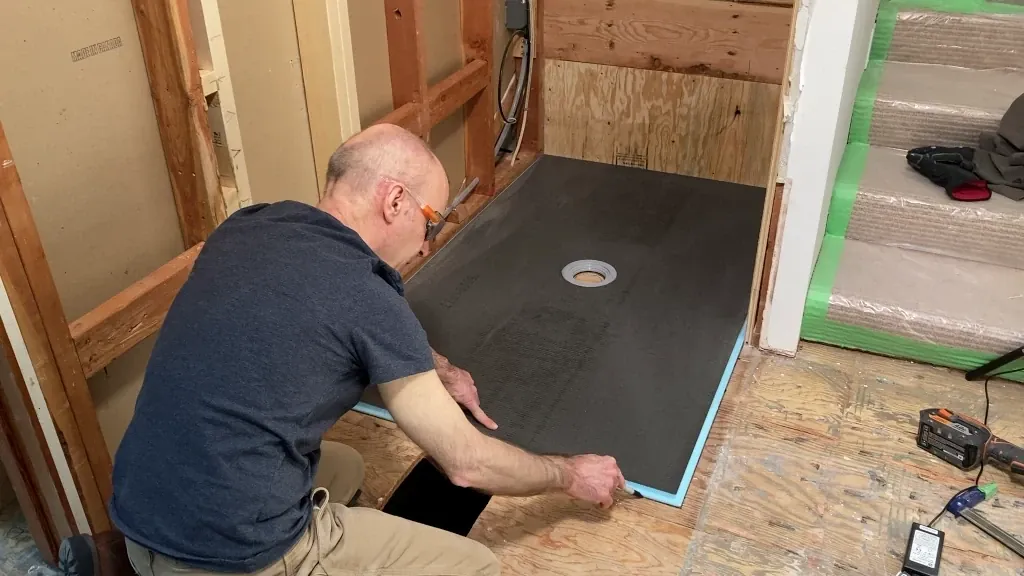
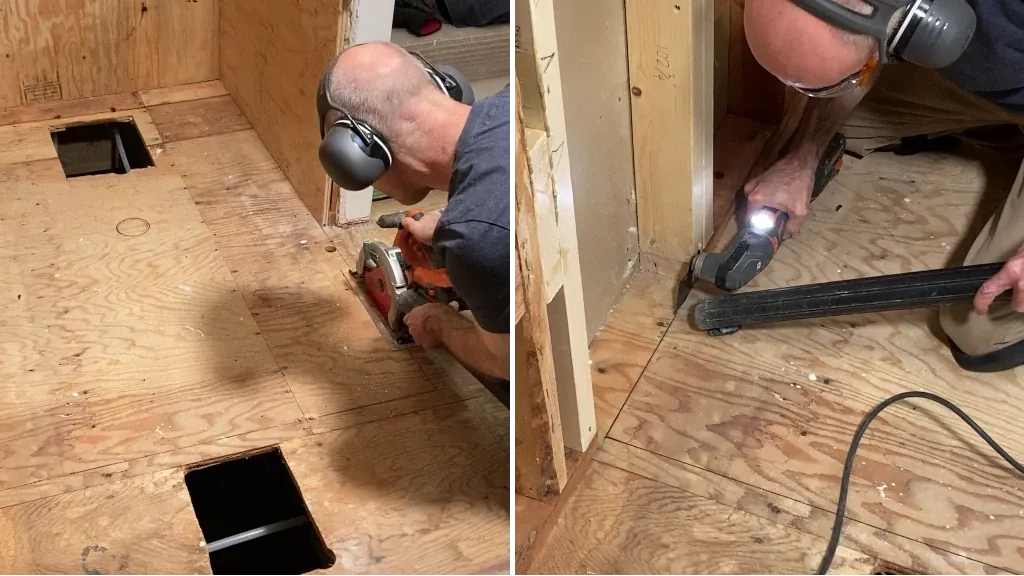
To cut out the subfloor I used a multi-saw next to the walls, and a circular saw for the rest (see image below).
Step 3: Relocating /Replacing Plumbing
Moving Water Lines
In my project, the water lines previously came up through the floor and connected to the roman tub faucet on the tub
deck, so they had to be cut from under the floor, then re-routed using some new pipe.
These water lines were also 1/2 inch copper so I decided to convert them to my favorite pipe, ProPex (by Uponor)
before routing them into the new valve wall. This type of plastic water line represents the highest standard in the
industry right now, so I always make this change when I can.
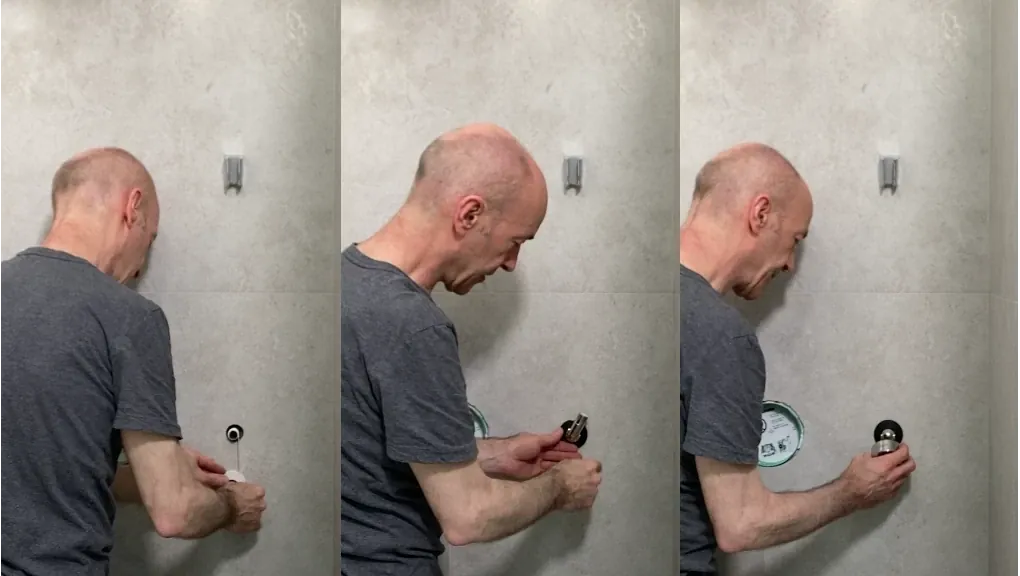
When doing any work on the water supply lines, it's a good idea to install a couple of inline ball valves (see image)
immediately after shutting off the main water supply. That way the main water can be turned back on quickly to avoid
disruption, and your plumber can continue working on the shower side water lines on his/ her own schedule.

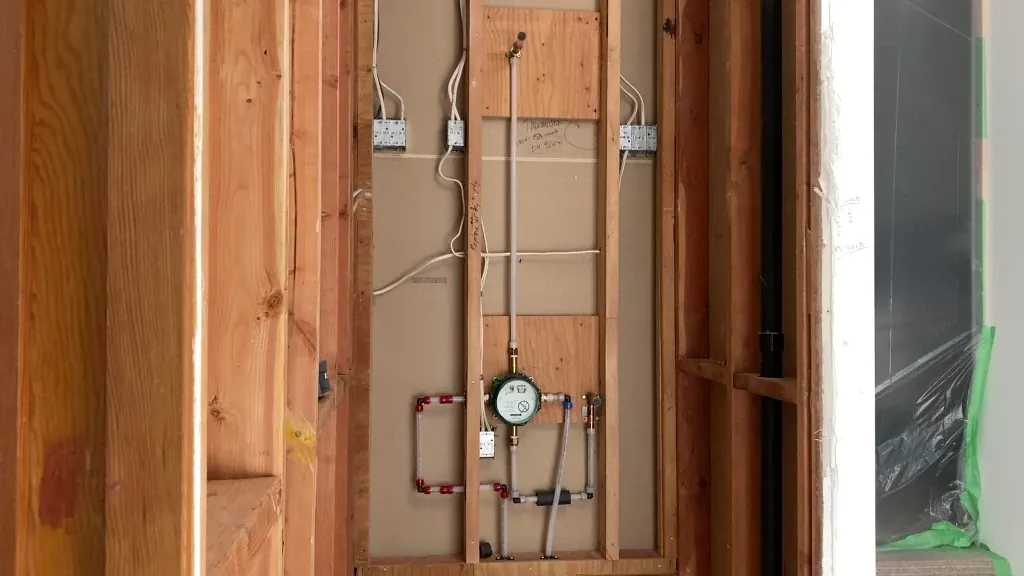
After converting the water supply lines to ProPex, I relocated the new water supply lines into the valve wall. This
was accomplished by drilled up into the wall diagonally from the crawl space to avoid a structural beam that
supports the floor of the adjacent room.
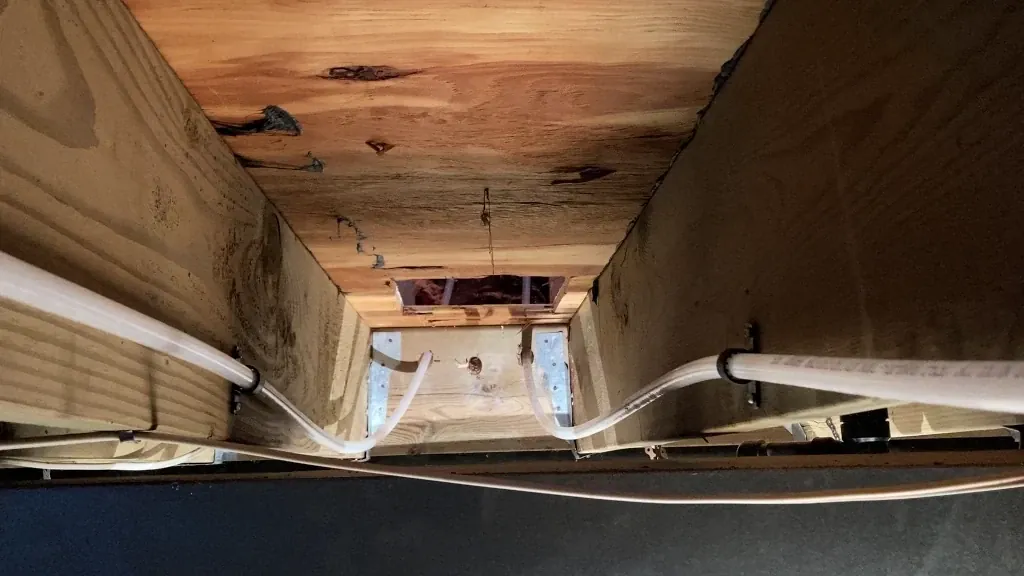
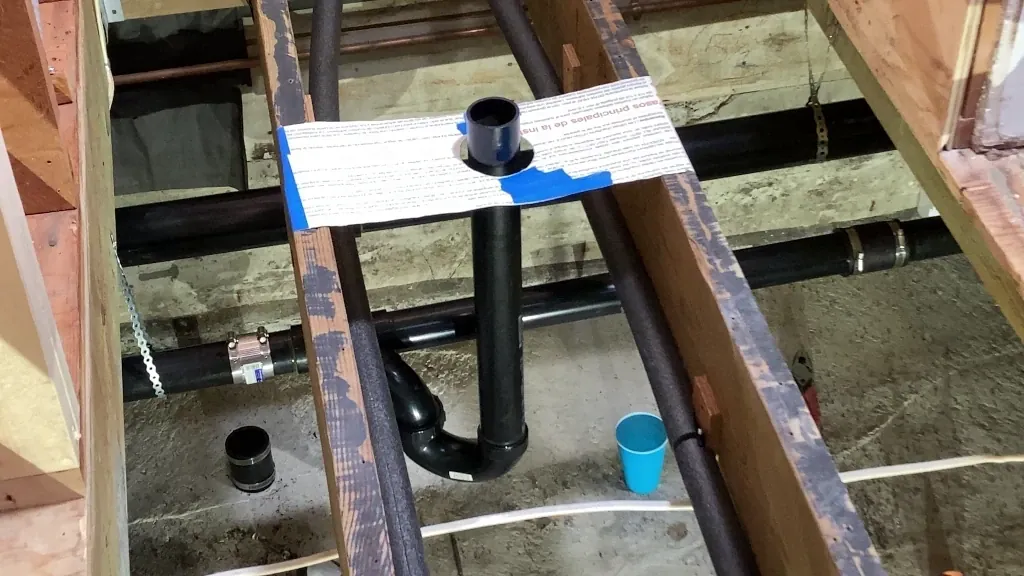
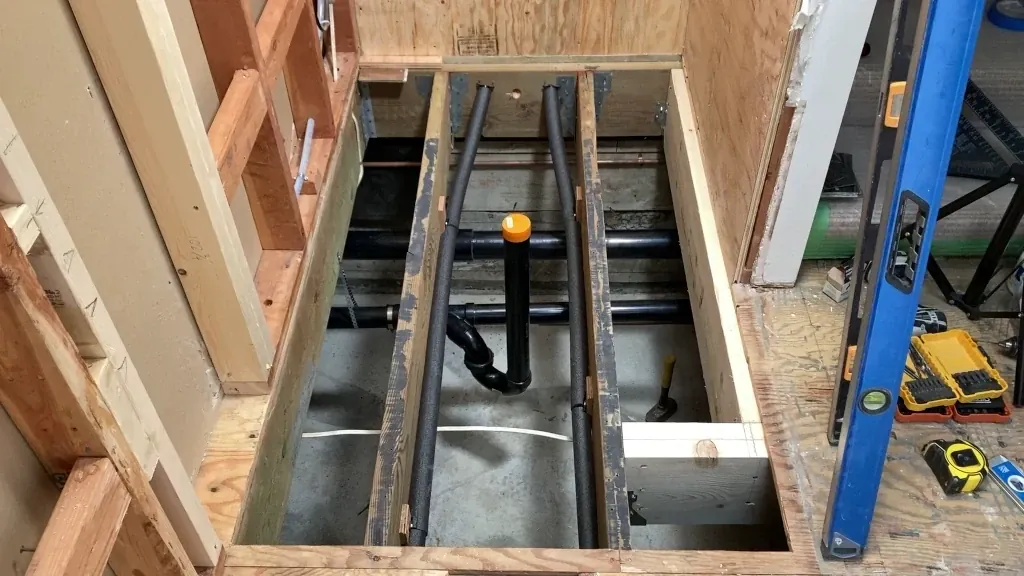
Moving Drainage Lines
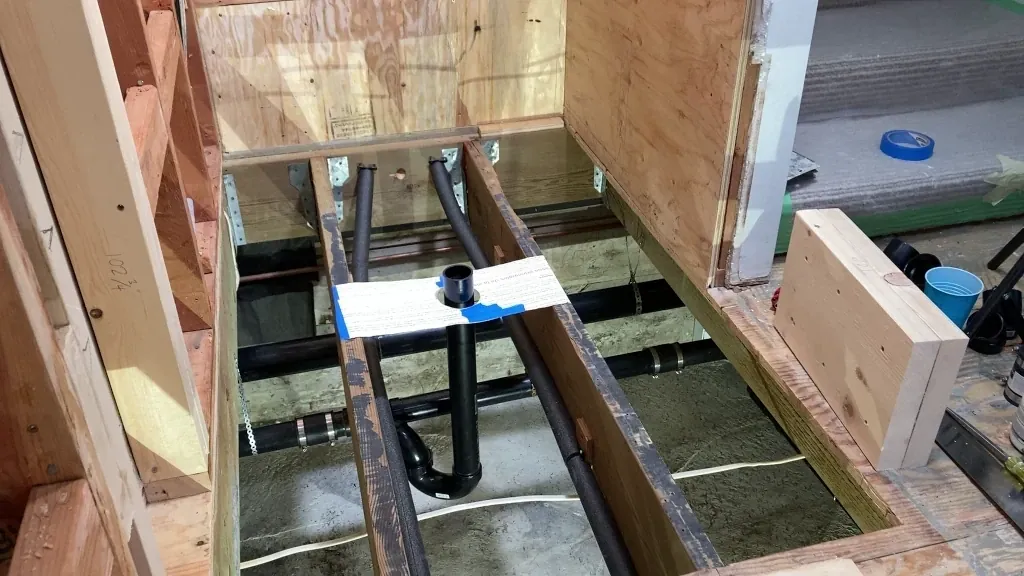
Since the old tub was in the same location as the new walk in shower, there was a 2 inch horizontal drain line
running underneath with an existing 1 1/2 inch branch line for the tub drain.
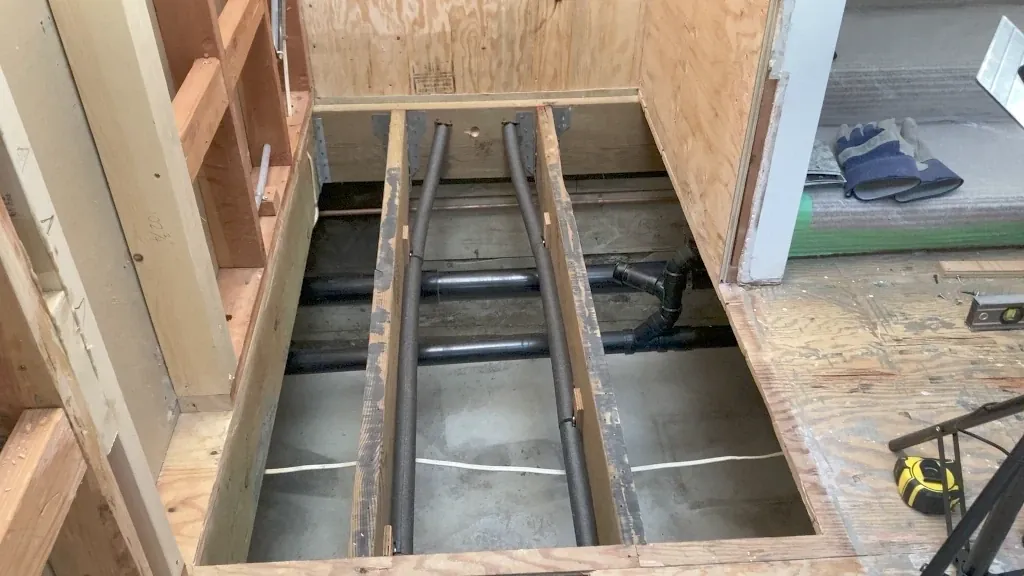
Since this branch line was not in the correct location, and it was the wrong diameter, I relocated it about 2 feet to
the left and converted it to a 2 inch branch line for the new shower (see images below).
Notice that I measured and marked out the new drain location by placing a template across the joist space so I could
install the new 2 inch pipe in the correct location.
Step 4: Stud Wall Prep
Flattening Stud Plane
If you're shower wall studs are steel, you won't have to worry about flattening out the stud plane in your diy walk
in shower project, but if they're wood, then you need to know this if you want the wall tile installation to go
smoothly. I will summarize my method below, but if want to get a more detailed explanation please check out my tile installation post.
The basic reasoning is this: If your wall studs are curved at all (have high points or low points vertically along
their length), your wall sheeting will not be flat when it's attached to the studs.
This is an extremely common problem with wood frame construction, but it usually doesn't pose a problem for drywall
installation. Backer board and tile installation is a completely different story.
The bumps and hollows in the backer board make it very difficult to create a smooth, flat, finished tile surface,
especially with ultra-popular larger format tiles. You need to constantly vary the thickness of the thinset mortar
bed beneath the tiles in order to line them up with adjacent tiles.
This is what is called "tile lippage" in the industry, and I can tell you from experience that it's a nightmare, and
very difficult to manage even for an experienced pro tiler.
The solution: Flatten the stud plane before the backer board is installed.
Back Framing
Many plumbers that I run into are frankly a bit lazy when it comes to installing secure back framing behind valve
body(s), shower head(s), and hand showers.
But make no mistake, back framing is indeed a critical part of this assembly. If the framing is inadequate, your
valve(s) with wobble a bit, your shower head will wiggle every time you adjust it, and your shower bar will get
loose.
This movement over time can result in water line fracture in the wall behind the shower head, valve trim seals
loosening up and letting water into the wall, and the hand shower bar disconnecting from the wall. You've probably
experienced one of these events already in your old shower.
So, if you want to avoid any problems with loose valve body and fittings in your diy walk in shower project, you'd
better take on this responsibility yourself, well before your plumber shows up.
Valve Backing
In this project I only needed to install two pieces of plywood backing between the middle two wall studs (see second
image below).
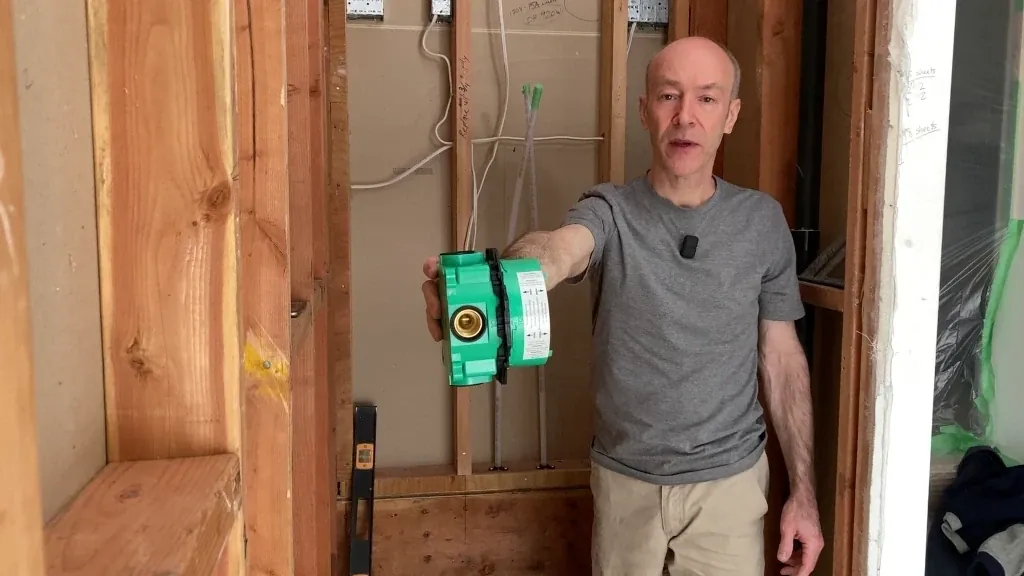
When it comes to backing for your valve assembly, the offset (or backset) distance from the finished wall surface is
the most important. This ensures that valve stem protrudes the correct distance out from the finished tile surface
so the valve handle(s) and trim can attach correctly.
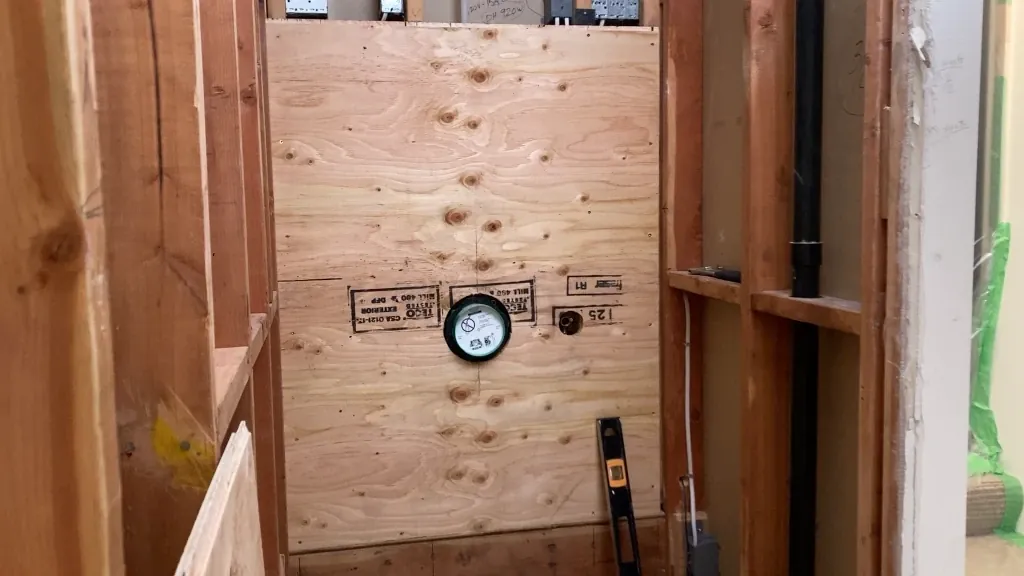
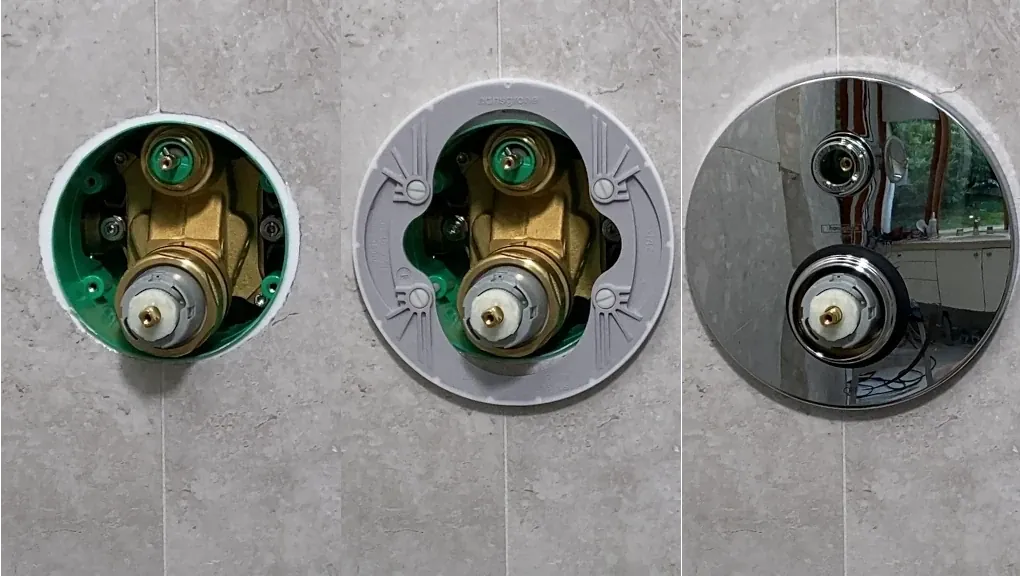
The finished wall surface is often written on your rough-in valve body (see image). You can use this gauge to
determine the exact backset distance. In this project, the finished wall surface will be 1 7/8 inches proud of the
wall studs (3/4" ply, 1/2" Wedi Board, 5/8" thinset and tile).
Backing for Shower Head and Hand Shower
The backset distance for the hand shower "drop ear elbow" or the shower head drop ear elbow is not so important as
long as there's room enough for it behind the wall.
I decided on an 84 inch height for the shower head so the backing was installed to allow for this.
The elbow for the hand shower was installed on the same backing as the valve body since it was also installed in the
middle stud cavity, just to the right of the valve.
Step 5: Installing Rough-Ins
Now that all your backing is securely attached to your shower wall framing, you can install the valve body, the "Drop Ear Elbow" fitting for the shower head, and the same fitting
again for the hand shower coupling.
Valve Body Install
For your finished diy walk in shower to look good, the valve body needs to be installed on your newly installed valve
backing, directly in the center of this wall horizontally.
The vertical height can be pretty much any height you want but you should keep in mind who will be using this shower
when determining the height.
Another thing to be aware of is valve body attitude/ orientation. When you screw the valve body into your backing,
make sure that the surface plane of the "Plaster Ground" that surrounds the valve stem (round blue plastic piece
that sticks out of the front) is exactly parallel to the stud plane.
Valve bodies are notorious for being a bit rounded on their mounting surface (not flat), so if one of the four
attachment screws are slightly tighter than the others, the surface of the plaster ground will not be parallel to
your wall, making the valve control a bit skewed on your finished wall.
Lay a 2-foot spirit level across the surface of the plaster ground vertically and horizontally to check how parallel
it is to the stud plane. You can correct the discrepancies by loosening and tightening the appropriate screws around
the valve body.
Shower Head Coupling Install
You can also see by the first image above that I used a ProPex fittings for most of my water connections, including
the "drop ear elbow" fitting for the showr head.
But I often recommend SharkBite "push" fittings to my diy readers because they're super
good quality and super easy to install, albeit a bit expensive. You can get them at Home Depot or Lowes. Just make
sure you get the branded SharkBite couplings.
I placed the WIS head drop ear fitting at 84 inches from the floor, which meant that the rain head ended up at about
80 inches from the floor. There is no hard and fast rule here - it really depends on the preference of the users.
Rain heads are usually installed a little higher than conventional heads and my clients were around 60 inches in
height, so it was luxuriously high for them.
This fitting needs to be secured firmly to the backing material, centered directly above the valve. To determine your
center mark, I would suggest that you draw a vertical line up from the C of the valve rather than measuring from the
right or left wall.
If you try to center it by measuring from the left or right-side walls, your fitting will not be centered above the
valve unless these walls are perfectly vertical. In my experience, shower walls are rarely plumb so be aware of
this.
Hand Shower Coupling Install
The elbow for the hand showr was placed to the right of the valve, centered horizontally with the valve body and
attached to the same backing as the valve body.
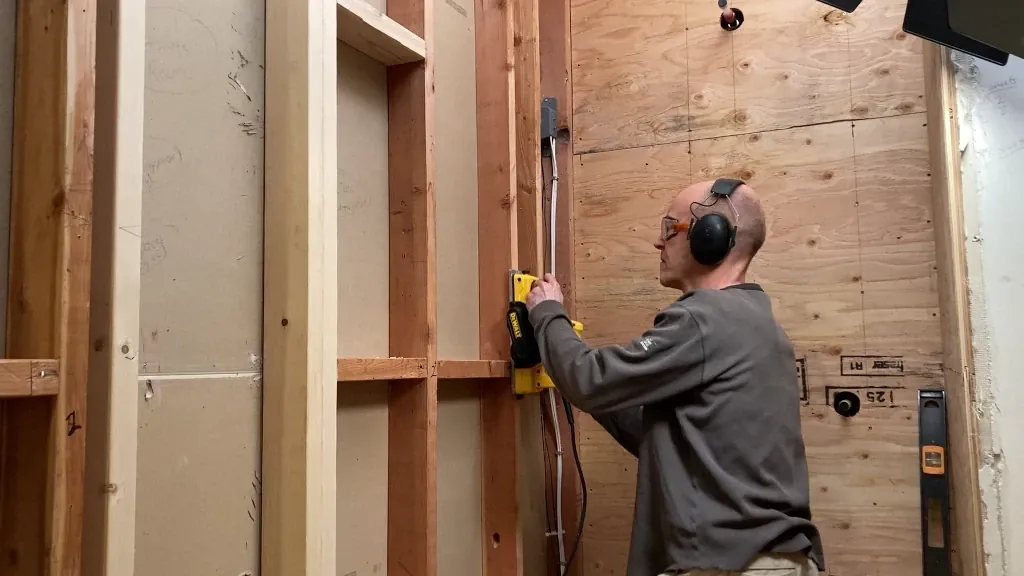
The backing for the hand shower "bracket" or "holster" only needs to be attached to a stud or some kind of backing at
the stud plane. Since I installed a sheet of plywood over the studs to furr-out this wall, this plywood sheet became
the attachment backing for this bracket.
That means I can install the bracket basically anywhere on this wall, since the plywood covers everything. Above
you'll see the image of the finished backing I installed, as well as the image of the plywood I installed to
furr-out the studs.
Step 6: Reinforcing the Subfloor
When recessing your diy walk in shower pan into the floor, you need to make sure the framing beneath your entire
shower is super solid.
If the perimeter walls of your diy walk in shower are not structurally solid, there will be movement in the subfloor
beneath. This can result in grout line cracking, tile delamination, and failure of the drain and waterproofing
membrane.
That's why I added support framing under the right-side pony wall.
As you can see in the "before" image below, the nearest supporting floor joist lies about 1/2 inch beyond the outer
edge of the wall plate under the right-side shower wall. This means that this wall was essentially unsupported (see
image below).
To reinforce this wall, I installed a double header and double floor joist under the right-side pony wall to support
the significant weight this wall will bare after backer board and tile are installed (see image below).
Alternatively, you could install blocking every 2 feet (or less) under this wall. It's a bit more work, but it is a
solid option if you prefer.
I was lucky to have a floor joist directly under my left-side wall, so I didn't need any additional reinforcement.
If by chance, the floor joists below your new WIS are 2x10's instead of 2x12's, I would recommend that you also
install 2x10 blocking every 2-3 feet in the joist spaces under your pan and every 3-4 feet under your entire
bathroom floor. A 2x10 floor joist (assuming 16 inch on Center) will flex a lot more than a 2x12 floor so it should
get a little extra reinforcement.
Reinstalling the Subfloor
After reinforcing the right-side pony wall in my diy walk in shower, the recessed subfloor plywood now needs to be
installed to further solidify the structure and fully support my Wedi Fundo Ligno pan/ tray.
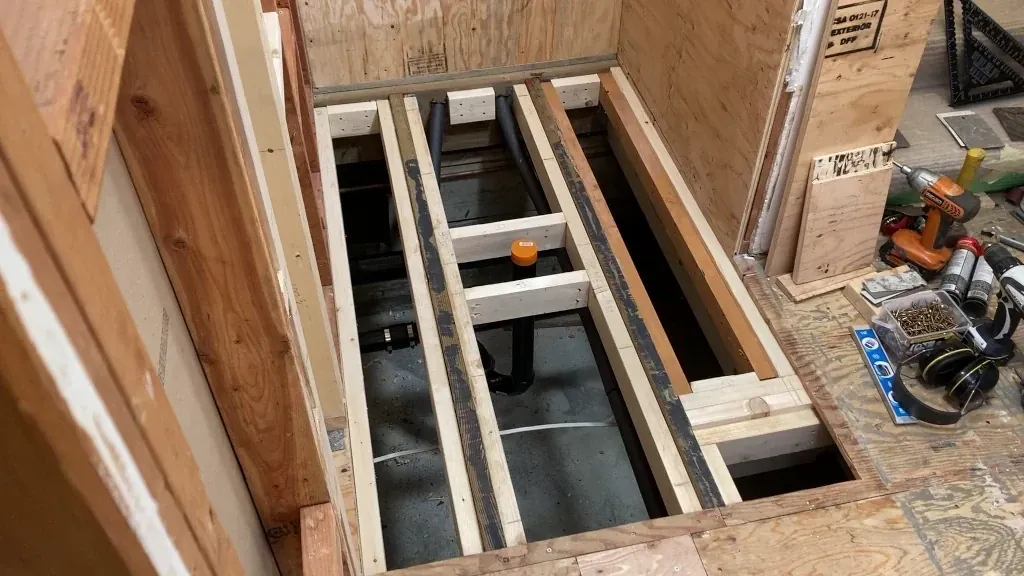
This is pretty easy to accomplish by attaching support braces (blocking) between the three joists, attached 3/4 inch
below the joist surface. Then cut strips of 3/4 inch ply and attach them onto your blocking with a bead of
construction adhesive and 1 1/2 inch framing screws (see images below).
I always use this subfloor recessing strategy over any other simply because it creates the strongest and most rigid
floor beneath your pan.
A very popular subfloor recessing method is the metal bracket-based floor recess kits. These kits will indeed help
you recess your subfloor quickly, and they are adequate to support the load under normal conditions. However, they
rely too much on the integrity of each independent floor joist and do nothing to reduce flexure in the joist.
Tying the subfloor elements together, creates a single, rigid structural assembly that dramatically reduces movement
between the structural members making your subfloor MUCH stronger than it would be when using a bracket system.
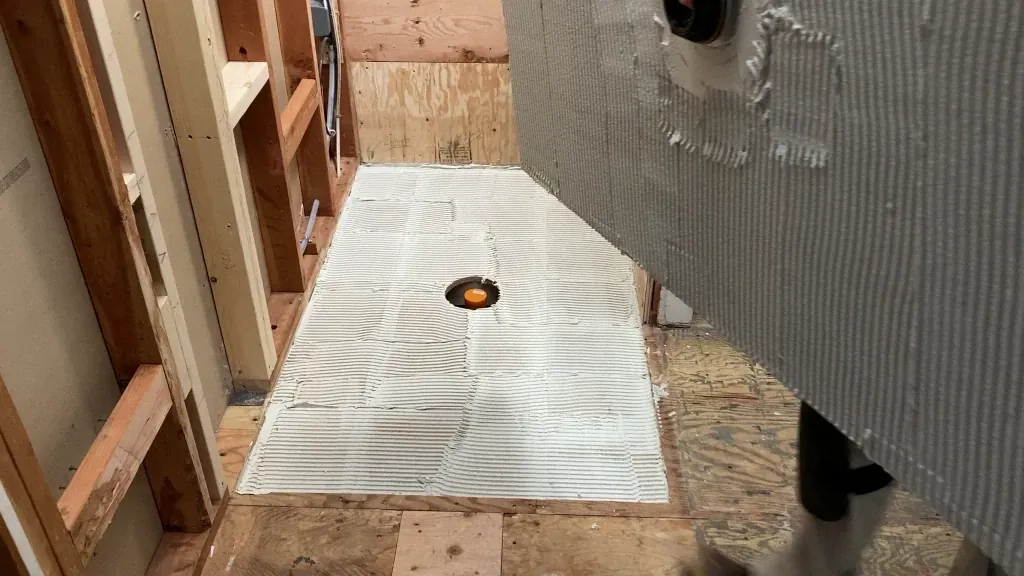
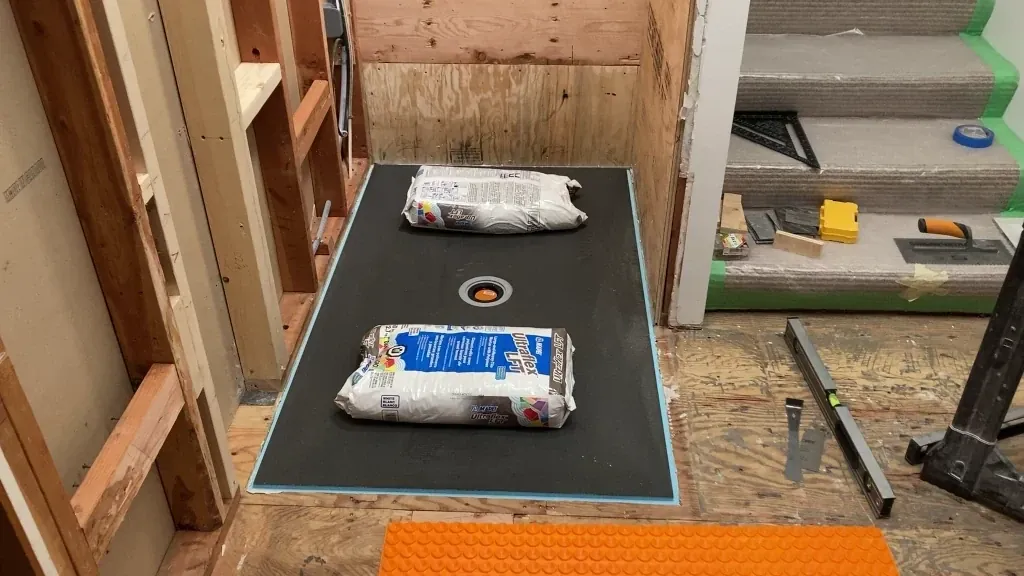
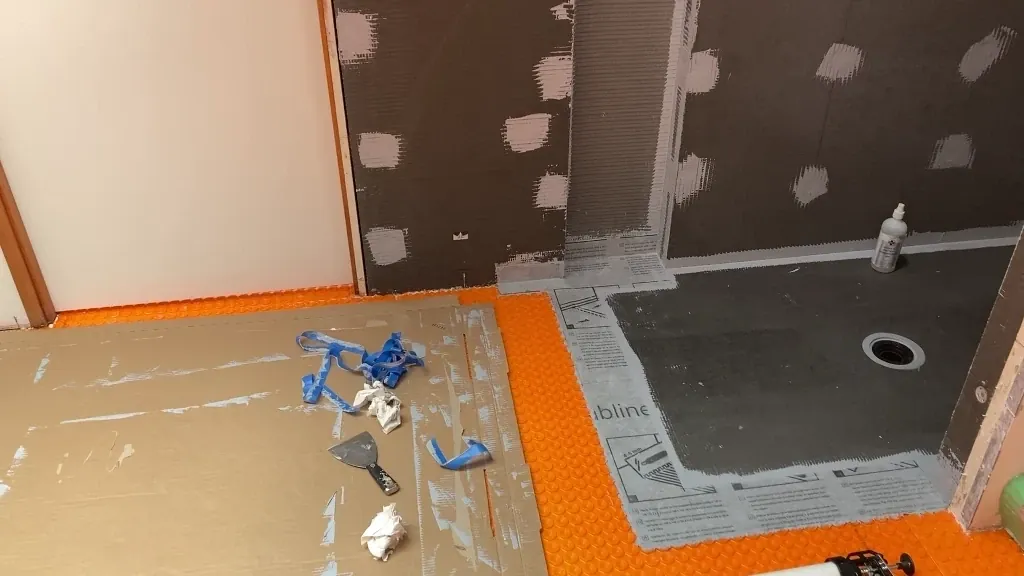
Step 7: Installing the Shower Tray
To install the Wedi tray to the subfloor, you need to set it into a layer of thinset mortar. By following the Wedi Fundo Ligno Install instructions, slightly more than a 1/4
inch of thinset mortar ends up beneath your tray. This ensures that it's flush with the surrounding subfloor after
install, assuming that the subfloor was recessed a full 3/4 inch.
The two options Wedi suggests are: 1. Spread thinset on the back of the tray using a 1/4 inch of notched trowel AND
on the floor under the tray using the same trowel. 2. Spread thinset on the floor under the tray, then simply back
buttering the back of the tray.
My goal was to bring the tray about 1/4 inch proud of the surrounding subfloor to accommodate a Schluter Ditra Heat
matt on the surrounding bathroom floor. To accomplish this, I spread a 1/2 inch notched mortar bed on the recessed
subfloor, as well as a 1/2 inch notched mortar bed on the back of the tray. This worked out nicely.
You can also see in the image that I spread the mortar in only one direction, which is important to prevent air
pockets.
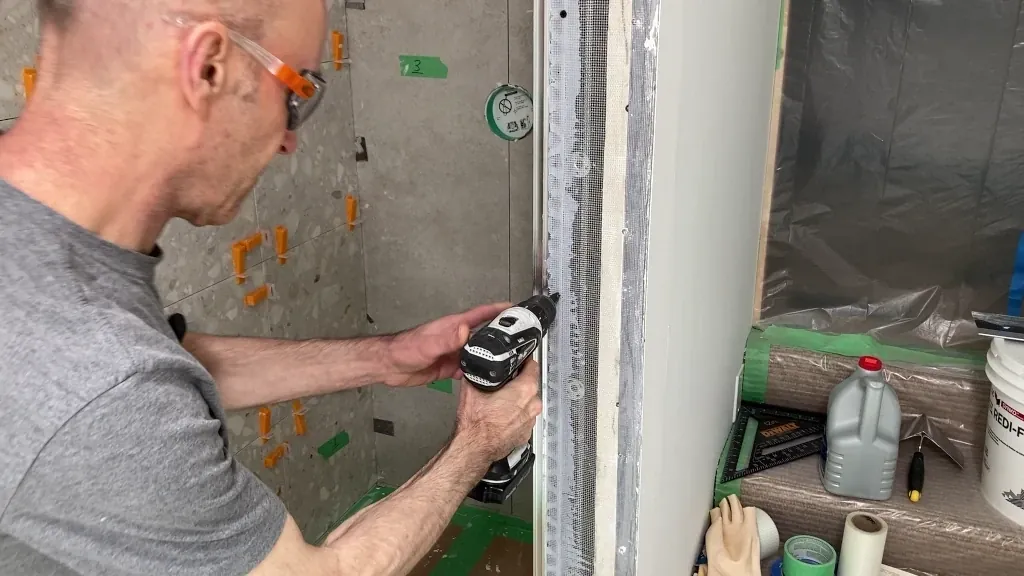
Step 8: Backer Board Installation
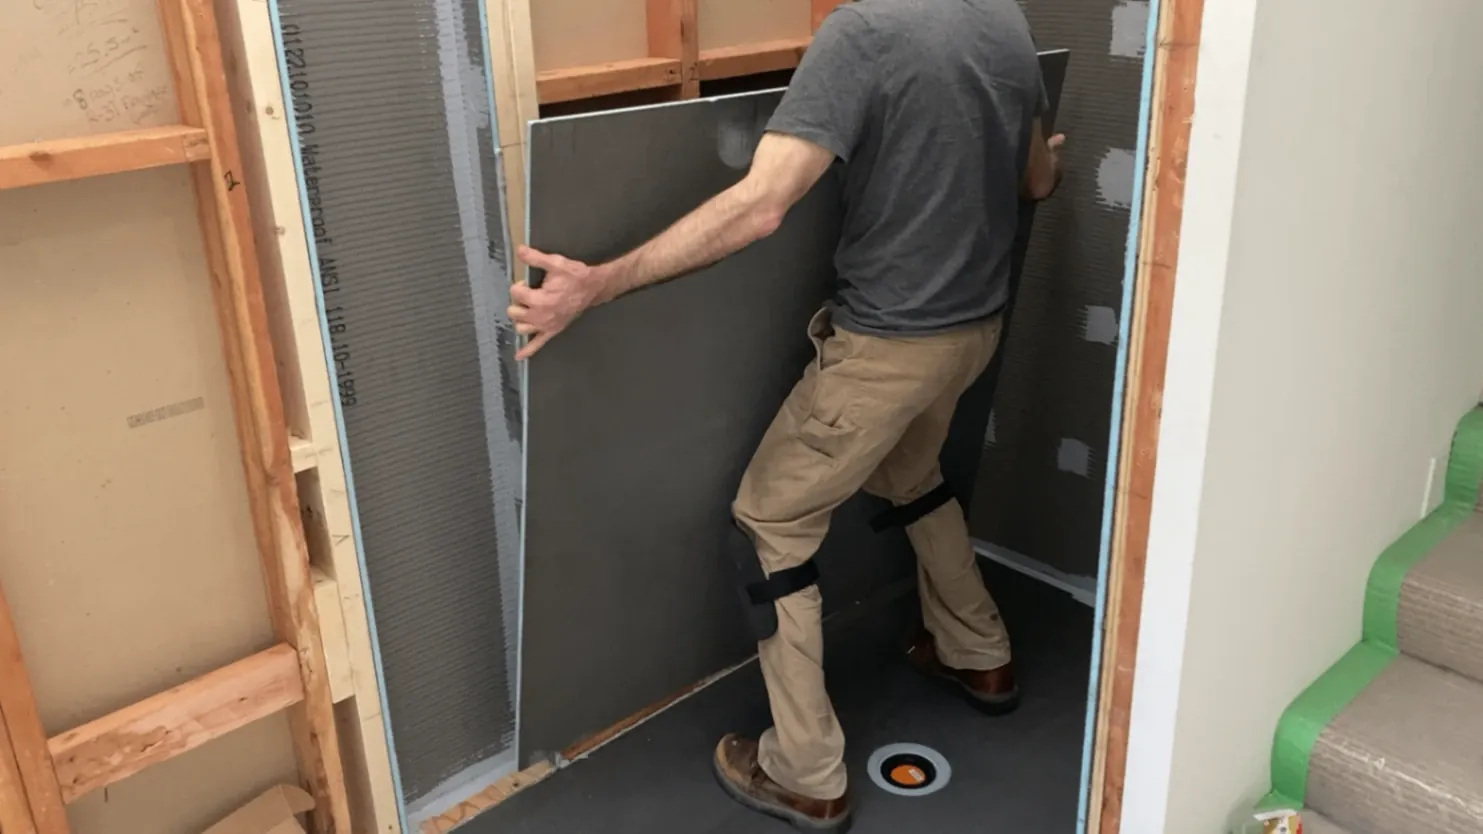
When you're installing Wedi board as your tile backer (see image above), you need to recess it into an installation
groove on the Wedi tray, using Wedi Joint Sealant. The adhesive essentially connects the pan and wall panel together into a
single waterproof unit.
You should follow the install directions and install it with the recommended fasteners, washers and sealant supplied
by the manufacturer.
Prefinished Shower Panels
If you're planning to install prefinished shower panels on the perimeter walls instead of tile, most people would
tell you that you don't need to install tile backer board behind these panels. I disagree. I would recommend that
you still install a real tile backer board instead of just drywall behind these shower wall panels.
No matter how "waterproof" these panels might seem, some moisture will always make it through and accumulate behind
the panel. Real tile BB will "breathe" much better than gypsum wallboard, and they contain antimicrobials to reduce
the chance of mold, mildew and deterioration.
Cement Backer Board
If your installing cementitious backer board, it's typically installed after the pan is installed. This allows the
surface of the backer to overlap the outer edge of the pan.
This overlap allows any moisture/ water that's makes its way to the face of the backer board, to accumulate on the
pan surface, rather than on the seam between the board and the pan. This is not really relevant if a waterproofing
membrane is installed, but it's a good practice, nonetheless.
Attachment of any cementitious backer board to the stud wall requires backer board screws like RockOn or equivalant. If you want more info on tile backer board
and how to install it, please check out my Tile Backer Board post.
If you're installing cement backer board instead of foam backer, you'll also need to install a waterproofing membrane
over your wall panels and seal it properly against the pan. Please read my Shower Waterproofing post for more info on this.
Shower Floor Heating (optional)
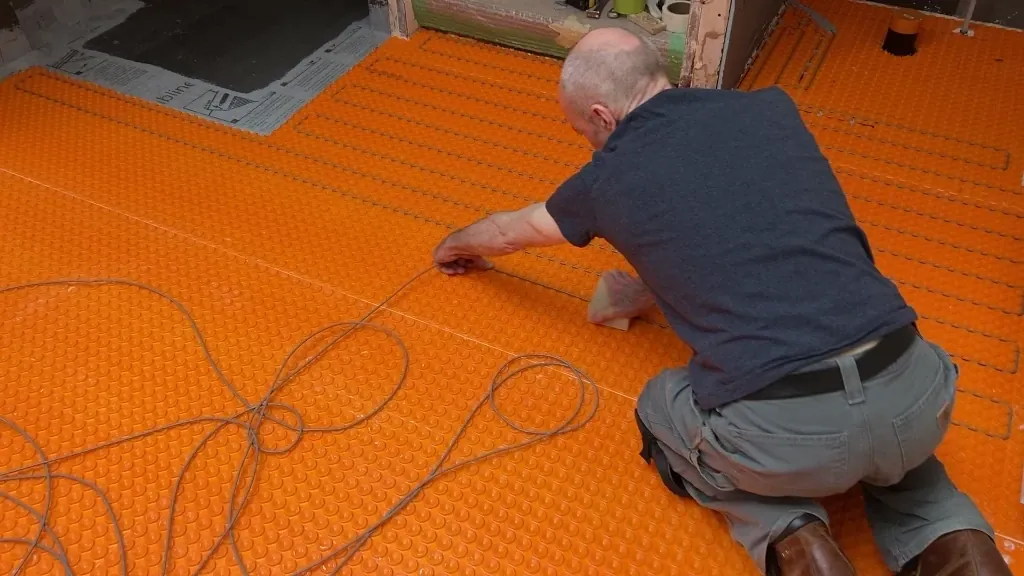
Many of my clients ask me if it's possible to extend the bathroom floor heating into their walk in shower. And my
answer is always yes!... with conditions.
In this project, my client decided not to have any heating in the shower (see image above). The electrical code in
this jurisdiction required that a new heating cable and thermostat be installed for the pan, and my client didn't
like the idea. She also thought that the extra cash outlay was unnecessary since the entire bathroom floor outside
the WIS was heated.
If you prefer to have heated tile in the shower, you will need to make some inquiries with a local building code
official in your city. The code requirements for this are different in many jurisdictions and may not be allowed in
some areas.
You'll also need to check the specs on the shower pan you're planning to install. I know from experience that
Schluter System allows you to install their Ditra Heat system over their Kerdi Shower Trays but they stress that the cable be isolated
from the bathroom floor warming circuit, if there is one.
Wedi also allows electric floor heating cables to be installed over their cement coated foam bases (like the Fundo
Ligno) however, Wedi states that heating cables should only "be installed over Wedi’s cement coating surface.". This means that they don't want you to
cut through the cement coating and bury cables into the foam substrate material, which makes a lot of sense
considering the possible heat buildup and fire hazard.
Step 9: Waterproofing, Tiling, Grouting
Waterproofing
Since this diy walk in shower project is surrounded by interior walls, extensive waterproofing and insulation was not
super important here, especially since we're installing Wedi Building board panels exclusively. As you can see by
the images, I didn't install any additional waterproofing or insulation in any of the perimeter walls.
However, I did perform a few extra "waterproofing" steps during this diy walk in shower project. Installed some Wedi
joint sealant around the valve housing (plaster ground) and a Wedi Flexi Collar at both the hand shower coupling and the shower
head coupling. I also installed a waterproofing strip across the pan-to-floor margin.

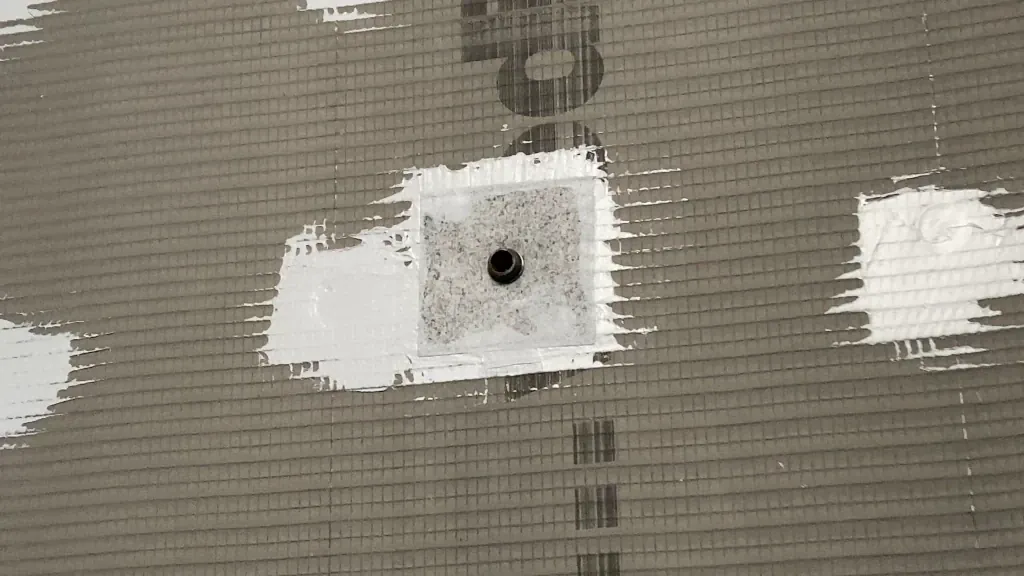
The valve and pipe seals are self-explanatory if you look at my images, but the pan/ floor margin seal requires a few
more words.
As you can see in the image, I applied a 4 inch wide strip of Wedi Subliner Dry waterproofing membrane across this margin to
seal it. This is an important step to prevent and moisture from making it down to the subfloor framing via this
crack.
I also chose to use Wedi joint sealant on both the pan side and Ditra side because I really love its performance.
However, it was actually overkill, and not really necessary. I was guarding against a "capillary problem" that is
only theoretical and would practically never occur with an assembly so carefully built ;).
I should instead have used thinset mortar on both sides. It would have been a lot faster, but most importantly, it
would have set in about 1/4 the time. As great as Wedi joint sealant is, it takes a long time to dry under a bullet
proof waterproofing membrane like Subliner Dry.
I should also mention that this process would be exactly the same if there was a plywood subfloor on one side instead
of the Ditra Heat matt.
Important Info for Exterior Walls
You should be aware that additional waterproofing is critically important on exterior shower walls, even when you're
using those "waterproof" foam backer board panels (like Wedi building panels).
In most regions of the US, the year-round temperature fluctuations are wide enough to cause condensation problems in
your walls if you're only installing foam backer board panels without additional waterproofing.
So... if your shower is an outside wall, I would strongly recommend that you read my Shower Waterproofing post to get more info on this important topic.
Tile Installation & Grouting
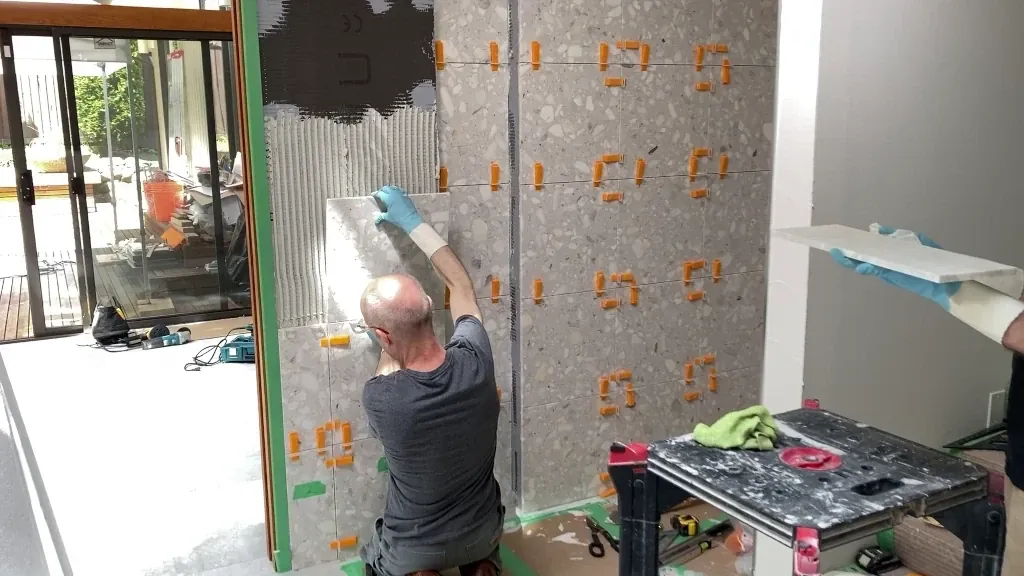
This a pretty big topic, needless to say. As such, I thought I would write an entire post on the topic. So please
check out my Shower Tile Installation post to get all the info you need on tiling your shower.
Shower Floor Tile Installation
Although my Shower Tile Installation post is very complete, it does not cover the specifics associated with cutting
and laying the shower floor tiles. I will summarize this process below.
As you can see in the image, I cut all these tiles in this geometry so I could establish a uniform slope towards the
center drain using these large rectangular porcelain tiles.
To accomplish this, you'll have to measure and cut very carefully (with a wet saw) and lay out your cut tiles on the
WIS tray to see that you got your measurements right.
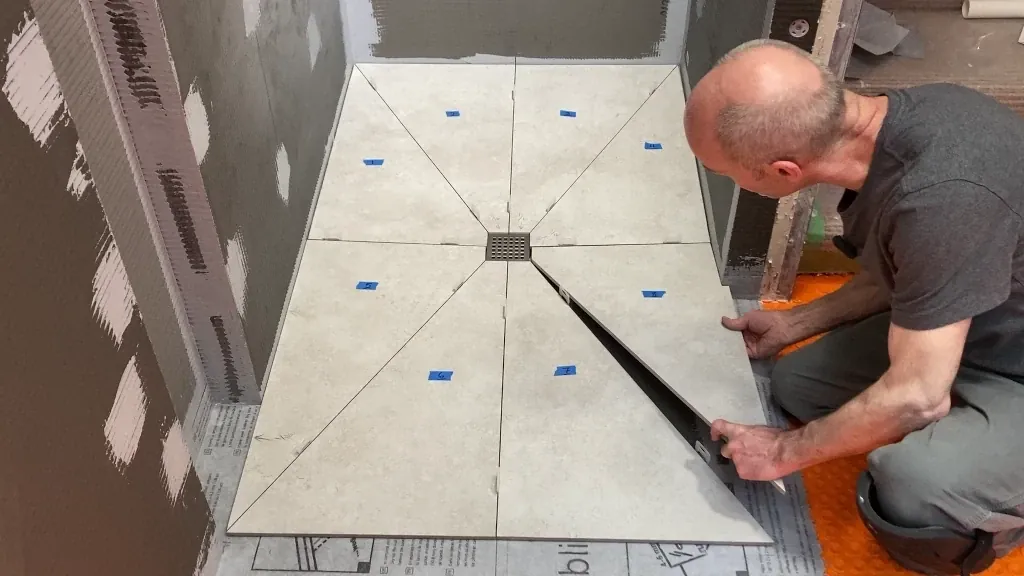
This is not really a difficult process, but it does involve a lot of care, and attention to detail. If you've not
tackled this type of tile cutting before, I would recommend that you stay away from the large format tiles for your
shower floor.
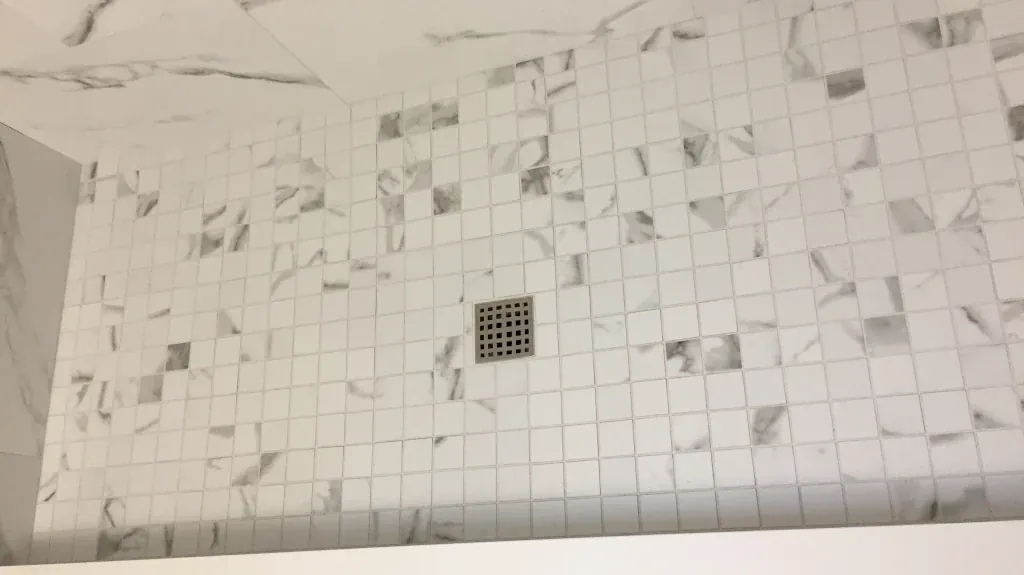
I would instead suggest installing something like a 2x2 mosaic. These come in 12 inch square matts, making them much
easier to install than larger tiles, especially around the drain. They also look really nice and are not too small
to create other "mosaic tile problems". Here's a pic from another project.
Shower Drain Install
Sorry, but I'm not going to go over this, because the Wedi Instructions are the best resource for this task. Don't
freak out! It's actually super easy, and their instructions are very good.
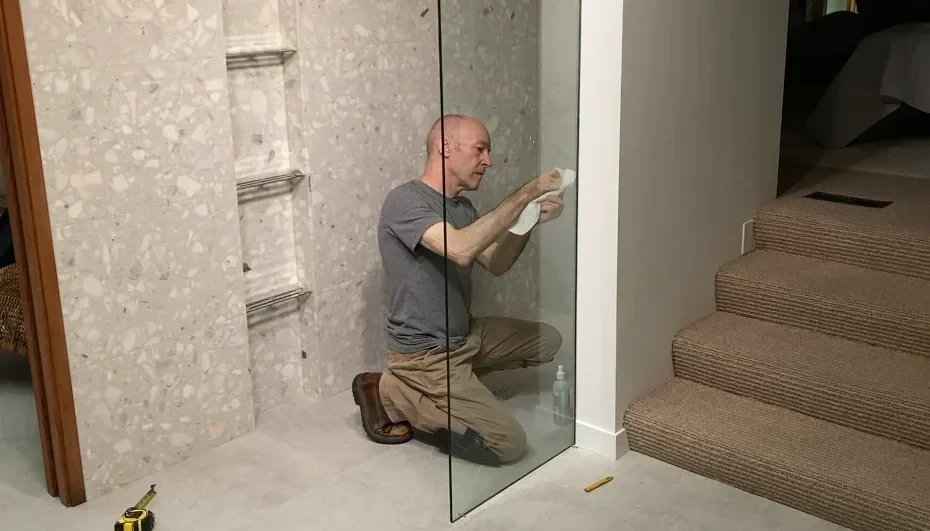
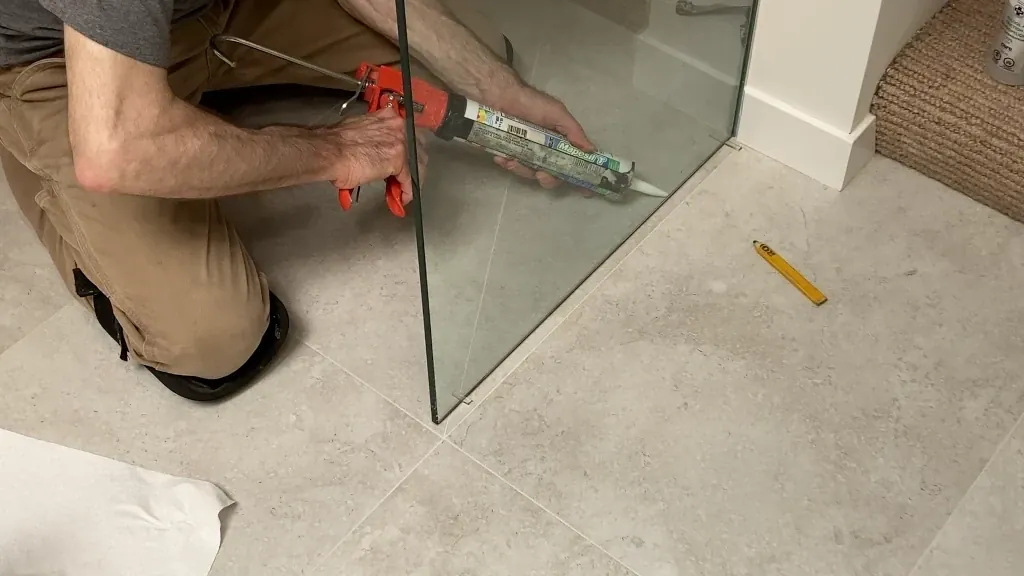
Step 10: Glass Panel, Shower Head, & Trim Install
As you can see be the finished images in this diy walk in shower post, I installed a 2 foot wide, 10mm glass panel at
the end of the right-side pony wall to provide some extra splash protection.
This was not entirely necessary since the entire shower pan area is slopped towards the drain, and the 3 foot
right-side pony wall contains most of the water splash during showering. However, my client felt that it was worth
installing to eliminate the small amount of water that gets past the wall.
I prepared for this by installing a special Schluter tile edging vertically on the end of the pony wall,
designed to trim out 10mm glass panels. I did not install any trim on the horizontal edge of the glass, because my
client preferred the "frameless" look.
Instead, I placed some clear rubber spacers under the panel to shim it to horizontal and allow me to position the
glass panel on the tile floor without damaging it. Then I applied silicone to both sides and cut away the excess
spacer material the next day after it set.
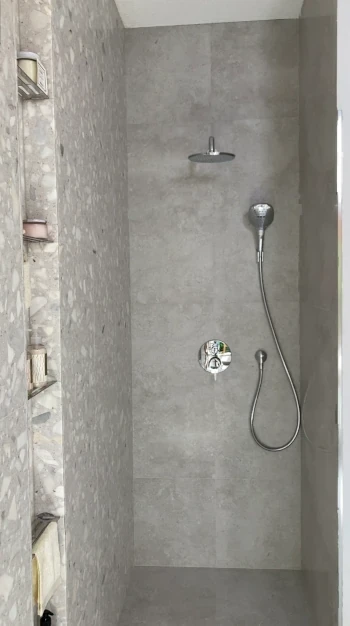
Installation of Shower Head and other Trims
This is a particularly fun "final stage" of your diy walk in shower project when all the big stuff is finished and
the shower is almost ready to be used.
The arm that supplies water to the rain head is the next to be installed. The Grohe rain shower head that my client chose includes its own
custom shower arm which is a bit heftier and a bit longer than most conventional arms.
It just screws into the 1/2 inch "Drop Ear Elbow" that I installed about 3 feet directly above the valve body, the
same as any other 1/2 inch shower arm. You just need to wrap the threads with some plumber's tape (Teflon tape) and
apply a bit of elbow grease to screw it in.
If you've applied too little or too much Teflon tape, and you can't get the arm adequately tight and in the correct
position, don't worry. Just remove the arm and all the tape, then start again with a little less, or a little more
tape. Remember that this arm needs to be tight but also facing directly downwards so your shower head ends up in the
correct position. Just keep trying until you achieve this.
I would also suggest that you add a bit of Teflon tape to the threads on the shower head side to tighten up the
threads a bit (wrap it three times only). To be clear, this does not create a seal between the arm and the head -
the shower head has its own rubber gasket which is designed for this. So make sure you tighten it enough to make
firm contact with the gasket.
The hand shower water supply coupling in your diy walk in shower is connected via the same type of brass nipple that
I mentioned in the valve backing section.
Determine the length you need by measuring from the surface of the threaded water supply coupling inside the wall,
out to the tile face. Then add about 3/8 inch on each side to account for the threads penetrating the couplings on
both sides (total ends up between 5/8 and 3/4 inch long).
Make sure you measure carefully and dry-fit a couple of different brass nipple sizes to be sure the Hand shower elbow
fits tightly on the nipple and leaves enough clearance for the cover trim.
Keep in mind that when you add plumber's tape (PT) to the threads, you won't be able to fully seat the elbow as you
do in the dry fit, so it will protrude a little farther out from the tile face. This is a good thing if your hand
shower elbow does not face downward during dry fit. You'll be varying the amount of PT until your fittings are
tight, and the elbow faces downward. You can see me installing the nipple, elbow and cover-trim in image
below.
The hand shower wall bracket, and the hand shower water supply coupling also need to be installed at this stage of
your diy walk in shower project.
Since an extra layer of 3/4" ply was installed on the entire valve wall (below the backer board), there was backing
for the hand shower wall bracket, no matter where I decided to install it. I attached it in a convenient location on
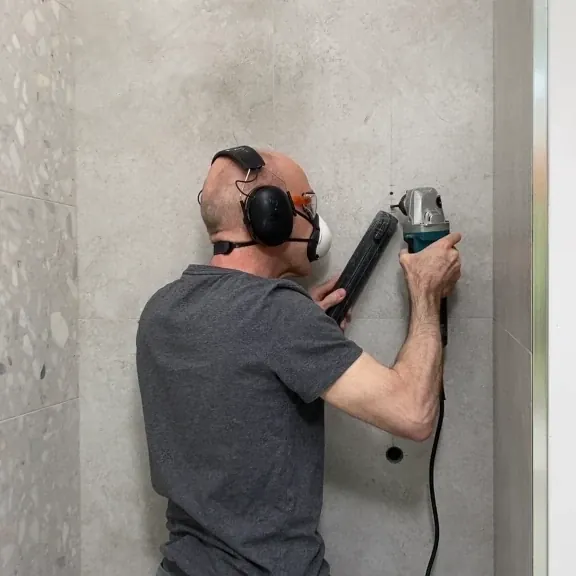
the right side of this wall by drilling a couple of holes in the tile for the attachment screws.
I usually use a good quality tile hole saw bit to cut through the tile. This type of a bit is
designed for use with an angle grinder instead of a hand drill. This will cut through most porcelain tile about 5
seconds, but it will burn through any ceramic tile in just about 2 seconds.
You just need to make sure you do a few test cuts first (into some scrap tile) to get the hang of this process. The
grinder is very powerful and can easily get away from you and severely scratch your tile surface if you're not
careful.
Valve Trim Install
This installation process is explained in detail in the instructions that come with the valve, so I won't go over it
in detail here, but I've included a couple of images and a short explanation below.
The first image below shows the valve control/ diverter assembly installed in this diy walk in shower project.
The plaster ground is protruding from the tile surface about 1/2 inch, which is the correct distance according to the
gauge visible in one of the earlier images above. Unfortunately, the camera angle does not show this clearly.
Additional Functionality and Style
This diy walk in shower project included some nice features like a hand shower and rain shower head, but there are
other elements that you might want to include in your diy walk in shower.
Practical features like a bench, makes the space more comfortable and accessible. Shower niches and shelves can also
add a serious amount of storage functionality as well as a coolness factor.
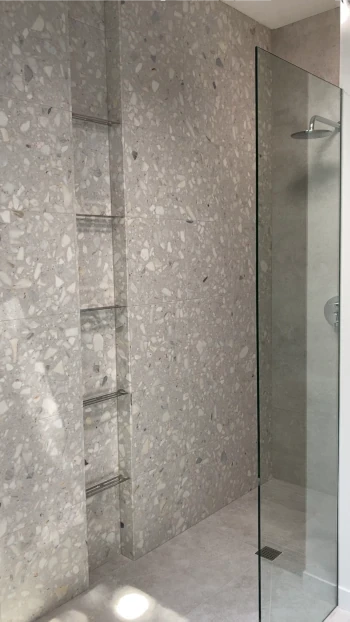
Niche and Shelves
As you've probably already noticed, this diy walk in shower project includes a floor to ceiling custom vertical shower niche with some super cool stainless steel shower niche shelves. Including this niche in your
project is a fair amount of extra work, and a lot of extra steps, so I decided to write a post that covers this
exclusively. You can check it out via the link above, if you decide to go this route.
If you decide against the custom option above, you should think seriously about other storage options in your new
WIS. Among the few clients that decided not to install shelving in their WIS projects, all have regretted
this decision in the end. Don't make this mistake!
If you like recessed storage niches and want to keep things simple, you could consider installing a stainless steel shower niche like the one shown in the image
below. It's super easy to install during your diy walk in shower build and integrates seamlessly with any
waterproofing membrane (if you're installing cement backer board), or with Wedi Building Board or Schluter Kerdi
Board. I've installed many of these for customers that appreciate the bold look.
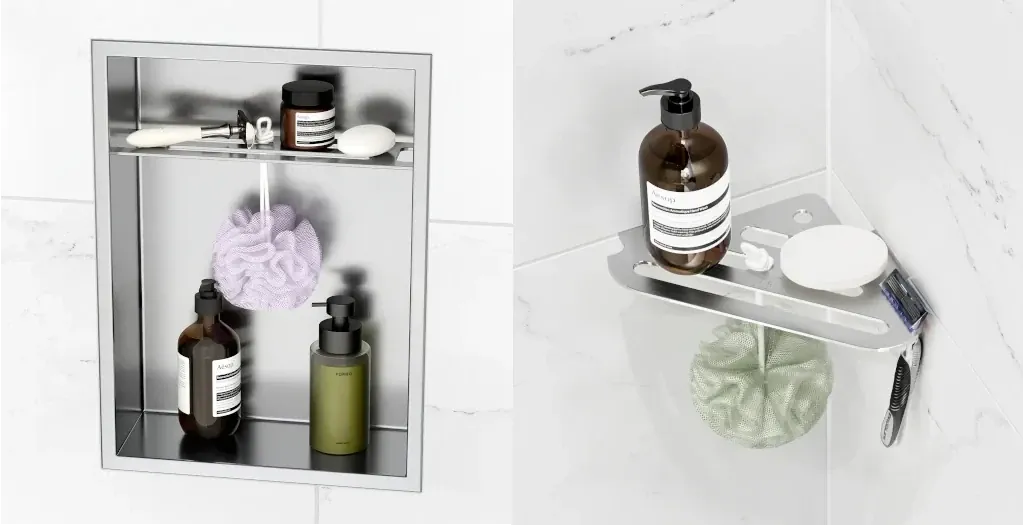
Without a storage recess of some kind, corner shelves are an attractive and easy install alternative for your diy
walk in shower build. The ones I prefer are the in-grout stainless steel corner shelves shown in the image above.
Made from 316 Marine grade stainless steel, lots of drainage, and a super cool look.
Benches and Body Jets
Although my client for this diy walk in shower project didn't want a shower bench, a bench can provide a lot more
comfort for washing/shaving, for those people that feel uneasy about standing all the time in the shower. And for
the mobility impaired, a bench can be an essential part of a barrier free WIS build.
Installing benches is serious business because they need to bare a lot of weight. For example, if a wall mounted
bench is installed incorrectly, it can easily distort the shower wall when someone sits on it.
However, a foam bench can offer a solid base, and waterproofing membrane integration, for a worry-free install. They
can also be tiled to match your floor or wall tile pattern. The only problem with foam benches is the space they
take up in the shower. This is usually a deal breaker for most of my clients.
Body jets are also something to consider. But to be honest, I usually discourage them simply because I've noticed
that they usually end up being a novelty feature that my clients rarely use. They're also relatively expensive to
install, requiring extra water supply rerouting and additional diverters. In other words, you should think seriously
about it, before deciding on this feature.
FAQ
What are the Essential Steps to Build a DIY Walk-in shower?
There are 10 basic steps. Please check out my DIY Walk In Shower post for all the details. Step 1: Sub-Structure
& Utilities Assessment. Step 2: Demolish the Shower / Tub Area. Step 3: Relocating /Replacing Plumbing. Step 4:
Stud Wall Prep. Step 5: Installing Rough-Ins. Step 6: Reinforcing the Subfloor. Step 7: Installing the Shower Tray.
Step 8: Backer Board Installation. Step 9: Waterproofing, Tiling, Grouting, Step 10: Glass Panel, Shower Head, &
Trim Install
What materials do I need for constructing a DIY walk in shower?
Basic building materials required: Foam backer board panels, prefab foam shower tray/ pan, framing materials (floor
reinforcement), plumbing supplies (moving water lines and drainage), backer board attachment hardware and sealant,
tiles for walls and floors, thinset mortar, shower fixtures and finishes (ex: shelves).
How can I waterproof my DIY walk-in shower effectively?
Installing a prefab foam shower system like Schluter or Wedi on interior walls, requires no additional waterproofing
when utilizing fasteners, sealant, edge and corner tape included in the system. If a shower wall is an exterior
wall, or if you're installing a mortar base with cementitious backer board, additional waterproofing is required.
Do I need to cut out the subfloor when building a walk in shower?
Cutting out the plywood subfloor is indeed a requirement when installing a recessed prefab foam shower tray/ pan.
This is the preferred way to build a walk in shower since cutting notches into the floor framing is not required, as
it is with dry pack mortar pans.
Is a barrier free shower the same as a walk in shower for accessibility?
Yes, a barrier free shower is considered the same as a walk in shower in terms of accessibility, since they both have
no curb to step over. However, some "accessible" showers often include additional mobility aids such as a shower
bench or grab bars.