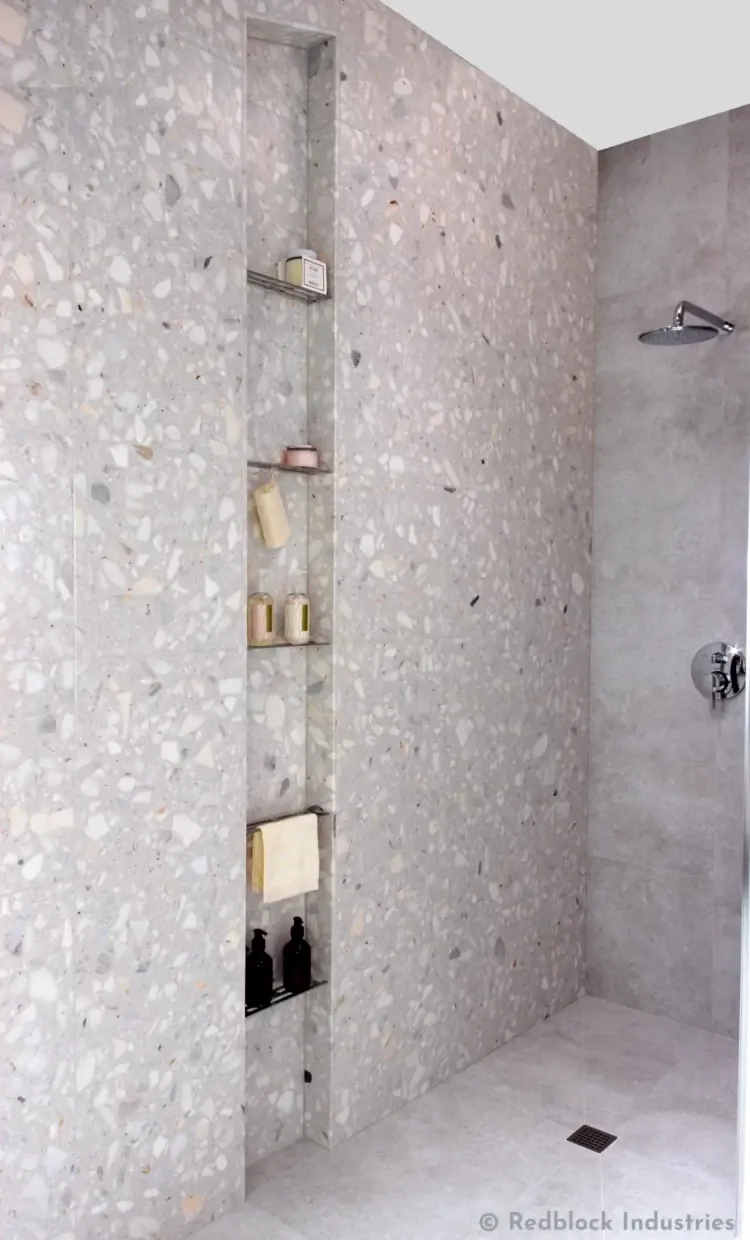
The Finished Niche:
Step 1: Niche Type and Location
The first step in my how to build a custom shower niche tutorial is deciding what type to install and where to
install it.
I initially suggested to my client that a vertical SN might be better than a horizontal shower niche (she asked about
both), simply because I could achieve the storage she wanted and keep it neatly tucked away within the existing stud
wall without the need for the complicated extra framing and risk associated with horizontal shower
niches.
My client agreed that the vertical design was the best option and decided on a floor to ceiling vertical SN because
she wanted to maximize her storage, but also create a high-end architectural show piece rather than just a simple
shower niche.
Then we talked about placement.

The obvious placement was within the longest wall, far enough out from the valve wall so it’s still within the
footprint of the shower pan, still within easy reach, and out of the “splash zone”. The width of my framed SN opening
ended up to be 13 inches, reducing to 12 inches after backerboard install, and further reducing to around 11 inches
after the tile is installed. It’s finished depth, 3-1/2 inches with a height of 9 feet (just below the top wall
plate).
Luckily this shower was not bordered by any exterior walls so I didn’t have to worry about applying additional
waterproofing and insulation. If you’re planning to build your custom tall shower niche on an outside wall, you should
read my Shower Niche Problems post.
If you’re planning on building a smaller SN (width or height), the info in this "how to build a shower niche" post
(and video) will still be of great help to you since all the construction basics are pretty much the same.
If you don't want your SN to extend vertically from floor to ceiling, you’ll need to decide on the height of your niche (off the floor) as well as the interior size. I decided on the 12" rough width simply because of the 12 inch stainless steel shelves that my client decided to install.
Step 2: Framing your DIY Shower Niche
The second step and the first "build" step in my how to build a shower niche tutorial is installing the SN support
frame. Don't be intimidated by this step. I'll step you through it in detail.
Since I wanted to line up the outer edge of SN with the edge of the shower base tile, the first thing I needed to do
was to determine where the edge of the shower pan would end up.
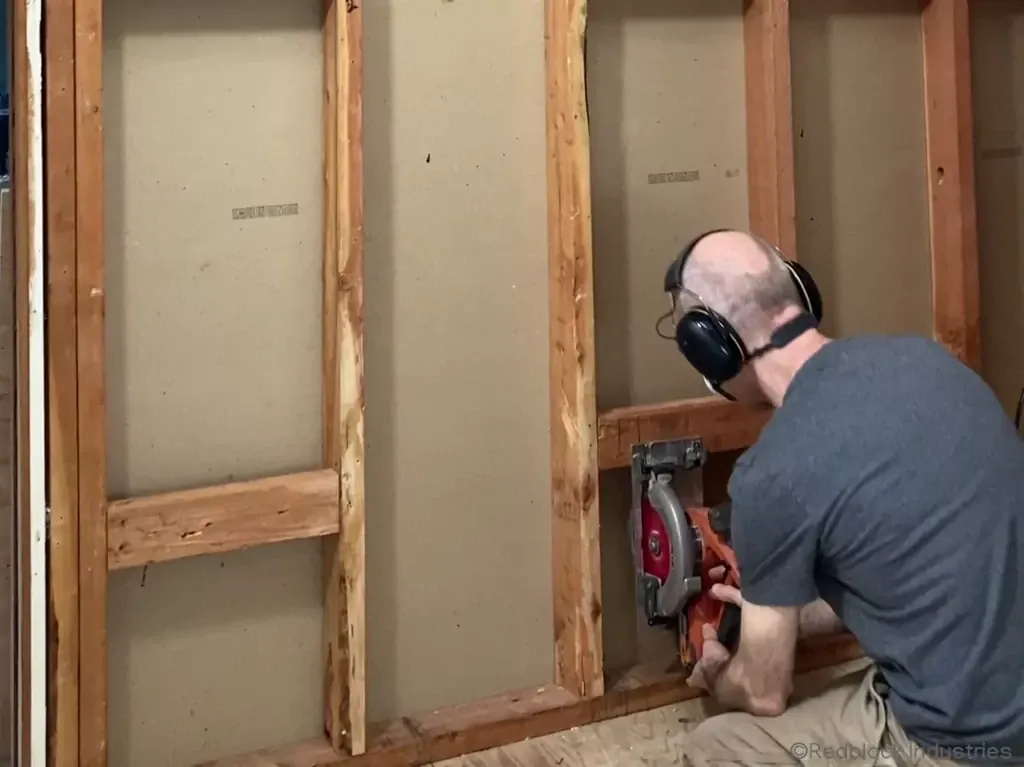
From these measurements (and some frustrations with a wonky stud wall), I realized that I needed to move the right
side stud a little to the right, to allow my new SN to line up with the edge of the shower base. I decided to remove
this stud (instead of moving it to the right) because it was super warped and it was going to take too much time
trying to straighten it (see image).
But before I could remove the right side stud, I needed to cut some horizontal braces in the right hand stud space.
Task 1 - Stud brace removal:
Cut the horizontal stud braces on the right side of the SN, then remove the right side stud.
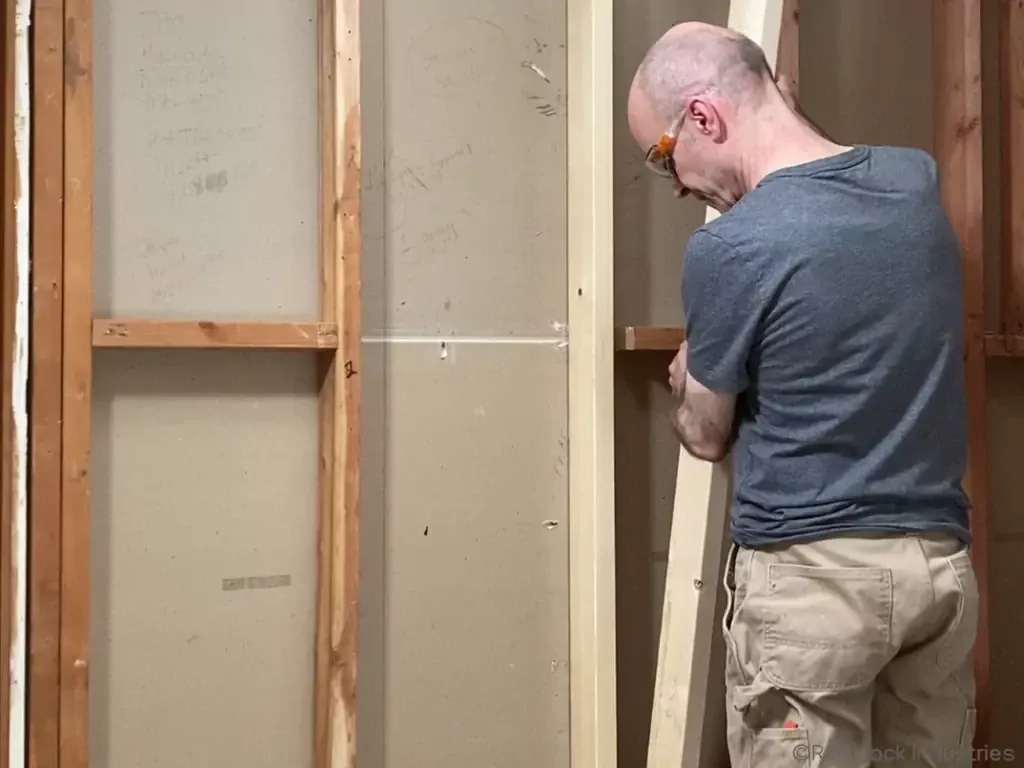
And because this new SN will be floor-to-ceiling, I needed to make sure that both sides of the niche were framed with
solid, double stud, structural posts.
Task 2 - Frame out the Niche:
Install studs on the left and right sides of the SN opening.
I decided to move the SN a little to the right, but even if you don’t need to do this, you’ll still have to install
another support stud (or strips of plywood attached to the stud) to reduce the stud bay width to around 13 1/8 inches.
This will give you the required 12 inch width after the Wedi board is installed in the SN interior (later step). Just
make sure that both sides of the niche are as plumb and straight as possible.
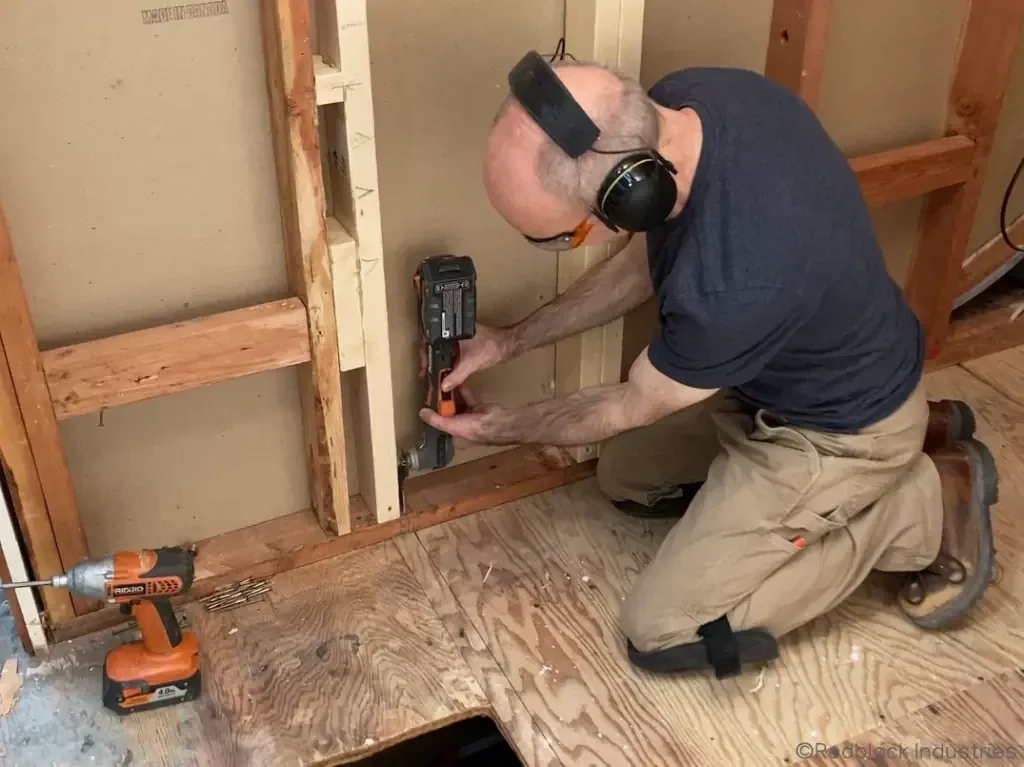
The last part of the structural reinforcement that transforms this humble wall recess into a spectacular floor to
ceiling shower niche, was to remove a section of the wall plate at the bottom of the niche. This was a bit of a
delicate procedure because I had to ensure that I don’t damage the drywall on the other side of the wall, but it
worked out very nicely as you can see in the video.
Another option:
If you prefer to keep the bottom plate intact, that’s definitely an option. This will not achieve the
floor-to-ceiling look that I was shooting for in this shower design, but you can certainly do it if you prefer that
look.
And if you prefer to position the SN base a little higher off the floor, you should place at least one horizontal
stud brace at the bottom of your SN for support. I would slope this brace 1/16 inch (from back to front) so you don’t
have to mess around with sloping the backerboard or base tile.
Then install a piece of Wedi board on this stud brace to create the base of your SN.
Task 3 - Cut out the Plate:
Cut out a section of the bottom plate below the rough-in SN.
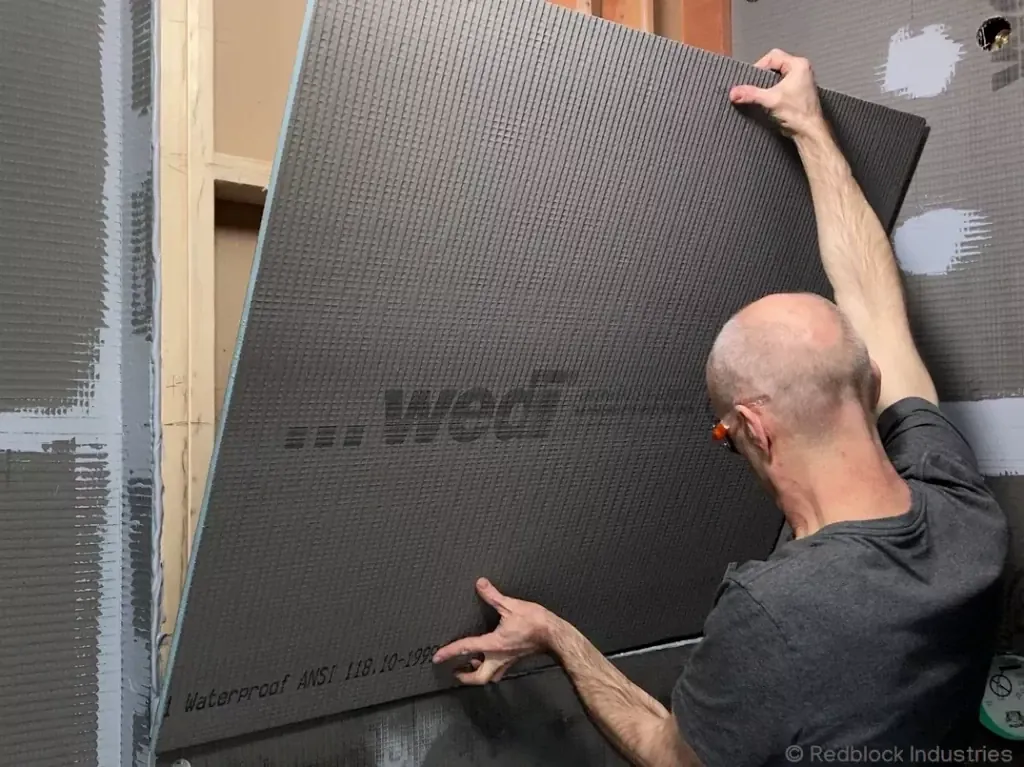
Step 3: Wedi Backerboard Installation
The next step in my how to make a shower niche tutorial is backer board installation. And the backer board I'm using,
Wedi Foam Backer panels.
Foam Wallboard Waterproofing Membrane?
One of the best things about using Wedi Board was that it serves as both a backer board and a waterproofing membrane.
This saved me the time and hassle of applying a membrane inside the SN and in the rest of the shower.
To be clear... I'm not a big fan of using foam board as both a backerboard and membrane, but this shower was
surrounded by interior walls. so it was perfectly OK in this instance. If you need any more info about Shower Tile Backer Board, please visit my post on the topic.
The first board piece I decided to install was on the back wall of the SN (before attaching the panels to the shower
wall).
Task 1 - Install Cement Resin Coated Wedi Foam Backer
Cut and install the Wedi board at the back of the SN.
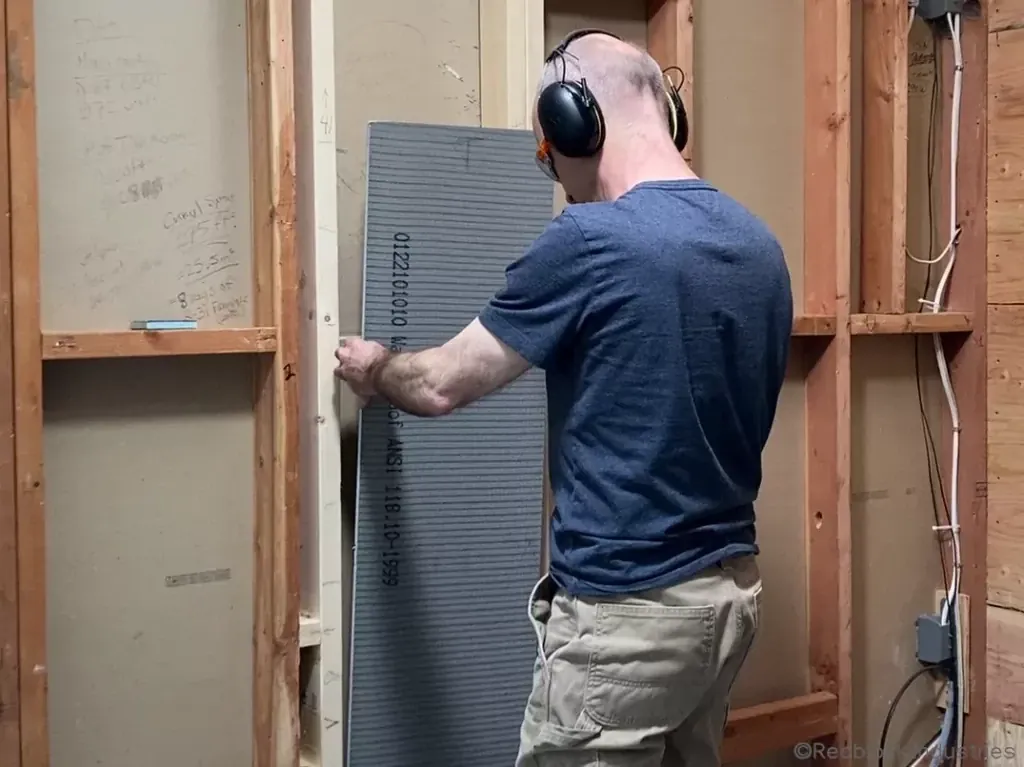
I cut this panel so that it fits quite tightly into place with a very small bead of Wedi Joint Sealant on each
side, so it seals against the framing but not the drywall at the back of the SN.
The backer board pieces for the sides of the niche were cut flush with the surface of the surrounding shower wall
framing and a bead of Wedi joint sealant applied to seal them against the back panel.
And they are attached to the wall studs with Wedi SS Screws and Washers.
Ad: The above two text links are Amazon affiliate links. See affiliate
disclosure page for details.
Task 2 - Caulk the seam, Install side panels
Cut and install backer board pieces at the sides of the SN.
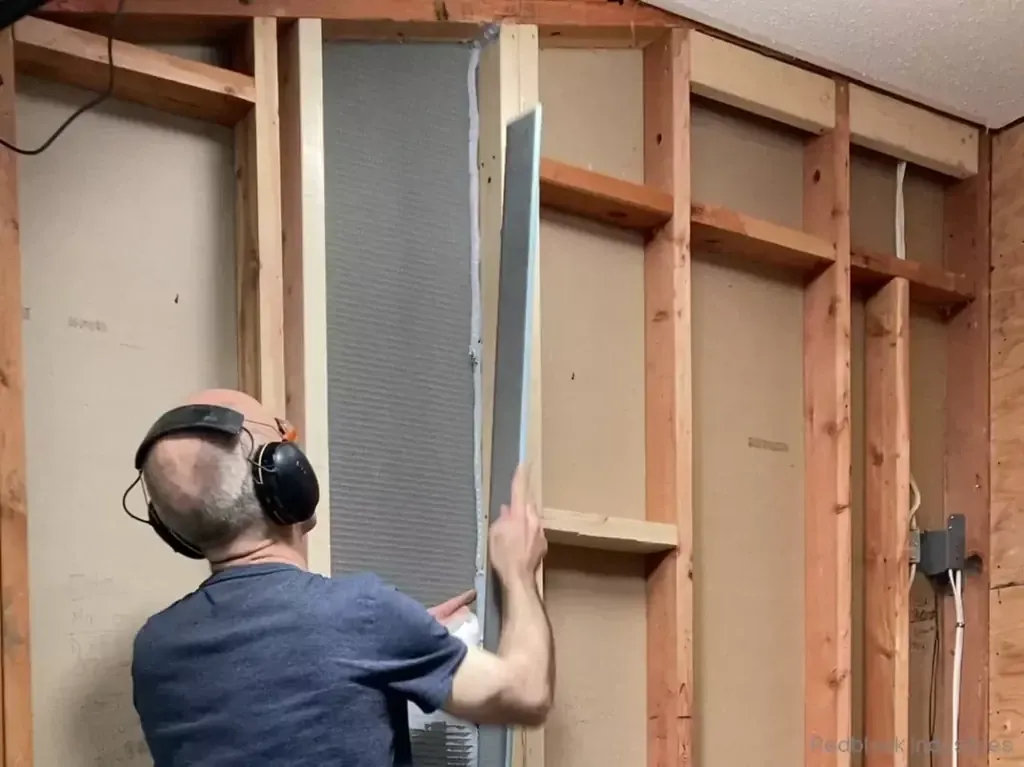
The last Wedi Board pieces to install were on the face of the shower wall on the left and right side of the SN. These
side pieces overlapped the SN side pieces to allow the seam to face the inside of the SN. Wedi joint sealant was
applied to create a watertight seal.
Task 3:
Install Wedi Board pieces on the face of the shower wall, left and right of the SN.
Task 4 - Fill in the Z notch:
Install a small piece of Wedi board to fill the base perimeter’s notch channel (Z notch) in front of SN. This thin
strip of Wedi Board actually comes with the Wedi Fundo Ligno shwr pan, which makes it easy if you’re
also installing this pan (Ad: The adjacent text link is an Amazon affiliate link. See affiliate
disclosure page for details).
).
Step 4: How to Build a Shower Niche - Waterproofing
Step 4 of my how to build a shower niche tutorial is all about waterproofing the bottom of the SN.
As I mentioned previously, using Wedi Foam panels for this SN (and the shower) allowed me to skip the waterproofing
membrane installation step but there are some waterproofing concerns that must be addressed when creating a floor to
ceiling SN like this one.
If you'd like to find out more about shower waterproofing before continuing, you’re welcome to check out my Shower Membrane Waterproofing post.
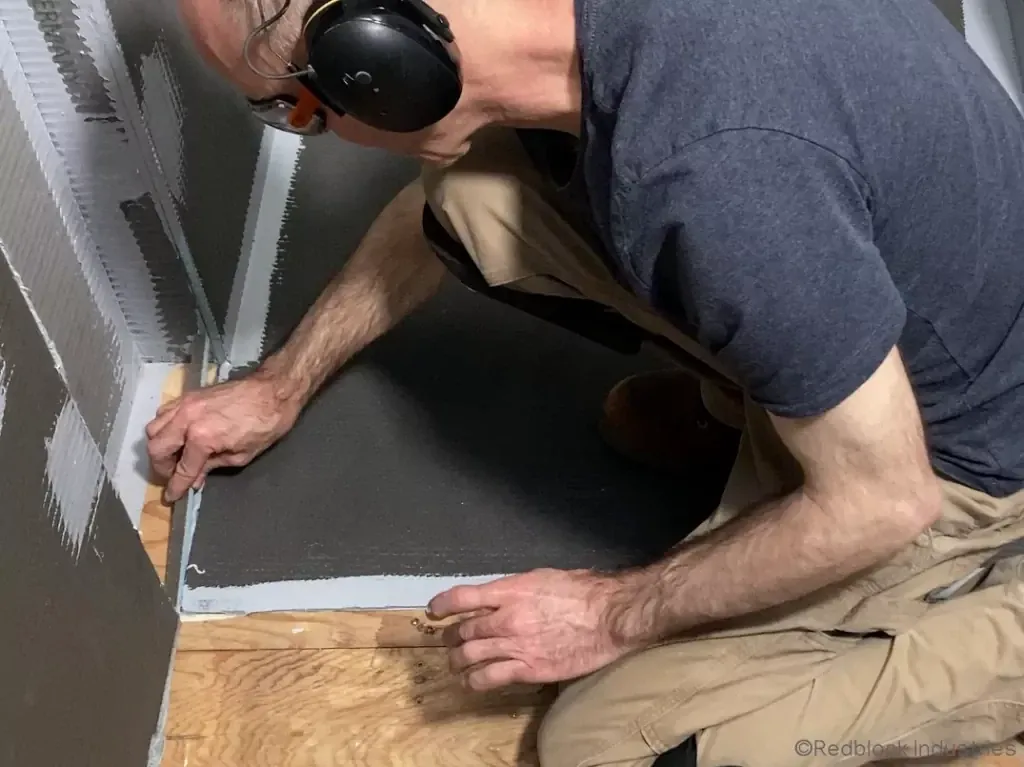
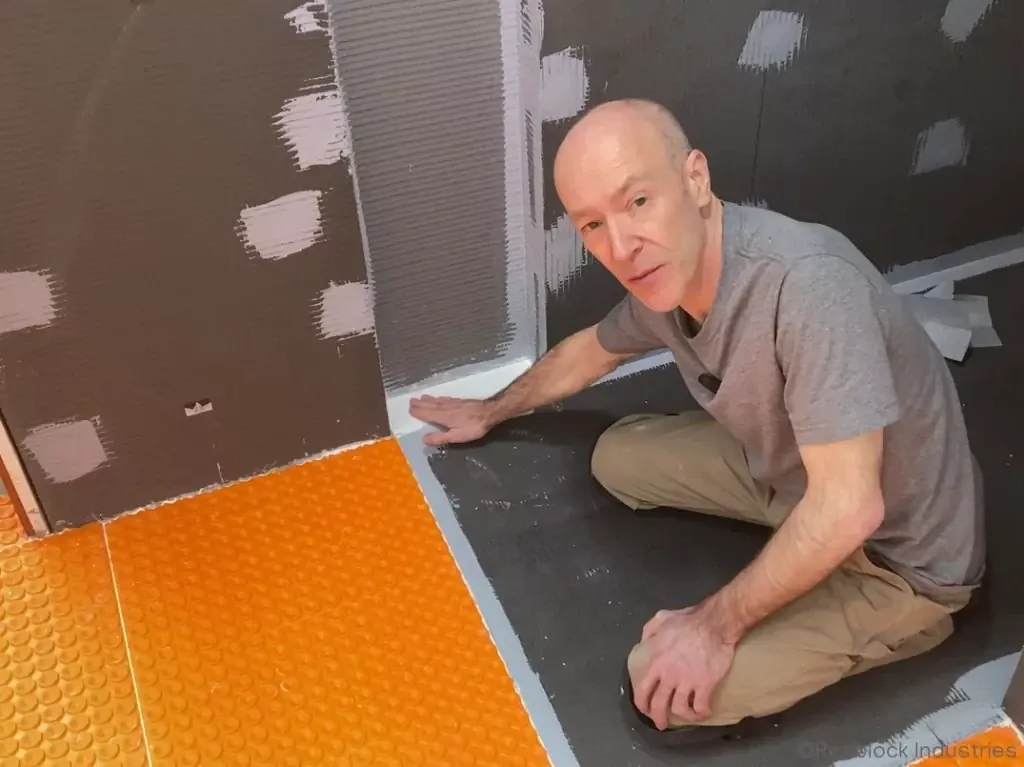
At this stage of the build, the base of the SN is still the exposed plywood subfloor (as you can see in the image).
You can also see that the subfloor is recessed about 1/4″ below the shower pan. As such, it needed to be raised up to
the subfloor grade before waterproofing.
I originally thought I would install a small piece of Schluter Ditra Mat to accomplish this (as I did on the
floor outside the shower), but I decided to just fill it with thinset mortar instead, because it would be a bit easier
to create the slope on the bottom of the SN (Ad: The text link above is an Amazon affiliate link. See affiliate
disclosure page for details)
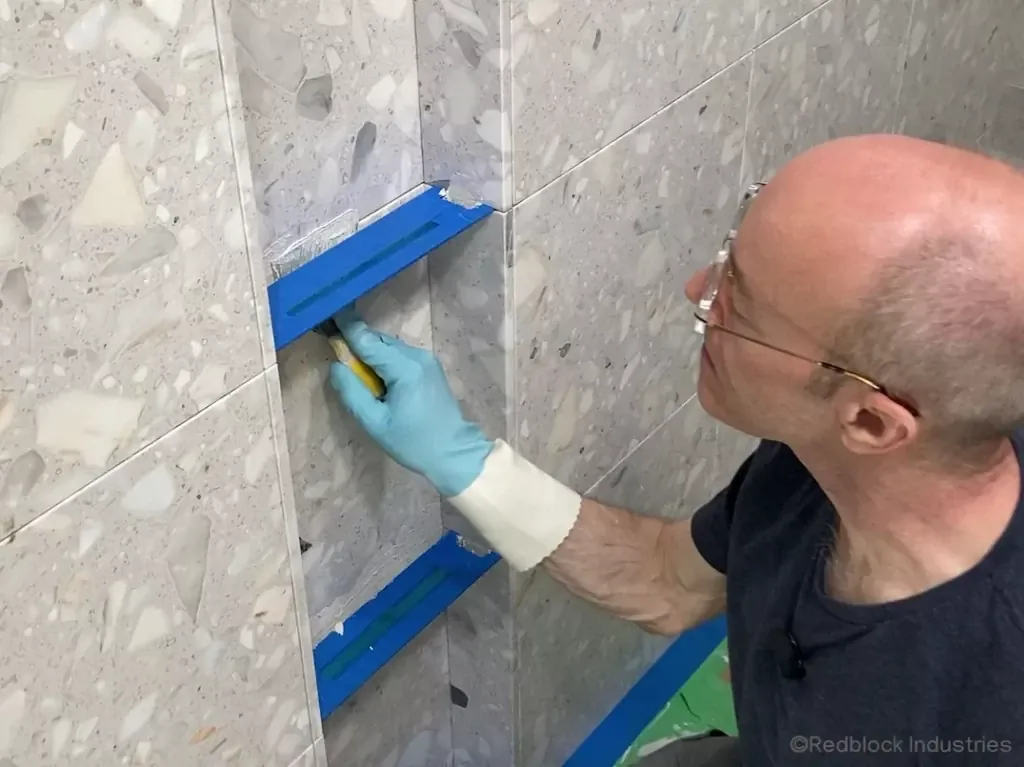
Task 1 - Apply sealant and spread the mortar:
Before spreading the thinset, I applied a bonding agent (diluted Weldbond) to the plywood to seal it. Then I spread
1/4″ of thinset over the subfloor at the base of the SN. Ensure that it’s sloped outward to promote proper draining.
1/16 inch slope from back to front is all you need.
Because this SN is “curbless”, the base, and all the corners, need to be waterproofed. This is a bit of a fiddly job
using a sheet membrane, but I prefer this for peace of mind. Check out my waterproofing post to find out why.
In order to prevent excessive overlapping of many individual pieces of sheet membrane at the base, I decided on one
carefully cut piece of Wedi Subliner Dry sheet membrane in combination with two Subliner Inside Corners, and two Subliner Outside Corners (Ad:
The adjacent text links are Amazon affiliate links. See affiliate disclosure page for details).
Task 2:
Install the cut section of Wedi Subliner Dry over shower pan seams and base of the SN.
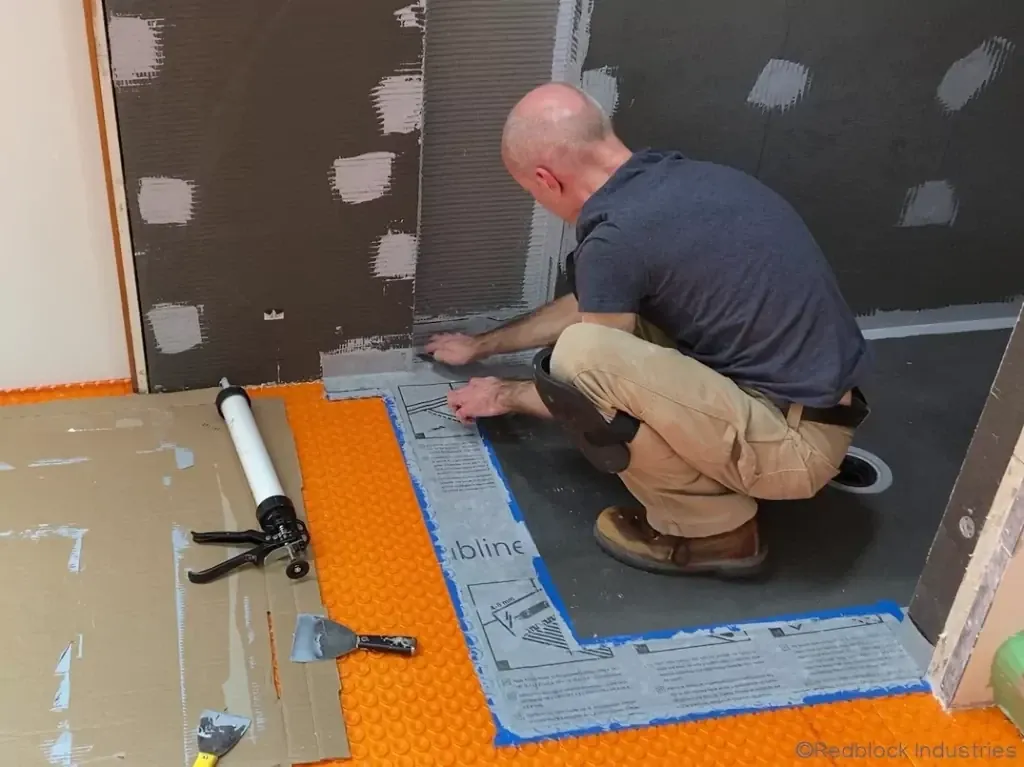
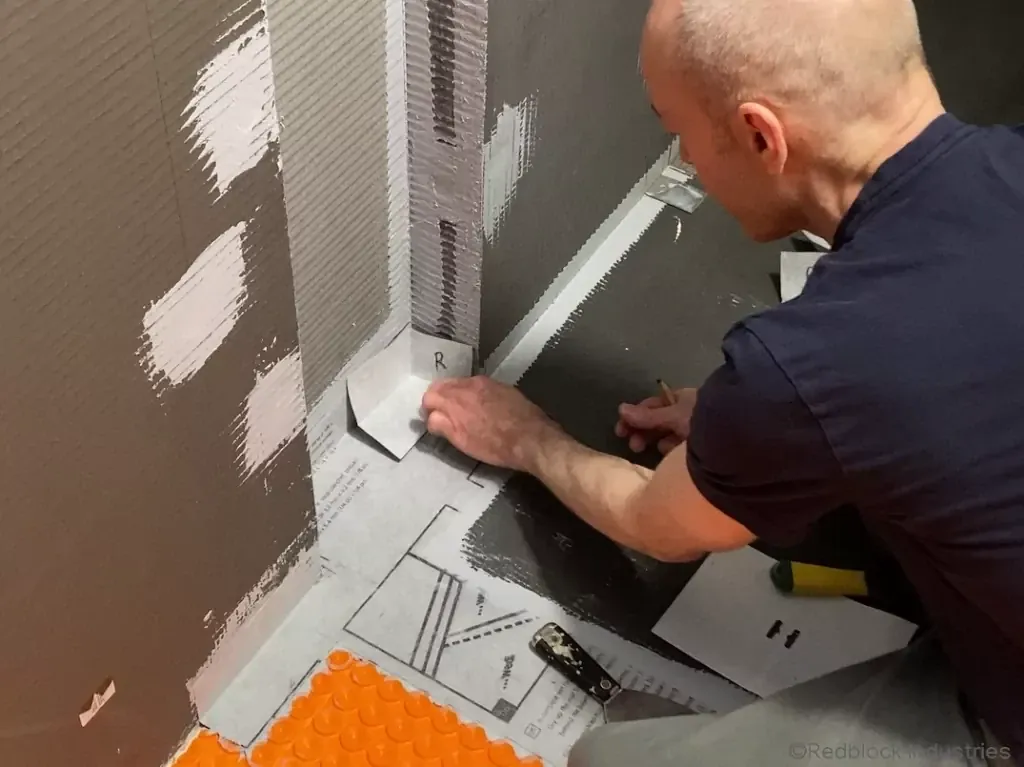
Task 3:
Seal the joint where the SN panels meet the floor by applying two sets of Wedi Subliner Dry Inside and Outside
Corners to this area.
Step 5: Tile & Shelf Installation
The next step in my how to build a shower niche tutorial is tiling and shelf installation.
If you need to find out more about shower tiling or shower shelves before you continue, you’re welcome to check out
my Shower Tile Installation post and/or my Find The Best Niche Shower Shelf For Your New Shower Remodel post.
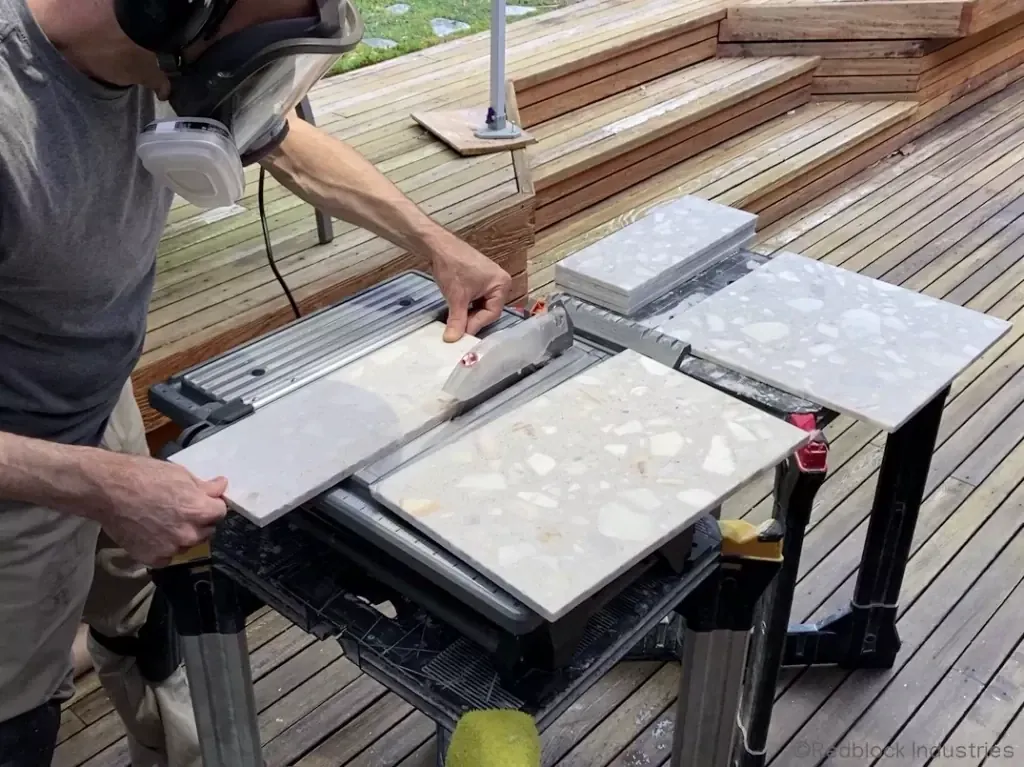
Because this is a tiled SN, and the particular tiles chosen by my client are composite marble, I decided to expose
the edges of the tiles on the sides of the SN. This involves a bit more work polishing and rounding the edges, but it
looks so awesome that I needed to do it for this build.
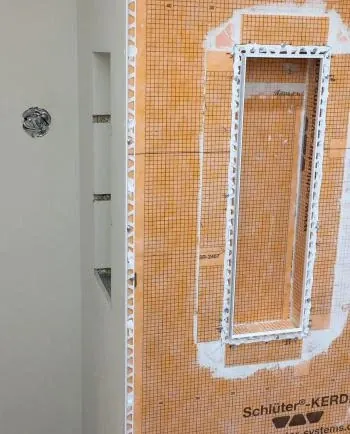
If you’re installing ceramic or porcelain tiles, you will not have this option. Instead, you’ll need to install a tile edge trim to frame the perimeter of your SN. You can see an example in this image.
Exposing the tile edges also means polishing them, which I do not have the time to cover in this post. However, I
will cover the entire tile edge polishing procedure in my Tile Edge Trim post if you are interested.
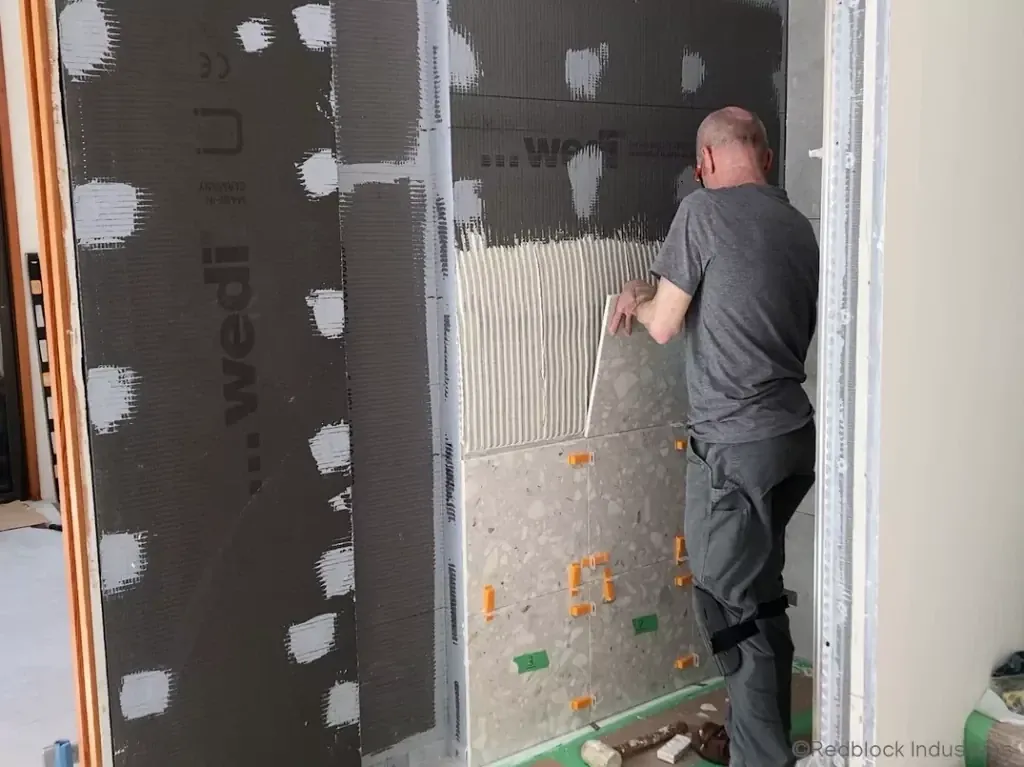
Before tiling the inside of the SN, I first installed the tile on the right side of the SN.
Task 1:
Cut and set the wall tiles on the right side of the SN.
After completing the tile installation on the right side wall, I could have immediately installed the left side wall
too, but I wanted to tile the SN back wall first, just to see how it looked!
Task 2:
Cut and install the tiles at the back of the niche.
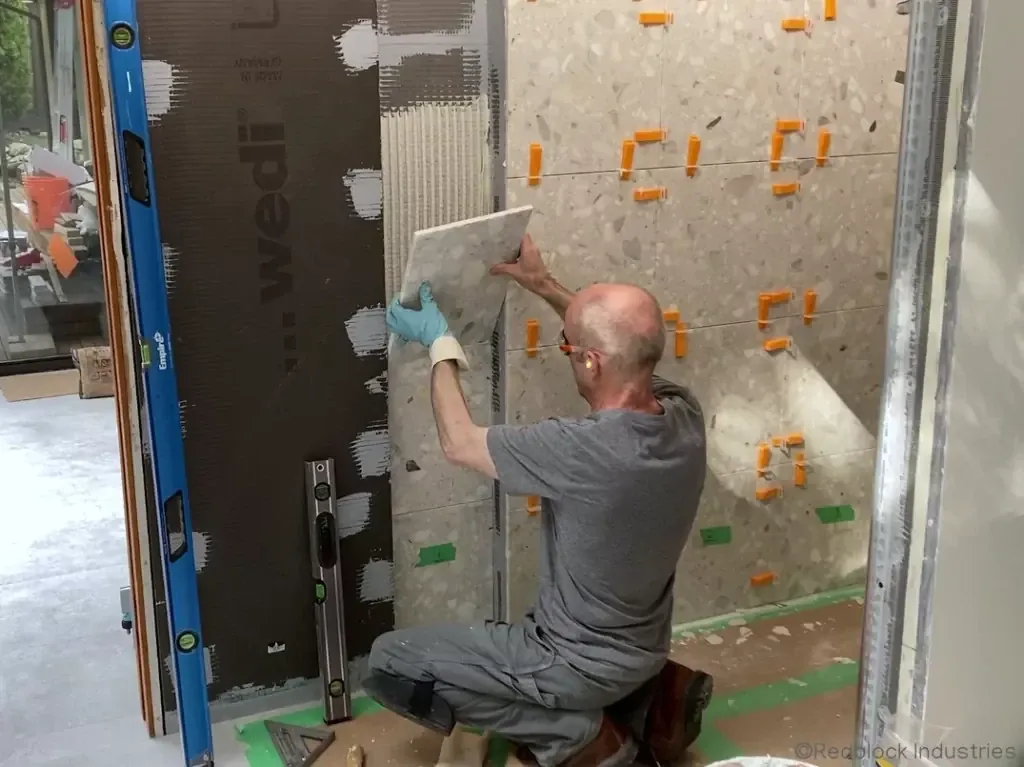
First setting the shower wall tiles on both sides of the SN and making sure they create a perfect vertical line on
each side of the SN opening is very important. This ensures that the sides of your SN will look perfectly plumb and
straight when the side wall tiles are set in place.
Task 3:
Cut and set the wall tiles on the left side of the SN.
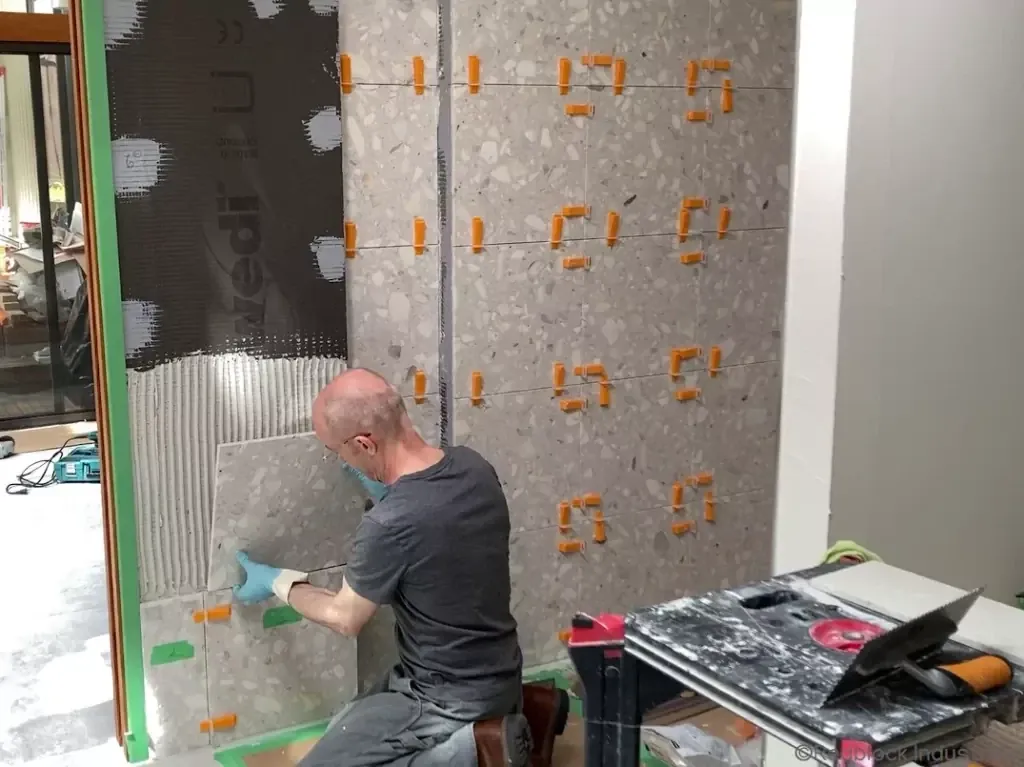
Once the wall tiles on each side of the niche were set in place, then it was time to cut and set the side wall tiles
inside the SN.
Task 4:
Cut the side wall tiles for the niche.
Task 5:
Install the side wall tiles and the shower niche shelves into the recess.

This step of my how to build a shower niche tutorial shows how to proceed with the shelf installation.
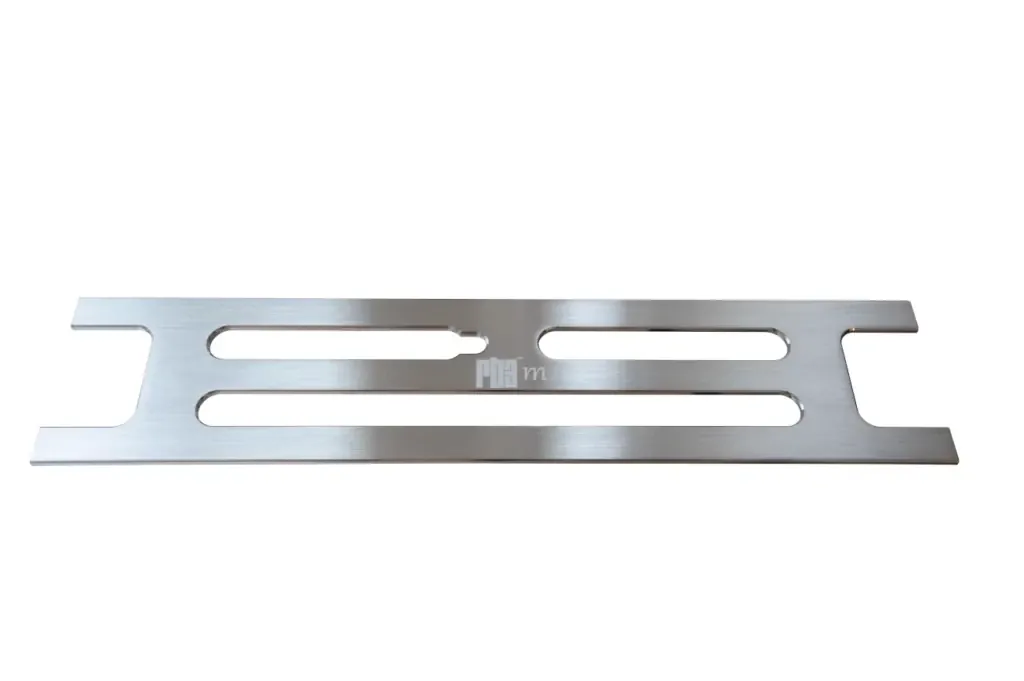
My client decided to install the Rb3 Stainless Steel Shower Niche Shelves because she wanted plenty of
storage space in her SN, but didn’t want the thick and clunky look of a tiled shelf or the slippery surface of a glass
shelf. These stainless steel shelves have a very low profile and fit into a standard 1/8″ grout line space, providing
the minimalist aesthetic she wanted.
Since these shelves are 1/8″ thick (slightly less), and my grout lines were around 1/16″, I needed to file the edges
of these tiles a bit to make room for the shelves. I will soon be adding a section to my Shower Tile Installation post that covers this in detail so stay tuned!
Click the image if you'd like to know more about the rb3 stainless steel shower niche shelf.
Btw, if you wanted to install a glass shelf instead, you’d need to cut the side wall tiles a bit shorter to make room
for the glass because they are a fair bit thicker than the stainless steel shelves I’m installing.
You can check out my Shower Shelf Options post if you’d like to see a large assortment of
different shower shelves to improve your storage.
Step 6: Grouting
Step 6 in my how to build a shower niche tutorial is grouting with a good quality pre-sealed or epoxy grout.
As I’ve mentioned before, I believe that grouting with a pre-sealed or epoxy grout is important for all showers and
tiled niches. As such, I decided to grout this SN and the rest of the walls with my favorite pre-sealed grout, Mapei
Flexcolor CQ (Ad: The adjacent text link is an Amazon affiliate link. See affiliate
disclosure page for details).
I love this product because it stays water resistant for a super long time after install and it sets rock hard
(unlike some other pre-sealed grouts). The only hitch with this product (and most pre-sealed grouts) is that the
application technique is a bit more involved than with regular cementitious grouts.
If you decide to use a pre-sealed grout, I would strongly suggest that you practice with it on a small area before
you take on a big grouting job. If you feel some apprehension about learning a new grouting technique, you can always
apply regular cementitious grout instead. But then you’ll need to seal it every year or two.
Task 1:
Grout the SN interior.
Check out my Lay Shower Tile post for more info on Flexcolor CQ and it’s application
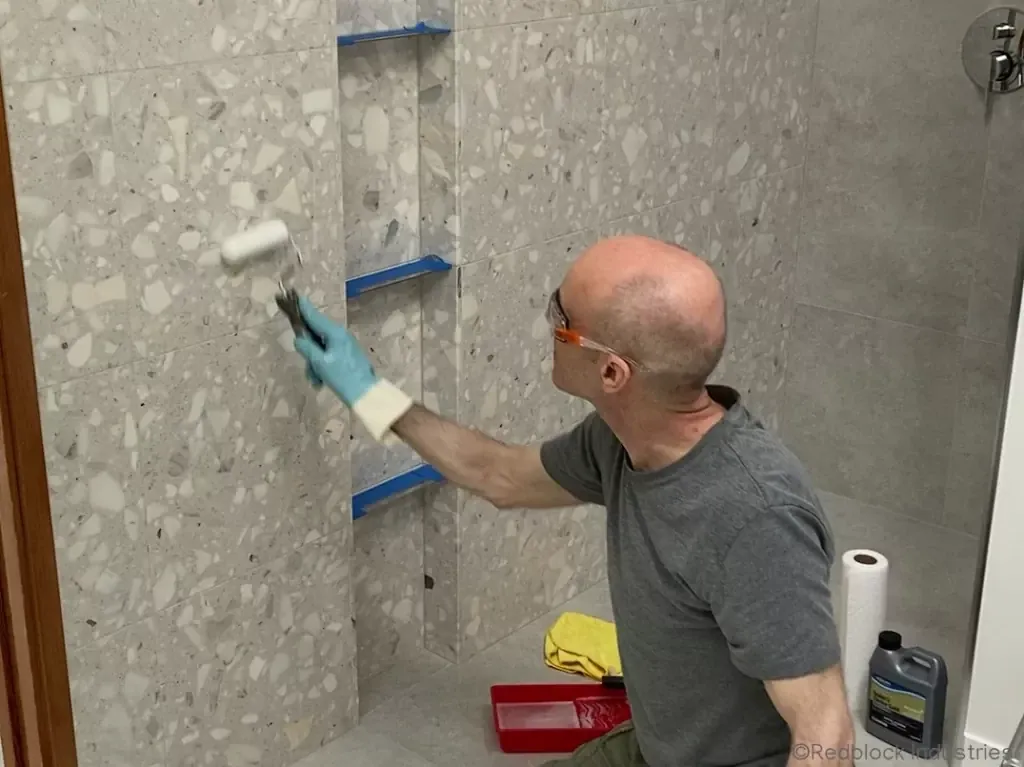
Step 7: Tile & Grout Sealer
The last step of my how to build a shower niche tutorial is sealing the tiles.
As I mentioned above, you'll never need to worry about sealing your grout again if you install a good pre-sealed
grout in your tiling project. As such, I didn’t do any grout sealing at this stage, but I did decide to seal the tile
surface with a good grout and stone
sealer. These tiles are made of composite marble, which is quite soft and porous, so sealing them was very
important (Ad: The text link above is an Amazon affiliate link. See affiliate
disclosure page for details).
You can find out more about grout sealing and in my Shower Tile Installation post.
Seal the tile with a good tile sealer.
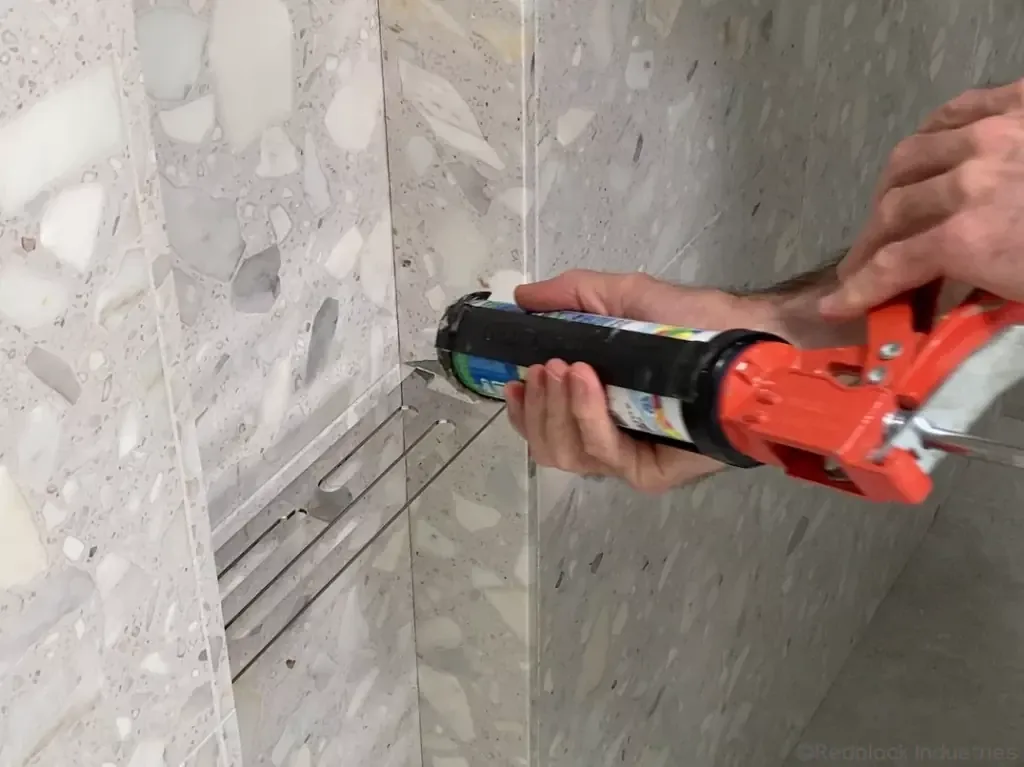
Task 2:
Apply a tiny bead of silicon around the shelves and the SN perimeter. Congratulations! You made it to the very last
step in my how to build a shower niche tutorial.
Materials Used in this Project
1/2
inch Wedi Board
Wedi
Screws and Washers
Wedi
Joint Sealant
Wedi
Subliner Dry Inside Corners and Outside Corners
Mapei
Ultraflex LFT Thinset Mortar (white, modified)
Mapei
Flexcolor CQ (premixed and pre-sealed)
Terazzo Renata composite marble tiles from Ann Sacks
Sealers Choice Gold stone and grout
sealer
QEP
Xtreme Floor and Wall Tile Leveling System
rb3 Stainless Steel Shower Niche Shelf from Redblock Industries
Ad: The ten text links above are Amazon affiliate links. See my affiliate
disclosure page for details.
Wrap Up
I hope you enjoyed my how to build a shower niche tutorial.
I really enjoyed building this custom niche and writing this how to build a shower niche tutorial, because it shows
how a simple niche can be transformed into an impressive architectural feature, if you’re willing to take it to the
next level 🙂.
This post will be part of a series of posts (and videos) covering an entire Wedi shower build, so stay tuned for my
next posts
(and video) covering the rest of this project.
Please let me know in the comments if you enjoyed my how to build a shower niche tutorial. And if you decide to take
on this project, please let me know how it all turned out. You can also ask me any question you might have. I’d be
happy to help you out!


