
How to mix thinset is not rocket science, but it's important to get the right mix if you want your tiles to stick firmly in place for now, and for years to come. I'm Steve Gehrmann with Redblock Industries (Steve's Bio). I've been remodeling bathrooms, and installing tile for 15+ years, so I know a fair bit about how to mix thinset mortar. When you mix your mortar the right way, it will stick well, spread well, and cure well, which is exactly what you want.
What is Thinset Mortar?
Before learning how to mix thin-set mortar, you should know what it is first. Here's a brief overview.
Thinset mortar is a cementitious adhesive for attaching tile to various substrates on walls and floors.
All thinsets contains Portland cement, fine sand and water, but unmodified or "dry-set" mortar contains only these ingredients. Polymer modified thinset mortars also include polymer additives (in powder form) that when mixed with water, make the mortar more flexible, with greater bond strength.
Both unmodified, and modified mortar are strong and reliable for adhering tile to most substrates including waterproofing membranes. However, modified thinset mortar is better suited for substrates that flex or move slightly with changes in temperature and/or humidity.
I've also noticed that polymer modified mortars generally have a longer pot life (longer time in bucket) than unmodified mortar. They’re also easier to work with on vertical surfaces because they’re more sticky than unmodified, with less slumping.
It's pretty safe to say that modified mortars will help your tiles stick better to surfaces that are not generally considered great bonding surfaces, such as untreated concrete and when applying porous ceramic tile.
So... modified thinset is definitely a "safer" bet for diyers that don't want to take any chances. But it's also important to consider that unmodified thinset will definitely bond as well as any modified mortar, as long as the tile and substrate are inherently good bonding surfaces (porcelain tile onto Hardibacker for example).
I've demolished a lot of tile installations constructed with good old fashioned unmodified thinset, and so I can assure you that this stuff is super strong. Insanely strong, actually... and very difficult to remove even with a high-power demo hammer with tile removal blade.
But this post is about how to mix thinset mortar, not about the different types. And the mixing procedure is the same for all thinsets, so let's move onto the good stuff.
Tools and Safety
Mixing Tools
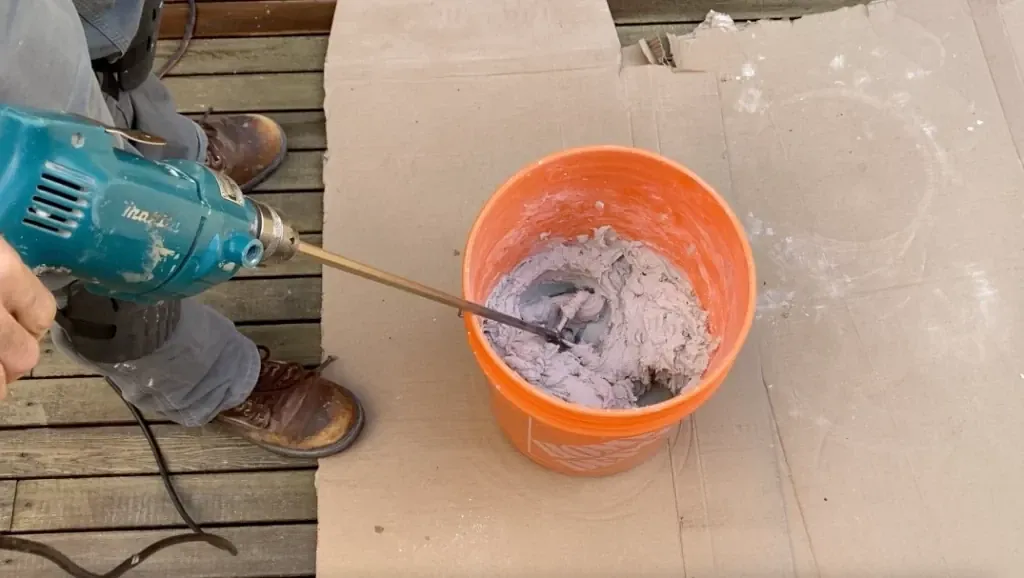
How to mix thinset correctly involves using the right tools. You need a paddle mixer, a mixing bucket, and a strong power drill.
- Paddle Mixer:
- I always use an "egg-beater" style mixing paddle, and it works great. Some pros say that mixing paddles with spiral or helical blades work better, but I don't really agree. You just need to be thorough and not do a half-assed job.
- If you really want to use a spiral mixing paddle, I'd suggest that you use the rod style spiral paddle, not the blade style. The blade style mixes the mortar too violently in my opinion.
- Power Drill:
- You need one that can go at least 300 RPM to blend the thinset well. A dedicated mortar mixing drill is obviously the best tool for this job, but if you don't want to invest in one of these, just make sure you use a plug-in drill instead of a cordless. I know from experience that even if you think your new cordless is awesome and powerful, you will burn it out if you use it to mix thinset. DON'T DO IT!
- If you're not using a dedicated mortar mixing drill, it's much easier if your plug-in drill has a lateral support handle. Mixing thinset is hard on your forearms and wrists and your drill can easily slip out of your hands if you don't have a side handle to keep it from twisting.
- Mixing Bucket:
- A strong 5 gallon mixing pail is required for a 40 lb bag of thinset so you should always have a couple of these around, even if you're mixing smaller quantities. Having an extra one around is great when you realize that you forgot to clean out the pail after the last tiling project.
Safety
- Dust Mask:
- Silicosis of the lungs is no joke, so make sure you have a good quality N95 dust mask around to protect yourself from dry thin-set dust inhalation.
- A true reusable respirator with replaceable filters is an even better idea, to ensure that nothing but clean air will be entering your lungs during thinset mixing. It's also a good idea to mix outdoors so there's no chance that dust will enter your home or your client's home.
- Gloves:
- All mortars contain lime which is extremely alkaline, and really hard on your skin if you're not careful to protect yourself from exposure.
- So, make sure you wear a good pair of thick rubber gloves. If you only have those thin latex (surgical style) gloves, make sure you change them often because they don't really protect your skin well from continued exposure to wet mortar.
- Safety Glasses
- A decent pair of safety glasses certainly wouldn't hurt. Most pros don't wear them, but if dust gets into your eyes, it can definitely irritate. As well, it's not uncommon for some water to splash up during the first minute or so of mixing. If it gets into your eyes, you need to stop mixing, and immediate rinse out your eyes thoroughly with cold clean water. In other words, a huge hassle and completely avoidable if you wear safety glasses.
How to Mix Thinset Correctly, Step-by-Step
I've found that many of the professional tile installers that I've worked with don't realize how important thinset consistency is. They routinely mix too much water into the initial mix with the mistaken assumption that it will extend the pot life. A grave error, and one that I hope you will not make after reading this post.
Step 1: Add the Correct Amount of Water
Be sure to pour cool, clean water into a clean mixing bucket before you add the dry mix.
Most brands say you need about 5 to 7 quarts of water for each 50-pound bag of mortar (2.5-3.5 quarts for 1/2 bag), but I always start with about 2-3 cups less water than what they recommend.
Step 2: Add Thinset Powder
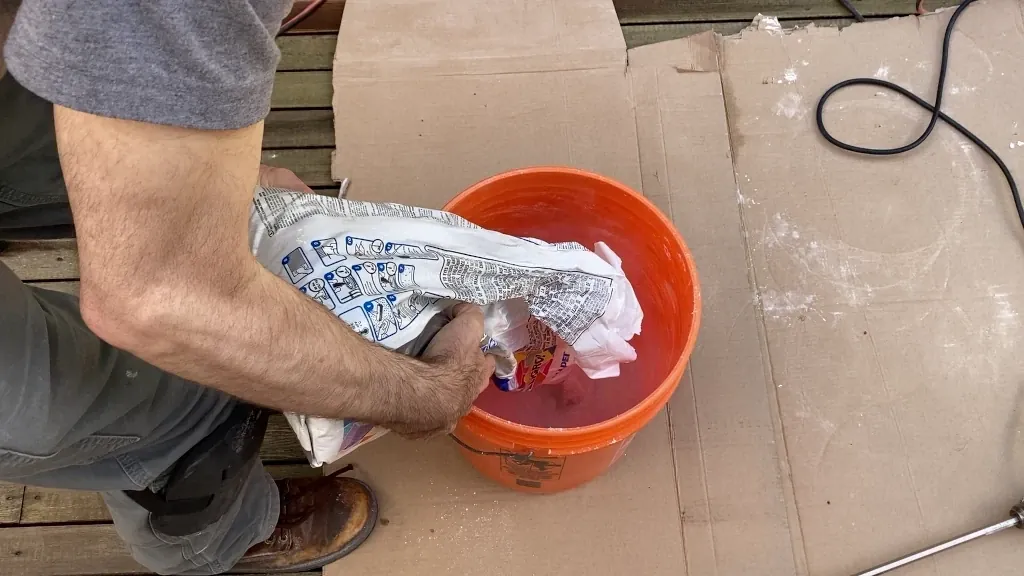
I would recommend that you only ever mix 1/2 bag at a time, no matter the project size. Most pros mix an entire 50 lb bag, at a time, but I found that if you're a meticulous tile installer (like me) the second half of the bag sits too long in the bucket and starts to firm up before you're done. It's also much less stressful this way, and not as messy.
Pour all the thinset powder into the mixing bucket. Mix with a paddle mixer at around 300 rpm, making sure that you thoroughly scrape the bottom of the bucket to remove any dry mix from the bottom corners.
The mortar will be very thick and won't mix uniformly with this initial amount of water, but you should still try your best to mix it as thoroughly as possible in this lumpy state (for about 1-2 minutes).
Step 3: Achieving the Correct Consistency
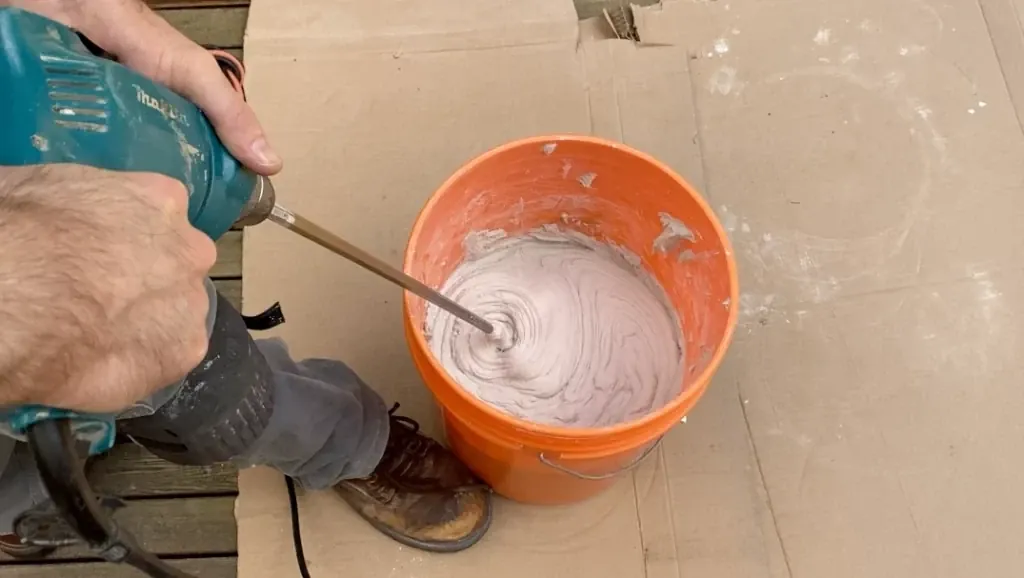
When learning how to mix thinset, you quickly realize that consistency is key. You want the entire mix to be properly hydrated, but not too thin, or bond strength and compression strength will be compromised.
This means that it should be as thick as possible, as long as it's well hydrated and spreads well. It's important to know this when learning how to mix thinset.
Assuming you're mixing a half bag (25 lbs) as I recommended, and you hold back some water as I mentioned above, the mortar will initially tear or fracture on the surface. You can see this in action in the image below.
I then add about 1/2 cup incrementally, mixing thoroughly in-between.
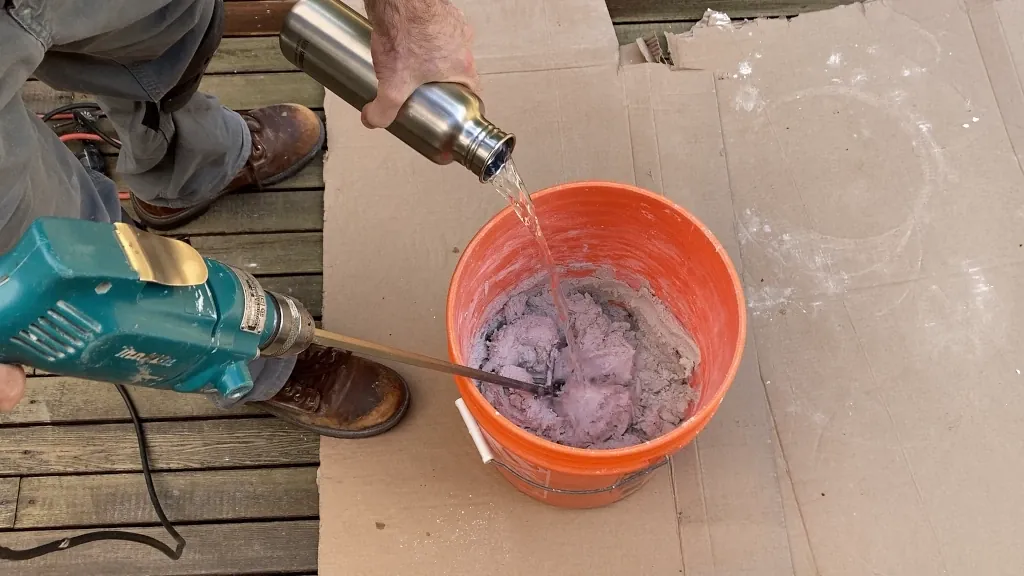
I stop adding water when I see the mortar ridges change from tearing, to flowing smoothly over the mixing paddle as you bring it close to the surface. This should give you the perfect thin-set consistency (see below).
Step 4: Allow to Slake, then Remix
If you want to know how to mix thinset, then you need to know about slaking. This is an important step to allow time for chemical reaction of calcium oxide with water to obtain calcium hydroxide. To put it simply, this allows the mortar to cure into a rock-solid bonding matrix under your tile.
Slaking thin-set means letting it sit for 5 to 10 minutes after it's thoroughly and completely mixed. Then remix for 1-2 minutes.
You should also be prepared to mix your thinset regularly during tile installation. As soon as it loses some of its smooth consistency, always remix for 10 -20 seconds. This will keep your mortar smooth and workable for the maximum amount of time.
Pot Life:
Pot Life simply represents the period of time your mortar sits in the bucket before it's unusable.
When the pot life has expired, remixing won't maintain the proper consistency anymore - you'll start notice your thinset getting thicker, more lumpy and not as easily spreadable. At this point, you should dispose of it and mix some new stuff.
To avoid the above problem, I'd recommend you only mix enough mortar to use the entire amount within 2-3 hours (if it’s modified). For me, this amounts to 1/2 of a 50 lb thinset bag.
If it’s cool and rainy outside, I find that pot life (working time) can be extended by as much as 1 hour, but this will vary depending on your elevation and climate.
Common Mistakes:
- Using a dirty bucket
- Too much water
- Using fast-setting thinset
- Dry powder sticking at the bottom or corners of the bucket.
- Skipping the slaking step.
Dirty Bucket:
When you learn how to mix thinset properly, nobody ever seems to mention the dirty bucket problem. I can tell you from experience that this is a big one, especially if you like to get some mileage out of your tools and buckets. Hopefully you pay attention to this because I'm only saying it once... make darn sure that your bucket (and your tools) are PERFECTLY clean before you mix a new batch of thin-set.
If you don't think that your bucket and trowel and mixing paddle are pristine clean, give them another thorough cleaning, or just go to Home Depot and buy new ones. Any residual mortar can accelerate the slaking which will dramatically lower the pot life. And this is not something you can fix with remixing. Your thinset will go off before your eyes, and there's nothing you can do except throw it out and start again.
Too Much Water:
Do not add more water to extend the working time when it starts to stiffen up. I know how tempting it can be to add just a tiny bit of extra water to the bucket when your mortar is getting a bit stiff and you’re almost finished.
Try remixing regularly instead. If your thin-set becomes too dry and no longer spreads well, dispose of it and mix some more. You will compromise bond strength and compression strength of you ignore this rule.
Using fast-set thinset
When you learn how to mix thinset properly, nobody ever warns you about the dangers of using fast-set thinset. I recommend STRONGLY against using any fast-setting thinset mortar. This stuff is very unpredictable and a real nightmare.
I know guys that use this stuff routinely and they love it, but just between you and me, these guys like to do things quick and dirty (to put it politely). In my experience, even if I'm super organized and efficient in my workflow, this type of mortar does not allow the time for tile adjustments during the installation, which is essential for my process.
If you think that this type of mortar might be a way to finish your project faster; I can assure you it won't. If you try using it, there's better than 90% chance that it will ruin your project (along with a lot of cursing and regret, of course).
Not Mixing thoroughly:
Be sure to move the mixing paddle around and into the corners of your bucket while mixing your thinset. I know that this sounds obvious, but I see it happen all the time. A few lumps of dry mix get clumped into the bottom corners of your mixing pail when you're in a rush to get started on your tiling project. So make sure you mix it carefully and thoroughly.
Skipping the slake:
Much like the mistake above, I've seen professionals and diy'ers alike, hastily mixing their thin-set and starting to spread it immediately after mixing. Do not skip the slaking step! You must wait about 10 minutes after mixing for the mix to adequately hydrate and slake. It's an essential preparation step for all mortars, including thin-set.
Bonus Tips:
Trowel Notch Size:
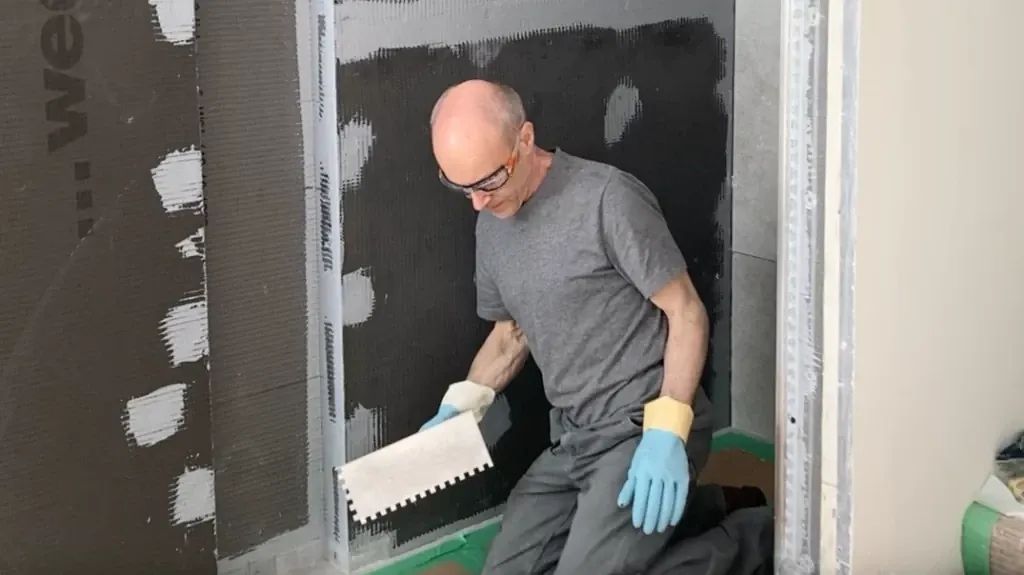
I won't talk a lot about this, but I will say that I prefer to use a 1/2″ square notch trowel when I’m laying one-foot square tiles or larger (see image). The larger notch size allows for a little more flexibility, especially when installing on an uneven substrate.
As I mentioned in my How to Lay Shower Tile post, an uneven substrate is going to cause tile lippage problems, so a little deeper mortar bed will allow you to better match the tile edges even over an uneven surface.
Spreading Thinset:
Again, I cover this in more detail in my Lay Shower Tile post, but I will cover a couple of important points here.
Using the flat side of a notched trowel, spread a layer of mortar onto the prepared substrate to a thickness roughly matching the notch depth of your trowel (1/2″ deep for 1/2″ notched trowel), covering a small section at a time.
Avoid spreading your thin-set over too large an area, as it will dry out before you notch it and embed the tiles.
Then with the notched side of the trowel angled roughly 45 degrees to the surface, sweep your trowel across the thinset in a single direction. This allows the raised areas of mortar to collapse and spread over the substrate and the back of the tile.
If the trowel lines change direction under your tile, air between the notches may not escape. With air is trapped under your tile, mortar lines won’t collapse fully, which reduces coverage.
Another important step is to back-butter your tiles before setting it into place, especially if you’re installing lower density ceramic tiles. Back buttering is simply applying a thin scratch coat of fresh mortar to the back, before setting it into place. Super important.
FAQ
How do I know if my thinset is mixed correctly?
Your mixed thinset needs to be smooth with no lumps. It should also stay in place on your trowel (not slip off) when it's tilted or inverted. It should also retain a notch. If notches aren't fairly square or slump at the corners, the mix is likely too thin.
Can I mix thinset by hand, or do I need a drill?
Although it is possible to mix a small amount of thinset by hand, I would recommend strongly against it. To put it simply, it's a giant hassle. It will take a lot longer than you think, your wrists and forearms will be throbbing, and you'll regret not using a drill and mixing paddle. Even if you only need a small amount, you should mix at least 5 lbs dry mix - enough to mix thoroughly with a mixing paddle in a decent sized pail. Then just discard the stuff you don't use.
How long can mixed thinset sit before it’s unusable?
Mixed thinset generally has a working time (or pot life) between 90 to 120 minutes, depending on elevation and ambient temperature. After this time, the setting compounds in your thinset are beginning to cure. This makes it more rigid, harder to spread, and less sticky. But most importantly, the bond and compression strength of your tile assembly will be compromised.
Is Slaking thinset that important?
Yes, a minimum amount of time for slaking (5-10 minutes) is super important because the chemical reactions that ensure the strength of the mortar have not completed until after this period has elapsed. However, it's important to note that the hydrated thinset mix will continue to slake for the entire time it takes to go through the contents of your mixing bucket, until it's no longer usable (pot life).


