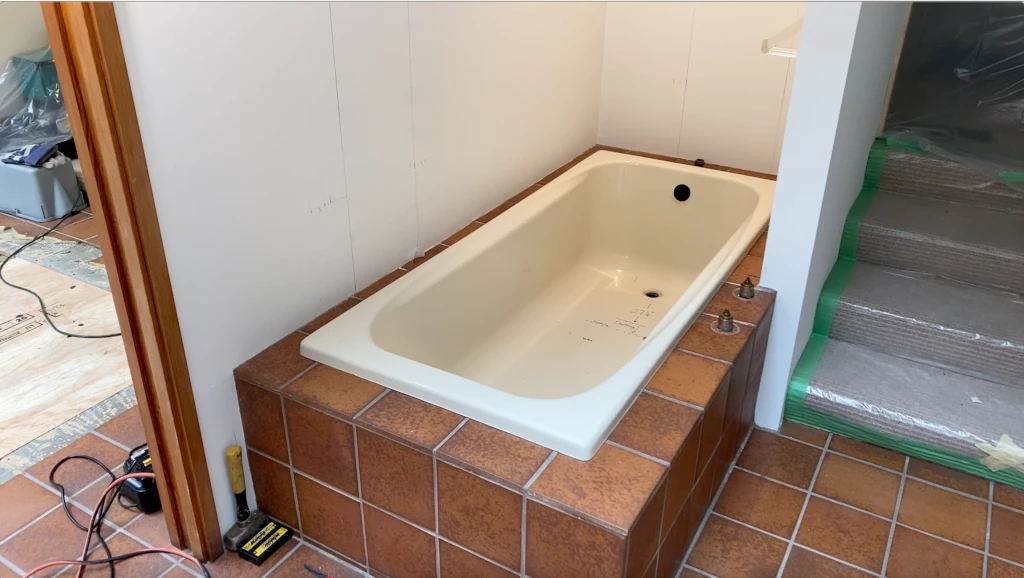
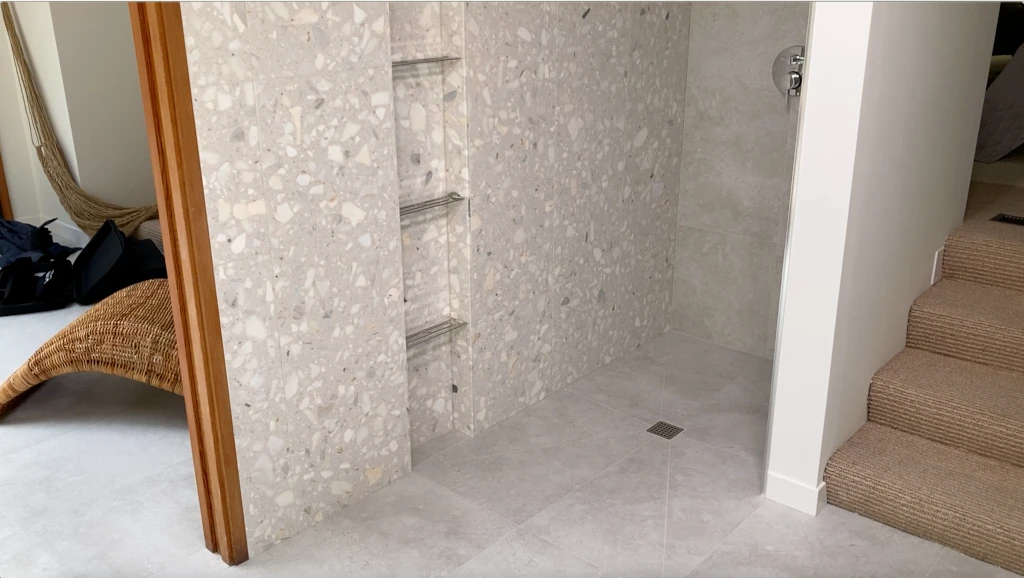
Here are the "Before" and the "After" pics of the shower bath conversion project I'll be referencing in this post.
The Basics of a Tub to Shower Remodel
A tub to shower conversion involves several basic steps: Removing or demolishing the old bathtub and tub surround (often the bathroom floor tile as well), removing and/or re-routing water supply and drain lines), installing a new shower pan and drain system, upgrading with new tile backer board board, waterproofing everything, laying your favorite tile or other finished wall product, then perhaps some glass doors.
All the above steps are quite involved, so I will spend a fair bit of time on each stage. My goal is to give you the knowledge and confidence to do this project yourself. Or if you’d prefer to hire a contractor, I’ll give you the knowledge and insight to manage your own project like an expert.
Main Reasons: Functionality, Aesthetics, Accessibility
The main reason that most of my clients decided to do a bathroom tub to shower conversion is basically because they never take baths anymore. The second is that their bathtub is worn out or outdated and they're looking for a change. The third reason is that they always wanted a curbless, or walk-in shower (WIS) for improved accessibility and a modern look.
Bath / shower conversions are also an opportunity to, not only create a more functional and accessible bathroom space, but also one that’s aesthetically pleasing - a high priority for most of my clients, with budget being the main limiting factor.
My client's priorities for this tub to shower conversion project was to build her a beautiful, accessible, low maintenance, barrier free shower. Another big priority was to include a super cool, floor to ceiling tiled shower niche with stainless steel shelves for easy access while showering and plenty of shower storage space.
Another thing to consider when contemplating a WIS over a standard shower (with curb) is that a WIS can presumably increase the value of your house/ home. I would say that this is associated more with a new bathroom remodel in general, but it might help... at least a little, which is definitely a good thing.
Bathtub to Shower Conversion Planning
If you want your tub to shower conversion project to turn out perfectly with no regrets, you need to do some careful planning. I always recommend to my clients to consider their entire bathroom layout/ design, rather than just focussing only on the walk in shower (WIS).
I also recommend using a design/ layout tool to plan their new space. Unless you're planning to hire a bathroom designer, this step is pretty important in my opinion, but also pretty easy.
Bathroom remodels can vary widely in scope and price based on your design and product choices. Most contractors and designers offer free consultations, which is an excellent way to get a feel for how big and expensive your dream project will be when it's all said and done.
The entire bathroom space has a very different feel once the bathtub is gone, so it usually benefits greatly from some design planning.
As such, I'd highly recommend that you review my Bathroom Remodel Planning post so you can get into the weeds on this topic, and make some informed decisions about your preferred layout / design. But I will also summarize some of the important steps below, specifically related to showers.
Design and Layout
Whether you want a a true WIS, or you're considering a shower with a curb, you should really think about the overall style and bathroom feel you want to achieve.
If you prefer a sleek and modern aesthetic, large-format porcelain or natural stone tiles are great options. For a more traditional look, something like classic white subway tile with contrasting grout is an easy choice. For a budget-friendly option, acrylic shower panels are available in numerous colors and finishes.
I always recommend that my clients look online (and social) for bathroom images to find the look they prefer. This is a fool proof method because it gives you the confidence that your bathroom will look great when the projects done, and it really helps your contractor(s) know exactly what kind of look you want, and what kind of fixtures and finishes you prefer if you’re hiring a contractor.
You should also keep in mind that your new shower doesn’t need to have the same footprint as the existing tub. Removing a large bathtub can create more room in your bathroom, for a more spacious or functional shower.
Tile-Ready Pans/ Trays
An excellent option is a prefab tile-ready foam shower pan / tray on the shower floor. They come in various shapes and sizes, with different drain orientations to suit your specific bath drainage location.
When my clients’ budget is a bit too lean for a curbless WIS, but they still want the elegance of tile, I always suggest the less expensive above grade tile-ready pans. This usually means a prefab foam pan/ tray like the Wedi Fundo Primo, or the Schluter Kerdi pan. These are both tile-ready pans, installed over the subfloor, with a surrounding curb.
You should also keep in mind that most tile-ready foam pans/ bases can be customized to match your bath layout, floor drain location, and your personal style. Even if the manufacturer doesn’t offer an extension kit, you can always cut a larger one down to size or extend a smaller one with dry pack mortar so that it conforms perfectly to the ideal shape and size. Ad: Three text links above are Amazon affiliate links. See my affiliate disclosure page for details.
Finished Pans/ Trays
There are also plenty of finished shower pans to choose from in materials like acrylic or cast iron, and in different styles, if you don't like the look and/or expense of a tiled pan. Ad: The ten text links above are Amazon affiliate links. See my affiliate disclosure page for details.
The most common types are the acrylic/ fiberglass pans/ bases. These are the ones you see basically everywhere. They're also the most economical, often plain white, and have a shiny plastic-like look and feel to them. They are quite durable and can last for many years.
However, the plastics in these pans will break down over time, causing discoloration and cracking, but the deterioration rate varies a lot depending on a few factors. I've found that the good pans can still be in great shape after 10+ years of use. You just have to make sure you get a reputable brand because quality varies greatly.
New Bathroom and Shower Design Ideas
Shower Heads and Fixtures
Choosing the right shower heads and fixtures is an important and exciting step for most homeowners because they really stand out. As such they're always considered a key part of the shower design and a big focus for many of my clients.
Today’s market offers a wide variety of options, from luxurious rainfall shower heads and body sprays to versatile hand-shower that can eliminate the need for a standard shower head. These features can also be combined into a custom shower system for those that prefer the custom approach.
Shower Doors and Glass Panels
Installing a frameless glass shower enclosure eliminates the traditional bulky metal shower door framing, giving your bathrooms a clean and modern aesthetic.
There's a baffling array of shower doors out there, as well as many different ways that you can utilize glass panels into your new WIS design. A sales rep at one of my bath wholesalers told me recently that many buyers are asking for glass panels without surrounding hardware, so it's definitely a growing trend.
In this project, my client originally wanted no doors or glass partitions at all, but she eventually decided that a small 24 inch wide glass panel would be an excellent way to reduce any splashing outside the shower floor area.
She wanted no metal framing around this panel at all, so I supported the panel solely with a Schluter glass panel trim attached vertically on the wall side, and used clear rubber spacers (with silicone) to support it underneath.
Natural Stone
Natural stone, like marble or granite, have been very popular choices for tile and vanity counter finishes for new bathrooms for many decades.
I routinely install natural stone tile and slabs in my bathroom remodel projects. Only the color/ tone preferences seemed to have changed over the years, with the exception of the monochromatic white and grey "Carrara" marble look that has basically transcended all eras.
If you continue to follow the build phase of this tub to shower conversion project (in my DIY Walk-in Shower post) you'll see that I installed a white marble composite tile which is particularly unique and beautiful. It's made up of different variations of white marble that have been bonded together in a matrix.
Linear Drains
Linear drains are a better option for people with limited mobility because of a more uniform slope, but they have also been in high demand from my clients over the last few years because they create a uniform and a high-end feel.
A standard round center drain is certainly not a deal breaker for the mobility impaired since the slope around it is very gentle, but negotiating the space with a wheelchair is just a bit harder compared to a tiled shower room with uniform sloping tile and a linear drain.
A linear drain is also an excellent option with larger-format tiles because of easier installation, and both really popular with my clients in their WIS conversion projects. They're are a bit more trouble with a WIS because of the need for a deeper shower pan recess, and a little more expensive, but some of my clients would not trade them for anything.
Electric Under-tile Radiant Floor Heating
Radiant floor heating adds luxury and comfort that is increasingly popular in all my recent remodels. I find that it's become an essential "accessory" in the bathroom, especially during colder months. Many have told me that once you experience radiant floor heating, you can never go back.
Again, if you continue to follow through to the build phase of this tub to shower conversion project (in my DIY Walk-in Shower post) you'll see that I installed Schluter Ditra Heat mat under the bathroom floor tile.
Accessible Shower Features
A few of my past projects were all about making the shower more accessible due to the client(s) mobility issues. These projects typically involved grab bar installations, appropriately positioned shower niches, hand showers, and benches.
Grab bars have a bad rep because nobody really wants to embrace the fact that they are getting old and they might need some help in the shower, now or in the future.
However, an increasing number of my clients have realized that since they're already retired, this bath remodel might be the last big one they will ever do, so they should probably think ahead! As such I have found a few of really nice grab bars over the years that look a bit more "cool".
Benches are also really great for those people that have balance issues, OR you just simply don't like balancing on one foot when you're washing. Here are some good benches I've found online. Ad: The two text links above are Amazon affiliate links. See my affiliate disclosure page for details.
Although not technically an accessible shower feature, I thought I needed to mention the importance of good lighting in any shower, especially if the shower is intended for persons with limited mobility.
Poor lighting means more accidents, so make sure you purchase the right lighting for your bathroom remodel, and distribute it evenly across the entire bathroom space.
I know it's a topic you probably don't want to think about, but safety should be an important health/ life priority for most people contemplating a bathroom remodel, especially when we all know that our eyesight and mobility will degrade eventually.
DIY or Hiring a Contractor?
I would recommend that you hire a company that specializes in bathroom demolition to remove your bathtub, demolish the tub surround, and remove all the debris.
However, if you’re set on doing the demo yourself, please refer to my Ultimate demo guide for all the info you’ll need to prepare for and perform the demo safely and efficiently.
As far as hiring a contractor for some or all of your shower build, you need to weigh a few pros and cons to make an informed decision. Reading my bathroom remodel planning post should help you with this.
DIY Hints
A great, low skill diy task is the installation of back framing for the new valves, hand-shower couplings, bars, etc. Plumbers often do a very poor job on this, so this is your chance to get this done right and reduce your plumbing bill at the same time.
Another important but easy DIY task, would be flattening the stud plane before you install your tile backer board. This is a step that few contractors bother with, yet it can make the difference between a smooth and successful tile installation or a tile lippage nightmare.
If you’ve got some basic plumbing knowledge, you could also consider running the new water lines yourself, but I would suggest that you hire a licensed plumber to do all the water connections and all the drainage work. This reduces the risk of things going sideways in your diy tub to shower conversion, and ensures that you comply with local building codes.
It's important to assess the existing pipes, including the location of water supply and drain pipes, as relocating or modifying pipe runs can significantly increase the cost of your project.
It would also be a good idea to discuss your diy plumbing plans with your chosen plumbing contractor so that he/she knows and approves of them. I think you’ll find that most plumbers are pretty good about this, as long as you don’t do any of the final connections. As licensed contractors, they are legally responsibility for all the plumbing work, so you need to be sensitive about this.
If you have the skills and feel confident, you can of course do almost all the rest of the work on your bathtub conversion project (aside from the plumbing work mentioned above). If this is indeed your plan, I would suggest that you read my DIY Walk in Shower post. This article will give all the info you need to tackle this project, diy style.
Convert Tub to Shower - Budgeting
While a tub to shower conversion project can be a slightly more cost-effective compared to a full bathroom remodel, it is definitely not considered a budget remodel.
The tub to shower conversion cost will likely be the most significant part of any bath remodel budget. As such, it’s essential to establish a clear budget before starting your project, and to determine whether you’ll be doing it yourself (diy) or hiring a contractor since labor cost is always the biggest conversion cost factor.
For walk-in and curbless shower remodels, keep in mind that walk-in / curbless showers can cost $5,000 - $8,350 due to the required floor framing modifications. High-end custom designs for bathtub-to-shower conversions can exceed $15,000.
If you’d like some more detailed info on this topic, please check out my Bathroom Remodel Budgeting post, but I will include a few more budgeting tips below, specifically related to a bathtub conversion to walk-in shower.
Quick Budget Tips
The first thing I should mention is that the tub to shower conversion that I'm referencing in this post creates a fairly high-end walk-in shower, which is a fair bit more expensive (in terms of labor charges) compared to a regular above grade acrylic shower base install or a fiberglass/ acrylic shower kit.
So, if you’re planning to hire a contractor to do most of this work on your tub to shower conversion project, and if your remodel budget is a primary concern, you may have to give up on the idea of a custom walk-in shower like this one.
Tip 1:
But if you’re planning a diy tub to shower conversion project, my advice is that you shouldn’t shy away from a custom Walk In Shower. It will take a fair bit more of your time then a regular above grade acrylic base or a acrylic shower kit, but the additional cost basically amounts to only the extra shower floor tile expense, so it can still be somewhat affordable depending on the tile you choose.
Tip 2:
In my experience, when I’m building a shower for a client, whether it's a tub to shower conversion or not, the labor costs and material costs are often very similar, assuming a slightly above average “grade” of remodel.
You can check out my Bathroom Remodel budgeting post to see exactly what I mean, but this usually represents slightly fancier than average fixtures and finishes. These are not what could be considered “budget” items, but rather one or two grades more expensive than this with no additional features.
Just keep in mind that this “formula” generally works only with relatively basic tile choices as well. A slightly more "luxury" tile can destroy your budget in a heartbeat. Hiring a “premium” contractor can also easily ruin the formula, OR if you decide on a few very high-end fixture items.
Tip 3:
If you’re going to hire a contractor for most of the work on your tub to shower conversion, you should always get a few quotes from some well rated contractors in your area and try to get them to provide as much detail as possible. A very common strategy used by many contractors is to produce a lower priced quote that’s short on details.
The questionable approach is all about securing the client, then figuring out ways to make more money during the project. This is a very difficult tactic to spot because unforeseen extra jobs and material expenses always come up in every project, but it’s a very real strategy, nonetheless.
The best way to avoid this problem is to make sure you hire the most reputable contractors in the area. It’s actually best if you get a recommendation from a trusted friend than to rely on online reviews, but these can be important as well.
Tip 4:
When searching for tile, fixture and finish ideas for your tub to shower conversion project, you can save a lot of money if you’re willing to put some time and effort into getting deals. For example, tile patterns are routinely retired and replaced with the hip new styles at wholesalers and home improvement stores. So, ask around and you might find some amazing deals on discontinued tiles.
Tub to Shower Conversion - First Steps
Once you’ve chosen the best design and layout for your shower space, it’s time to dive into the step-by-step bath - shower conversion / install process.
As promised, I’ll be going over the important steps involved in a tub to shower conversion project that I recently completed - the walk in shower I mentioned above, with a custom vertical, floor to ceiling shower niche.
This does not mean that you need to build this particular type of walk-in shower, but since the planning and preparations are similar with any bathtub replacement with shower, I thought it would be helpful to use a real project to help you understand each step more clearly whether you’re DIYing or hiring a contractor for most of the work.
Preparing Your Space and Gathering Tools
Before beginning the demo phase of the project, you need to protect your bathroom floor if you're not planning to reinstall new floor tiles during your remodel. Existing floor tiles will be very vulnerable to chipping and impact damage if you are planning to keep them, so they definitely need protection.
If you're considering keeping your existing floor tiles, I would strongly suggest that you reconsider. This is your chance to replace these tiles, and you probably won't get another. FYI, almost all of my clients that decided to keep their existing floor tiles ended up regretting it later.
At this point, you also need to do all the demo prep that's involved in any remodel, including getting all your demo tools together, and the right safety equipment (if you're DIYing it), as well as coming up an effective dust management plan. Check out my ultimate demo post for all the info you'll need for this important first step.
Removing the Bathtub and Plumbing
The next stage of your project is removing the old bathtub, old valves, trims, old drainage lines, and old water supply piping. The first step of this process is to shut off the water to the bathroom, then remove the faucet, valves and drain assembly.
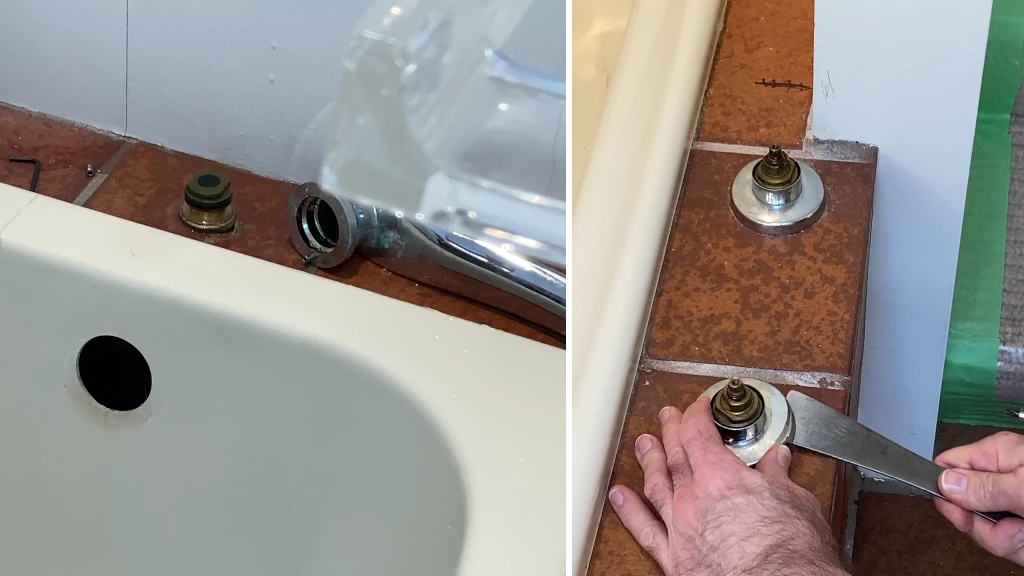
As you can see in the image, I usually remove these drains by jamming my handy lineman’s pliers into the drain opening and using channel lock pliers to unscrew the drain body. These drains rarely come off easily, and they’re often rusted in place, so you’ll need this extra leverage to loosen it.

To remove the bathtub, you’ll also need to disconnect and remove the overflow assembly. Keep in mind that there is a piece behind the trim that will be stuck to the back of the tub, so make sure you just give it a whack with your hammer to release it before tub removal.
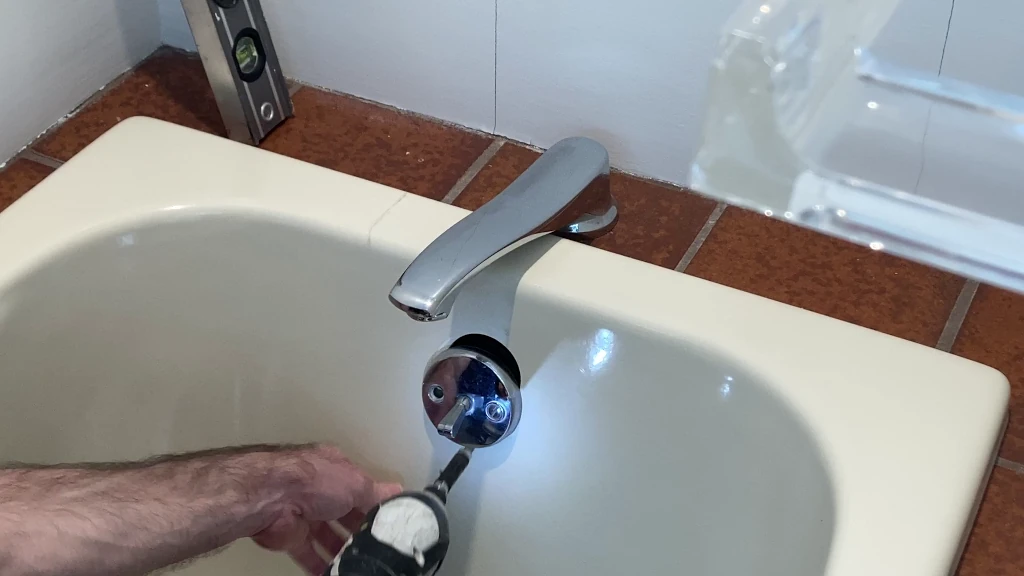
I would suggest that you also remove the valves and faucet before attempting to remove the tub, whether they are connected to the tub or not. They always get in your way if you leave them in place.
Since the old bathtub in this project was installed into a deck, it was actually a bit easier to get out than the average tub installed in a wall alcove. As such, I thought I would give you a few hints about how to detach and remove an alcove tub first, since I’ve done this dozens of times.
First you need to remove the wall surface surrounding the tub. I would strongly recommend that you remove the entire wall surface first, right down to the studs. The tub installation flange is always attached to the studs, under the wall tile, so it’ll make your tub removal easier, and you eventually need to remove the wall surface regardless.
Then simply pull the nails or unscrew the screws attaching it to the wall studs. The next step is the fun part, removing the tub. Whether you’re removing an alcove tub or a tub installed in a deck the strategy below works well for both.
I always cut it into manageable sections with my reciprocating saw to make it easier to handle and easier to dispose of. Whether it’s a steel tub or acrylic/ fiberglass, it’s the best strategy in my opinion.
To cut effectively, you need some new saw blades because the tub will tend to vibrate a lot if the blade’s not sharp. If you need to start with a long blade as I did (see image), try to switch to a shorter blade as soon as possible to avoid cutting anything behind the tub. For this same reason, try to cut as shallow as you can throughout the cut (see image).
If the tub vibrates too much during cutting, switch to a short blade and try planting the heel of the saw against the tub. This usually helps reduce vibration and facilitate cutting.
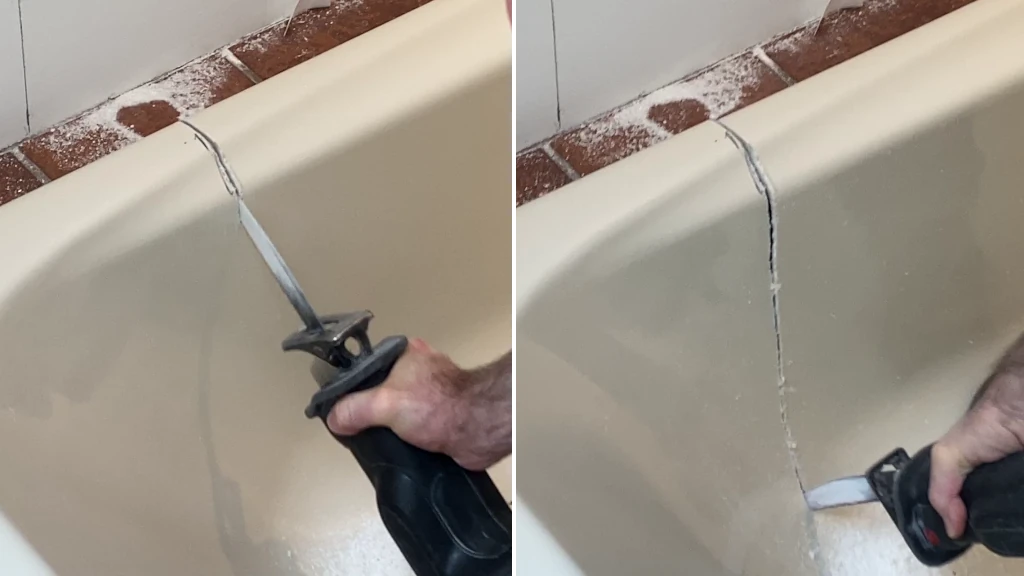
Be cautious when doing these cuts. In other words, make sure the blade is totally clear and your not cutting near any electrical wires, water lines, and drainage lines. Once the tub is cut into a few sections, it’s much easier to dispose of.
Once the tub is out, it’s a good time check the surrounding area to make sure you didn’t cut anything you weren’t supposed to.
Many older bathtubs have a layer of mortar beneath that you’ll have to remove. Just go nuts on it with a good pry bar and sledgehammer and dispose of the chunks.
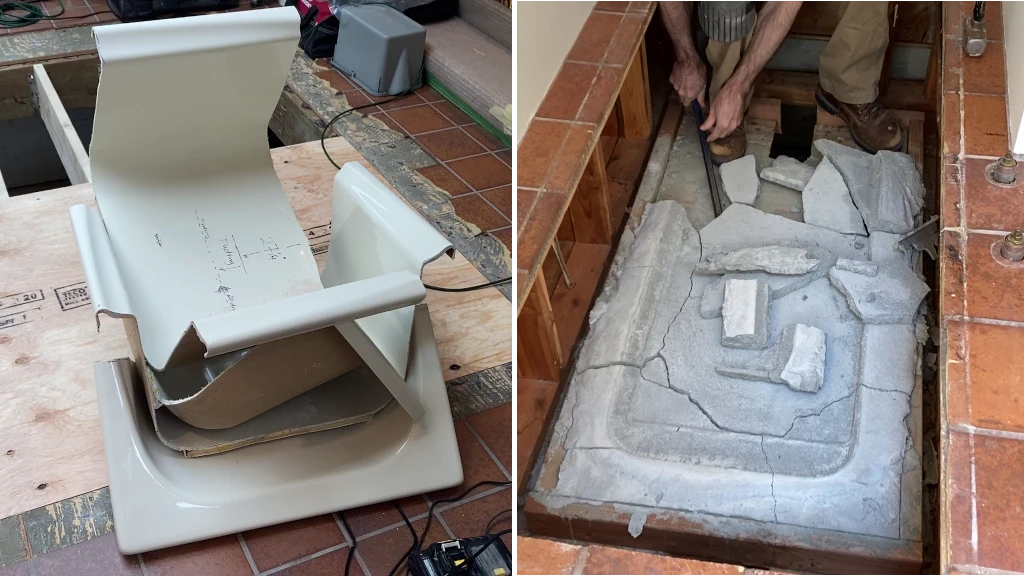
After I removed the tub deck framing and cleaned up all the debris, you can see below that I needed to get my electrician to re-wire that Romex wire back into the stud wall framing. The original electrician was being lazy and ran it through the tub deck instead of the wall.There are always at least a few surprises like this that come up during every demo. This small task added another $300 to the homeowner’s budget. A good example of why a little extra money in the budget is important for contingencies.
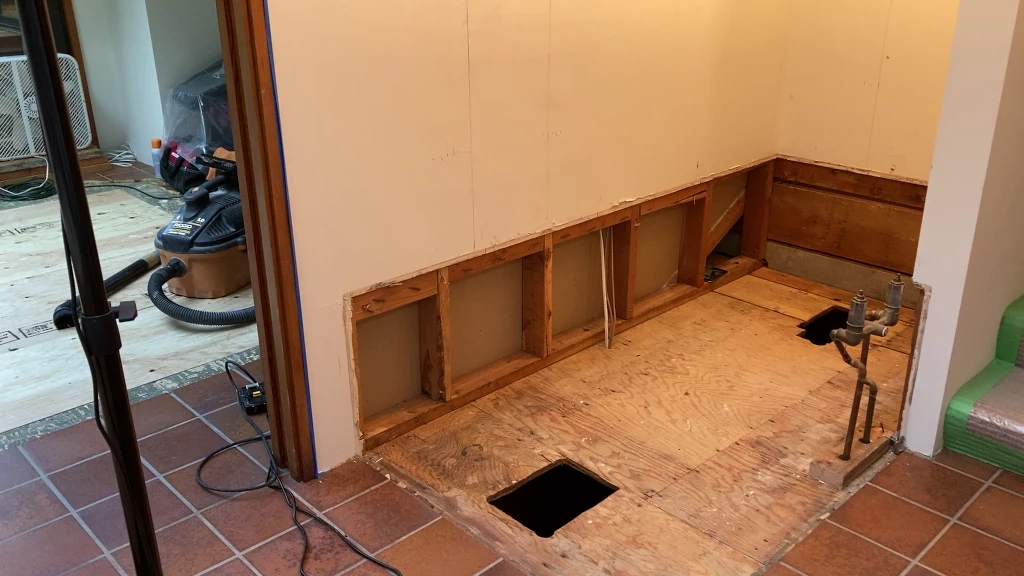
I also needed to remove the copper water supply piping above and below the subfloor. I addressed this during the next step in the project - the Shower Build Phase.
You should also take this opportunity to inspect the exposed shower wall studs and subfloor for any signs of water damage or rot. If there are any problems like this, they can be addressed in the shower build phase.
Next Remodel Step - The Shower Build
With the tub removed and the space prepped, your project has now reached the shower build phase!
As I mentioned above, the shower build is covered in great detail in my DIY Walk-in Shower post. This will allow you to build the super cool curbless shower with the floor-to-ceiling shower niche, that I’ve been talking about. My diy shower build post covers everything from demolition, subfloor reinforcement and shower wall prep, to shower tray installation, waterproofing, floor heating, tile setting, and a lot more.
But even if your budget doesn’t allow for a Curbless Shower Build, my DIY Walk-in Shower post can help you with all the fundamentals.
Installing an acrylic shower pan may not require as much subfloor reconstruction work as a walk-in shower, but pretty much every shower install requires some perimeter wall reinforcement, and benefits greatly from some subfloor reinforcement.
Good luck with your project!
Bathtub to Shower - FAQ
What is the average cost of converting a bathtub into a shower?
The average shower conversion cost ranges from $5,000 to around $15,000, depending on the size, materials chosen, and if you're paying "premium" labor and materials costs. Budgeting for materials, labor, and a contingency fund for unexpected expenses is crucial.
How long does a typical tub to shower conversion take?
A shower conversion can take anywhere from a couple of weeks to a couple of months, depending on the project scope and whether you're doing it yourself or hiring professionals. DIY projects typically take longer than those handled by experienced contractors.
Can I convert my bathtub into a walk-in shower by myself?
While converting a bathtub to a walk-in shower is achievable as a DIY project, it requires some renovation skills. You'll also need the right tools, a solid understanding of the process, and a significant time commitment.
Can I avoid using grout when converting my tub to a shower?
The simple answer is no, but there's no reason to avoid grout in your tub to shower conversion shower project or any tile installation. Water resistant grouts like Mapei Flexcolor CQ or epoxy grouts solve the problems of grout staining and cleaning, so there's no reason to avoid grout lines. Ad: The text link above is an Amazon affiliate link. See my affiliate disclosure page for details.


