One part of the shower that you should never take shortcuts on is waterproofing.
I've seen what happens when it's done wrong - rotting framing, mold behind tile, callbacks that should never have happened, and full tear-outs just a couple years after a "finished" remodel. And the frustrating part is that most of those failures were completely preventable.
Bathroom shower waterproofing isn't complicated, but it requires a careful and thorough approach to get it right. Even tiny mistakes in your installation technique can evolve into huge problems down the road.
In this guide, I'm going to walk through exactly how I approach shower waterproofing; from the underlying principles, to the different systems (sheet membranes, liquid membranes, foam board systems, and traditional approaches), to where installs most commonly fail in the real world.
Whether you're a contractor looking to tighten up your process or a serious DIYer trying to do it right the first time, this will give you a clear, no-BS framework to follow.
By the end of this guide, you should be able to:
- Understand how water actually moves through a shower assembly
- Choose the right waterproofing system for your project
- Avoid the most common (and costly) installation mistakes
- Build a bathroom shower that holds up long-term - not just until the warranty runs out
Article Contents (with Links):
- What Is Shower Waterproofing (and Why It Matters)
- Where Water Actually Goes in a Shower
- Shower Waterproofing Systems Explained
- Shower Waterproofing Methods (Overview)
- Shower Waterproofing Materials and Products
- Shower Waterproofing Best Practices (Contractor Summary)
- Step-by-Step: How to Waterproof a Shower (Contractor Method)
- Shower Waterproofing Code Requirements (What every Pros and DIY's Must Know)
- Why Shower Waterproofing Systems Fail
- How Long Does Shower Waterproofing Last?
- Cost of Shower Waterproofing
- Choosing the Right Waterproofing System for Your Project
- Shower Storage and Waterproofing (Often Overlooked)
- Key Shower Waterproofing Takeaways
- Frequently Asked Questions About Shower Waterproofing
What Is Shower Waterproofing (and Why It Matters)
Definition:
Shower waterproofing is the process of creating a waterproof shower assembly with a continuous membrane behind the tile assembly to prevent water infiltration, vapor diffusion, mold growth, and structural damage.
What is shower waterproofing, is a question I get asked quite often from clients and potential clients. In short, this is what I usually tell them.
Shower waterproofing systems prevent water infiltration, reduce vapor diffusion, and eliminate condensation and related damage within the wall structure.
These systems involve a few important parts (including the waterproofing membrane), which work together to protect the exterior wall and the building envelope by keeping moisture in the shower, and out of the sub-structure.
Waterproof vs Water-Resistant Materials
One of the biggest misunderstandings in bathroom shower waterproofing is around waterproof vs water resistant vs vapor resistant shower materials.
Here are a few facts about waterproofness of shower wall materials.
- All tiles are waterproof, but not moisture-proof (ceramic, porcelain, and stone).
- Most grouts are relatively waterproof initially, but can crack with movement, and become porous over time if not sealed regularly.
- A waterproof (not vapor-proof) tile assembly is possible as long as tile and grout are installed correctly, pre-sealed grout or epoxy grout is used, and substrate movement is addressed with expansion joints filled with 100 percent pure silicone caulk.
- Backer boards are not considered waterproof; foam boards are the only "waterproof" backer boards (examples: Kerdi Board, Wedi Board).
- Backer board materials are designed mainly as structural tile substrates, not as waterproofing layers. As such, they are generally only water resistant.
The important thing to remember here is that not all modern shower walls suffer damage from liquid water making it through tile layer. I consider a water breach in the tile layer to be a big shower wall construction error (in workmanship or materials usage).
The integrity of the tile layer is just as important as the integrity of the waterproofing membrane and it must be considered a first line of defense in every shower waterproofing system.
Vapor Resistance is Key
Most people don't recognize that water damage in the shower wall is often caused by water vapor that's made it through the tile assembly and into the shower wall, where it has condensed into water.
In other words, how "waterproof" or "water resistant" your shower wall materials are, should not be your only concern. Your focus should also be on the vapor resistance (Vapor Permeance, or Perm Rating) of all the layers of the tile assembly combined (tile, grout, and waterproofing membrane).
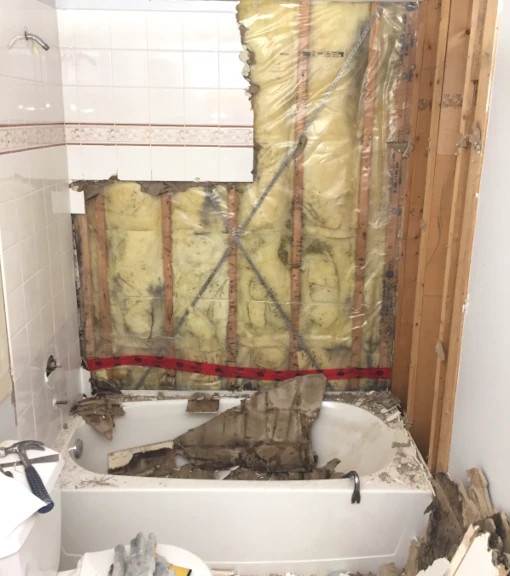
I've torn out plenty of showers where everything looked fine on the surface (no leaks), but once you get behind it, the substrate and/ or framing was saturated and moldy because of condensation, not because of a leak through the membrane.
Where Water Actually Goes in a Shower
In addition to making your shower beautiful, the tile surface serves as the primary drainage surface over which water moves on its path to the floor drain.
As such, the primary goal has always been to make the shower tile surface waterproof, with the waterproofing membrane mainly managing the movement of water vapor, and also managing water penetration problems from poorly constructed/ maintained tile assemblies.
The Traditional Pan Liner System
How water moves in the shower has changed over the years when it comes to the shower floor. Although the primary drainage plane has always been the tile surface here as well, there's always been a secondary drainage plane below the mortar/mud bed.
In these traditional "water-in, water-out" shower pan systems, water would penetrate and saturate the shower floor tile assembly and the base via gravity and capillary action.
A waterproof pan liner under this assembly would stop the water from penetrating any further and allow it to flow under the base, down towards the drain via a pan liner on a sloped substrate. The drain assembly allowed the water to enter the waste line via weep holes around the drain body.
Surface Applied Membrane Systems
Most modern surface applied, bonded shower waterproofing systems are installed directly on the backer board surface, under the tile layer.
These systems are designed to keep moisture from getting through the tile layer, and to keep water above the tile surface, where it can flow easily into the shower drain.
Where Water Goes if Waterproofing Fails
This is where things get expensive.
When you have a failed waterproofing shower system, the damage can be extensive and hard to assess until the walls and floor are opened up.
Problems I've seen:
- Water infiltration and fungal growth on the vapor barrier and wall framing.
- Rot and structural damage in framing and subfloors
- Rank smell (Mildew)
- Growth of black mold is a major respiratory allergen.
- Water saturated wall insulation and more fungal growth
- Poor performance of insulation.
- Frost damage
- Tile detachment and complete failure of the tile assembly
By the time you notice shower leak damage like soft drywall, musty smells, or loose tile, the problem has usually been there for a while.
And at that point, you're not doing a simple repair. You're looking at a complete tear-out, remediation, and rebuild.
That's why a careful and detailed approach to waterproofing a shower is so important.
Shower Waterproofing Systems Explained
By now you should understand that managing liquid water in the shower is not your only priority. A huge priority in shower waterproofing should also be managing water vapor diffusion through the wall.
All membrane system are equally effective at keeping water out of the substructure if installed correctly, but each of them manages water vapor differently.
Waterproofing Systems Chart:
| System Type | Waterproof Layer Location | Vapor Control | Drying Potential | Complexity | Long-Term Risk |
| Traditional liner | Below mortar bed | Moderate | Poor | High | High |
| Liquid membrane | Behind tile | Good | Excellent | Moderate | Lower |
| Sheet membrane | Behind tile | Excellent | Excellent | Moderate | Very Low |
| Foam board system | Integrated substrate | Excellent | Excellent | Lower | Very Low |
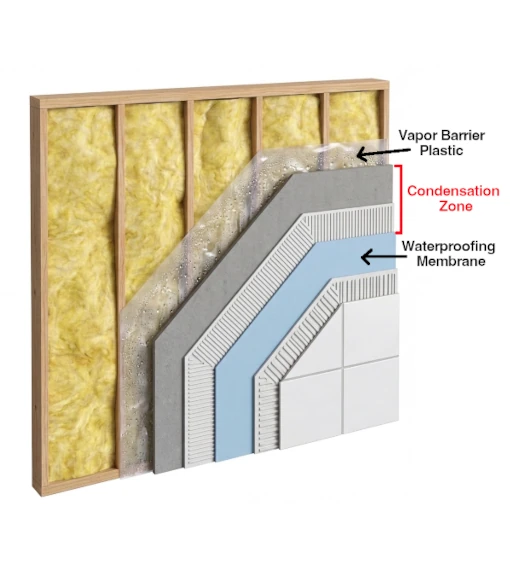
Traditional Vapor Barrier
A traditional and very commonly installed shower wall waterproofing membrane, is 10 mil (10/1000 inch) polyethylene (plastic) sheeting.
It's usually applied to the stud surface with staples, before any wall board is attached. A bead of acoustic sealant (tar-like caulking) is applied to the stud surface, under the plastic, ensuring that it stays water-tight and vapor-tight despite punctures from staples and wall board fasteners.
Three big problems:
- Although the acoustic sealant usually does a good job sealing penetrations into the stud (as long as it's applied correctly), it doesn't help with other penetrations like electrical boxes, conduit, shower valves, shower head pipes, etc. Other methods like Tuck Tape must be used seal these penetrations. This is often done poorly, which means vapor gets into the wall through these holes.
- Another problem is that the backerboard is installed on the "wet" side of the vapor barrier, which exposes it to moisture-based degradation over time.
- Since the vapor barrier plastic sheet stops most of the water vapor from migrating into the wall structure (only about .03 perms), there's also a high risk that this surface becomes a condensation surface, especially when the wall is too thin and there's inadequate wall insulation (see water vapor sandwich discussion later).
Traditional Shower Pan (Liner + Mortar Bed)
The shower pan liner system is the old-school method that's still widely used in many modern shower installations.
This setup uses a PVC liner shower pan or a fitted copper drainage pan installed beneath a mud-bed. Water passes through the tile and the bed, hits the liner, and is directed toward a clamping ring collar drain.
For this system to work as intended, a few details are critical:
- A proper pre-slope under the liner, so water actually moves toward the drain
- Open weep holes at the clamping ring collar drain to allow drainage under the mud bed
- Pea gravel around the drain to prevent the weep holes from getting clogged over time.
- A correctly installed liner with no punctures or low spots
If any of the first three are done wrong, water sits under the mortar-bed instead of draining. That's when you see full saturation of the base, mold growth, and accelerated deterioration of the base itself.
If the third one is done wrong, that's a worst case. If water makes it through the membrane to the substructure, it leads to even more fungal growth, rot, and deterioration of the building structure.
Poor Engineering
This system is flawed in my opinion, because a cementitious shower base that's exposed to constant moisture, without any chance to dry out, will eventually deteriorate.
Even with a perfect install, capillary water retention within this system, causes cyclic expansion and contraction from temperature and pressure changes, fungal growth, grout-line cracking, and tile detachment.
This process also accelerates the breakdown of the mortar bed, further reducing the life of the pan and the entire assembly. I've seen it all.
Surface-Applied Waterproofing Systems
These systems represent the peak of evolution in modern shower membrane systems in my opinion.
Instead of letting water vapor penetrate the entire tile assembly (including backer board) on shower walls, a surface-applied membrane creates a barrier directly behind the tile.
Even more important is the way it eliminates the need for the traditional "water-in water-out" shower floor waterproofing method. Both liquid waterproofing shower systems and sheet membrane shower systems are available. Both fall under what's called Fully Bonded Waterproofing.
Definition:
Fully bonded waterproofing involves a membrane that adheres directly to the structural surface, creating a monolithic waterproof barrier that eliminates lateral water migration.
In terms of a shower, it means an uninterrupted waterproofing layer that bridges all seams, seals all penetrations, and ties directly into a bonded flange drain to create a continuous barrier.
The advantage here is straightforward:
- Water never saturates the substrate
- The system dries faster
- You reduce long-term moisture exposure inside the assembly
Hybrid Systems (Common Real-World Installations)
This is where I see the most problems.
Mixing waterproofing systems shower assemblies happens all the time in the real world; usually when someone combines parts of different systems without understanding how they interact. You might be surprised to know that many "professionals" also make this mistake.
For example, combining a traditional pan liner with a surface-applied (under-tile) membrane can create some serious problems. These are integrated systems, so they're not designed to work with other systems.
That's where compatibility issues come in:
- Drain types that don't match the membrane system
- Overlapping waterproof layers that trap moisture
- Transitions that aren't properly sealed
These setups often look fine during installation, but they introduce hidden failure points.
If you're going to use one of the available types of shower waterproofing, it's best to follow that system all the way through. Mixing components without a clear plan is one of the fastest ways to end up with problems down the road (and callbacks for you pros out there).
Shower Waterproofing Methods (Overview)
When you're learning how to waterproof a shower, you soon realize that you can't do anything half-assed. The complete waterproof shower process depends on doing each part of the installation carefully and correctly.
Waterproofing a Shower Floor
A properly built waterproof shower floor starts with slope and drainage. A mortar bed must be sloped toward the drain to ensure water doesn't pool in a shower.
My typical dry pack mortar-bed shower floor installation:
- Ensure subfloor is reinforced to eliminate deflection (wood framing)
- Attach mesh to the subfloor
- Connect the bonded flange drain to the waste line.
- Seal the floor penetration around the drain assembly to prepare for dry pack mortar packing.
- Spread and pack around the integrated flange drain assembly
- Spread and pack the rest around the drain to establish the correct slope
- Install the membrane tight to the walls, adequate overlap over the drain's bonding flange.
The traditional water-in, water-out system with mud-base floating on a pan liner, or the hybrid method, "clamping drain with drain flashing"; I just don't install these anymore.
In my opinion, there's no longer any good reason to install these systems in any shower when modern bonded waterproofing systems have been proven in the field, to be more durable, simpler to install, and longer-lasting.
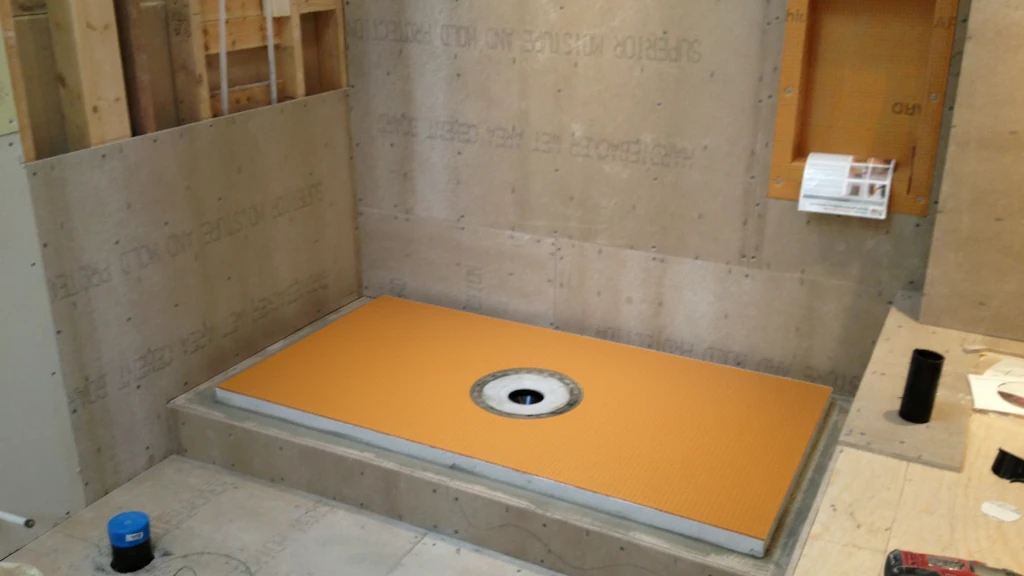
This is my prefab foam shower pan (tray) installation workflow:
Ensure subfloor is reinforced to eliminate deflection (wood framing)
- Spread thinset in one direction under pan, and on the subfloor.
- Drop tray into place, then walk in small expanding circles from center of tray outwards, to firmly set it into the thinset-mortar.
- Place a 40 lb bag of dry thinset on each side of the tray for 24 hours to ensure complete contact
Waterproofing Shower Walls
For waterproof shower walls, everything starts with proper substrate prep. This means ensuring your shower stud wall is flat before attaching any backer board to it. This might involve planning down some high points, shimming some low points, or just replacing or adding a few straight studs.
With wood studs, the wall will never be perfectly flat, but a reasonable effort toward this goal is essential if you want a uniformly flat finished tiled shower wall with no tile lippage.
Moisture-resistant cement board, fiber cement or glass mat boards, installed on the shower wall studs, makes a good foundation for shower waterproofing.
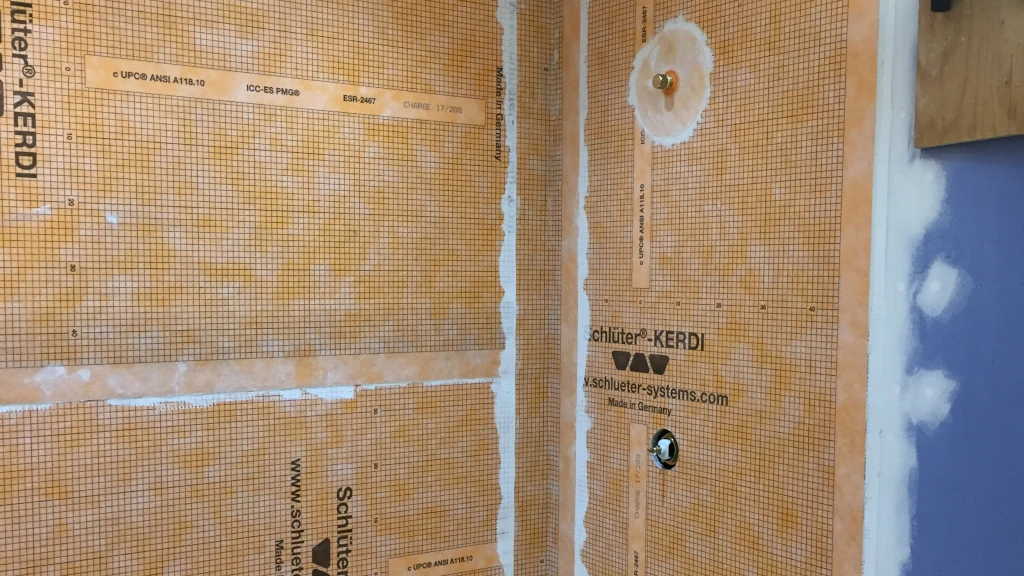
The seams where backer boards meet are vulnerable points for leaks, and require careful application. This ensures a stable and uniform membrane coverage at all transitions.
Foam boards should also be carefully sealed at butt joints and corners, but this is often done with specially-made polyurethane sealant (example: Kerdi Fix, Wedi Joint Sealant) rather than seam tape (example: Kerdi Band).
In standard tile board waterproofing, I try to ensure:
- that all seams are protected with the appropriate membrane or seam tape
- that all fasteners are sealed correctly
- that all penetrations are protected with membrane bonded rubber sealing collars
- there's complete coverage of thinset under the membrane sheet (sheet membranes)
- 3 careful and uniform applications with an appropriate roller (liquid membrane)
- 3-inch overlaps between membrane sheets that meet on board surface.
- a continuous, uninterrupted waterproof layer across the entire wall surface
This is where I see a lot of inconsistency in the field. Skipped seams, incomplete coverage, or poorly treated penetrations all lead to weak points.
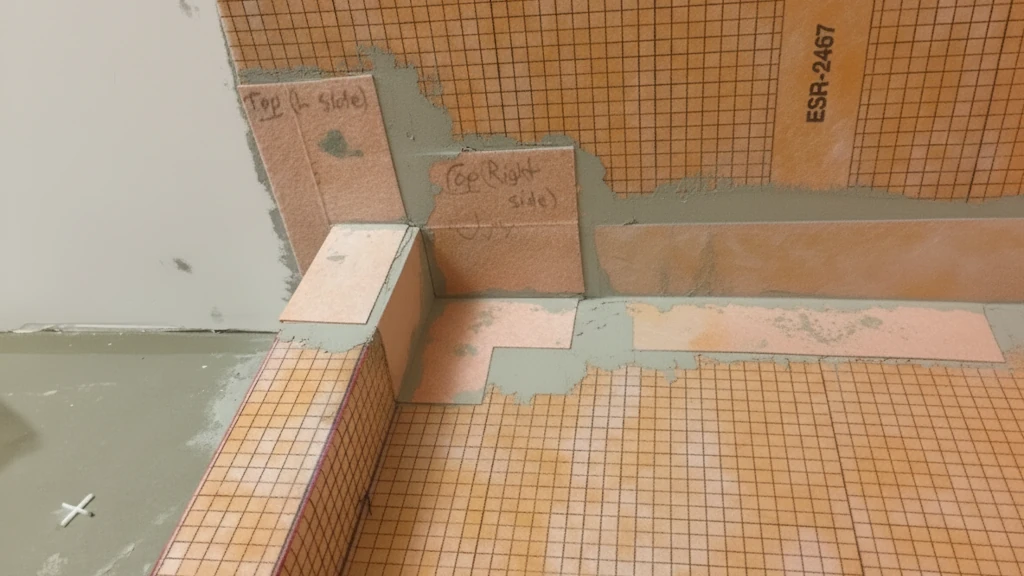
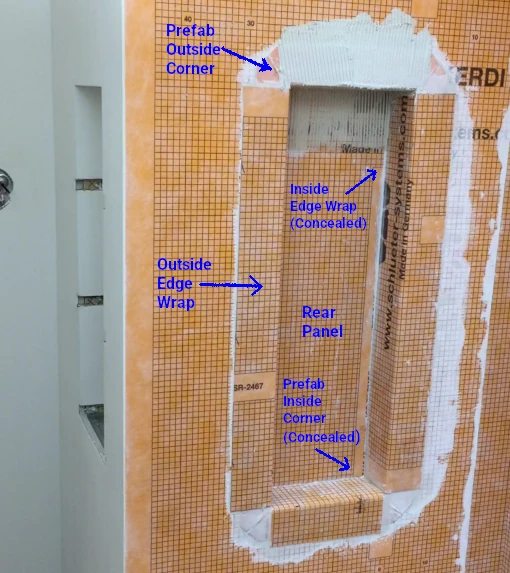
Waterproofing Shower Corners
Shower corner waterproofing is one of the most important parts of the entire assembly because they can be more vulnerable to moisture infiltration.
Corners, wall-to-floor transitions, and changes in plane are where movement occurs (movement joints). These areas are also where most failures start if they're not reinforced and waterproofed correctly.
- I use pre-formed corners whenever possible
- Use membrane sealing tape or fiber mesh tape (liquid) on all wall-to-wall and floor-to-wall transitions
- Pay close attention to wall to floor margin (highest risk area)
If these areas aren't addressed correctly, you end up with cracks or separation over time. Once that happens, moisture has a direct path behind the tile assembly and into the subfloor or wall framing.
Waterproofing the Shower Curb
A waterproof shower curb has always been difficult to achieve, before surface-applied waterproofing systems appeared on the scene. Even with these systems they are still a common failure point due to sloppy and incorrect installation techniques.
With all the corners involved, and the constant exposure to water, constructed shower curbs have always been a real test of skill and patience, even for pros.
What's important for wood framed curbs:
- Proper curb wrapping so the waterproof layer is continuous over the top and down both sides
- Avoiding fasteners through the inside or top of the curb (when attaching a liner)
- Making sure all transitions at the curb-to-wall and curb-to-floor connections are fully sealed, preferably using seam tape and pre-formed inside corners.
The very safest, and my recommended strategy is to skip the curb construction altogether, and just install a prefab foam shower curb instead. These curbs are constructed entirely from foam so they are completely waterproof.
However, you'll still need to pay attention to the transition joint between the curb and pan. You'll need to put some time, effort and due care into integrating and sealing it against the pan edge.
A curbless shower (walk in shower) is also a great alternative to building a shower with a curb, but it requires reinforcing the floor framing and recessing the shower tray / base, which can increases the cost significantly.
Shower Waterproofing Materials and Products
The performance of any waterproofing system comes down to choosing the right shower waterproofing materials for your particular shower wall, installing them correctly, as well as the temperature and humidity stresses they will be exposed to.
There isn't a single "best" product across every application. The particular product choice matters less than the manner (and quality) in which the wall layers are installed, as well as the thickness of the stud wall, and degree of wall insulation, if it's an outside wall.
Materials Specs Overview:
| Waterproofing System | Waterproofing Method | Vapor Resistance | Thickness Consistency | Installation Complexity | Common Failure Risk |
| Liquid membrane | Roller or Spray-applied | Low-Moderate | Variable | Low-Moderate | Inconsistent coverage |
| Sheet membrane | Thinset bonded | Moderate-High | Uniform | Moderate | Poor seam bonding |
| Foam board system | Integrated waterproof substrate | Low-Moderate | Uniform | Low | Improper seam sealing |
| Traditional liner system | Buried pan liner | Moderate | Uniform | High | Chronic moisture retention |
Liquid Waterproofing Membranes
A liquid membrane shower system is one of the most common approaches simply because installation is a bit easier and less intimidating, especially for DIY'ers.
These waterproof coatings come in a bucket and are applied by rolling, or spraying onto the surface. Once cured, they form a continuous membrane.
The main advantages:
- Conforms easily to irregular shapes and transitions
- Seams are slightly easier to manage than sheet systems
- Quicker to apply than sheet membranes
But performance depends heavily on application.
If the coating is too thin, it won't perform as intended. Too thick, and you risk improper curing. You also have to respect curing time between coats and before tiles are laid.
Bubbling is also a big issue. Bubbles can form in the membrane on some substrates, creating thin areas. This problem only occurs on the first coat, so it can usually be mitigated by first applying a bonding agent before the first coat.
Most issues I've seen with liquid systems come from inconsistent coverage at the seams. Many liquid membrane manufacturers suggest that that mesh tape is not required at the seams, which is a big mistake in my opinion.
The membrane liquid naturally recesses a bit at seams, especially at outside corners. Mesh tape needs to be applied at every seam and corner before application, or you will get inconsistent coverage and risk cracking at the corners.
Liquid vs. Sheet Membrane Comparison Table
| Feature | Liquid Membrane | Sheet Membrane |
| Thickness Consistency | Variable | Factory Controlled |
| Vapor Control | Moderate | Excellent |
| DIY Difficulty | Easier | Moderate |
| Cure Time | Required | Minimal |
| Seam Reliability | Depends on Application | Very Reliable |
| Exterior Wall Suitability | Limited | Excellent |
| Steam Shower Suitability | Limited | Excellent |
Sheet Membranes
Unlike liquid membranes, sheet membrane shower waterproofing systems are completely uniform in thickness and consistency.
These membranes are installed as sheets and bonded to the substrate, with overlapping seams to create a continuous barrier.
Key factors:
- 2-3 inch seam overlaps
- Generally better vapor permeance ratings compared to liquid
- Clean transitions at corners when folded
- Preformed inside and outside corners available
- Custom seals for penetrations available
- Full substrate adhesion via thinset
When installed correctly, sheet systems are very reliable because the membrane thickness is factory-controlled and perm ratings are lab tested.
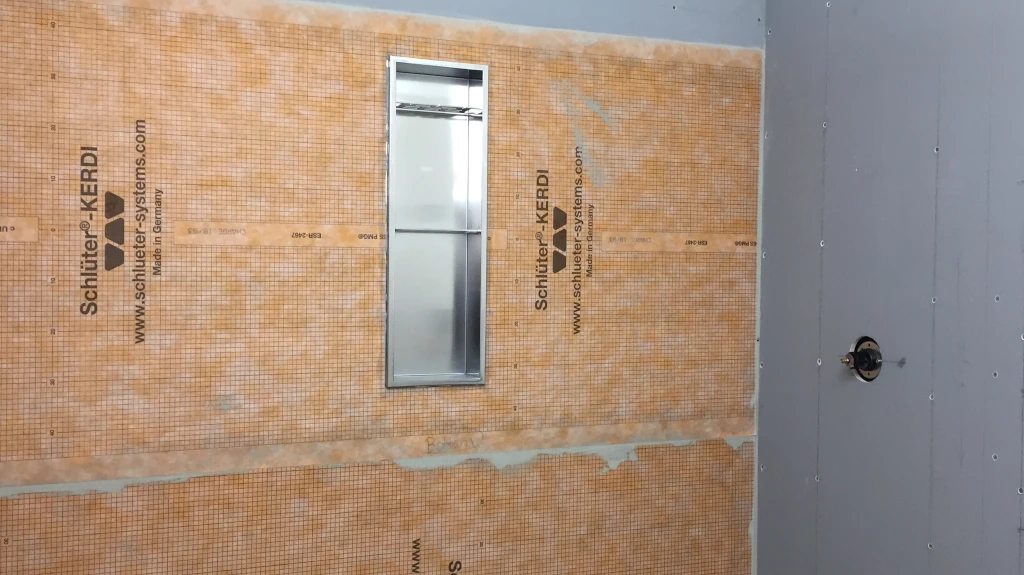
Foam Backer Board Systems
A foam board shower system on the other hand, integrates the substrate and waterproofing layer into one product. These systems are lighter, faster to install, and reduce variables if installed correctly.
Advantages of Foam Backer Board waterproofing:
- integrated waterproofing
- reduced installation variables
- vapor resistance
- lightweight handling
- integrated, easy install drain
- quicker seam sealing (with joint sealant)
- prefab edge and corner components
- system continuity
Curbless shower waterproofing is an excellent example of how foam backer boards shine compared to other systems. Integrated shower pan, drain and wall systems, all connected together with proprietary joint sealant, A fast, efficient, and waterproof assembly that's easy enough for even DIY remodelers.
However, as compelling as these systems are, most of the standard boards have poor vapor permeability (perm rating). As such, they're not appropriate for most outside shower wall installations, or for steam shower waterproofing.
Sealants, Tapes, and Accessories
The supporting components are what tie the system together.
These waterproofing accessories shower components include sealants, tapes, pre-formed corners, valve seals and pipe collars, and polyurethane joint sealant. They're not optional; they're required to complete the assembly.
High-quality, 100 percent pure silicone caulk is recommended for filling all movement joints before tile installation as well as all finished tiled corners. However, it should not be used in place of approved collars and pipe seals to seal plumbing fixture penetrations during the waterproofing stage.
Shower Waterproofing Best Practices (Contractor Summary)
- Use only ANSI A118.10 compliant waterproofing systems
- Use bonded waterproofing systems whenever possible
- Avoid mixing waterproofing systems
- Flood test every shower before tile installation
- Use low-perm membranes on exterior shower walls
- Seal all penetrations with manufacturer-approved collars
- Reinforce all corners and transitions
- Avoid wood-framed curbs and benches where possible
- Use manufacturer-approved drains and accessories
- Never rely on cement board alone for waterproofing
Step-by-Step: How to Waterproof a Shower (Contractor Method)
A proper shower waterproofing process is all about following a few simple rules. I want a fully sealed system with no weak transitions, no pinholes, and no breaks in the membrane layer.
This is the pro method I follow for how to waterproof a shower, step by step.
Step 1 - Prepare the Waterproofing Surface
Good shower prep waterproofing starts with the substrate surface itself. The membrane needs a clean, stable, and properly prepared surface to achieve full adhesion.
When it comes to tile backer boards, whether cement backer, fiber cement, glass mat or foam panels, you don't need to worry at all about surface prep. All these boards were created with this in mind so their surfaces are all treated with bonding agents to ensure solid thinset bonding.
Mortar/Mud bed
Dry pack mortar-bed shower bases are a different story. You need to ensure that your base has no obvious ridges, voids, or weird irregularities that might interfere with thinset bonding, and make sure that it's fully cured. Substrate cleanliness is also a big thing. Make sure the surface is free of all dust, debris, oils.
Then you apply an approved bonding agent to the surface to promote thinset adhesion. I don't do anything fancy here; just a diluted mixture of Weldbond and water (follow directions on package). It works great, and doesn't stink like many solvent-based boding agents do.
Foam Boards
Another important point to mention is that most of the foam boards recommend using their own joint sealant for sealing board seams, corners and fasteners.
This is all good, except I would recommend being careful about fanning the sealant out too widely around fasteners and seams. Thinset does not bond as well to this sealant than it does to the naked board surface, which could affect the bonding of thinset adhered waterproofing membranes.
The sealant manufacturers claim that the membrane can be adhered / glued directly to the sealant covered areas of the board with thinset mortar, but my experience tells me that the bond is not as solid as the clean board surface.
Step 2 - Apply the Waterproofing Membrane
When I apply bonded waterproof membrane shower systems, the goal is continuous coverage with no breaches.
Both liquid membrane and sheet membrane systems can perform well when installed correctly. The difference is usually in application method and detailing precision.
With liquid-applied products, I pay close attention to:
- wet film thickness (3 coats)
- cure times
- pinhole prevention (pre-bond)
- full coverage
With sheet systems, I focus on:
- slightly thinner thinset mix
- 2-3 inch overlaps
- air pocket removal
- thinset adhesion at seams and edges
- sheet wrapping the corners if possible
I always recommend that every pro and DIY'er look over the manufacturer specifications and installation instructions to make sure you don't miss anything.
Step 3 - Reinforce Seams, Corners, and Penetrations
If a waterproofing system is going to fail, seams, corners, and penetrations are the weak points where they will almost always happen.
I always:
- apply seam tape at change of plane and boards margins
- or apply joint sealant at change of plane and boards margins (foam board only)
- apply prefab corners at all inside and outside corners
- seal fasteners with joint sealant or membrane patches
- seal all penetrations with pipe sealing collars and valve seals
Step 4 - Integrate and Seal the Drain Assembly
The shower drain install waterproofing is one of the most critical parts of every shower tile assembly.
My priorities:
- Membrane and drain must be part of the same waterproofing system.
- Bond pan membrane to drain flange with slightly thinned thinset mix.
- Ensure full membrane coverage on drain flange (3-inch overlap).
- Ensure no bubbles or gaps
- Ensure there's adequate thinset thickness for a positive bond.
- NEVER use a clamping ring collar drain with any under-tile, bonded waterproofing membrane system.
Poor drain integration is one of the most common causes of concealed shower leaks.
Step 5 - Perform a Flood Test
I always perform a shower flood test before tile installation begins to guarantee membrane integrity, and code compliance (plumbing inspections are always a part of this process).
The drain is plugged, the shower base is filled with water, and the system remains under a water retention test for typically 24 hours or longer, depending on local code requirements.
During leak testing, I:
- Plug drain with an approved testing plug
- turn off exhaust fan and keep room sealed to reduce evaporation
- mark water level on curb
- check for signs of water under perimeter wall plate(s)
- check for signs of water on ceiling below
A flood test is the final waterproof verification step before the tile assembly gets installed. I'm sure I don't have to tell you how important this step is. It's literally your last chance to make sure the shower floor is sound.
Shower Waterproofing Code Requirements (What every Pros and DIY's Must Know)
Most shower waterproofing code requirements focus on preventing concealed water damage and ensuring the shower assembly can safely contain and direct water to the drain system.
The problem is that code compliance alone does not guarantee a durable installation, especially when the inspection process is not often thorough enough, or it's missed altogether.
As a contractor, the code represents a minimum standard, and the inspection is just a regulatory box to check. Any pro or DIY remodeler needs to make sure that the installation is sound, and not rely on the inspectors as your Quality Control department.
Key Plumbing and Building Codes
The primary shower waterproofing code standards in the United States typically fall under the IRC and UPC, along with local amendments adopted by the jurisdiction having authority.
However, these requirements are incomplete and cover only the minimum requirements of shower base waterproofing under a mortar-bed.
The TCNA has responded to these code deficiencies by establishing the ANSI standards for tile installations in showers (ANSI A118.10). One of the many details covered in these standards are the proper application of bonded waterproof membranes in shower installations.
Shower and shower pan code requirements generally cover:
- approved waterproof materials for shower floors
- proper drain integration (clamping ring collar drains)
- waterproof liner placement
- slope requirements
- flood testing procedures
- minimum curb height
- approved membrane materials
- drain compatibility
- minimum overlap dimensions
- fastening restrictions near the curb and lower wall areas
Below is a summary of the ANSI A118.10 requirements outlined in the TNCA Handbook, specifically the "American National Standard Specifications for Load Bearing, Bonded, Waterproof Membranes for Thin-Set Ceramic Tile and Dimension Stone Installation".
For shower applications specifically, ANSI A118.10-compliant systems generally require:
- Waterproof treatment of:
- walls
- shower floors
- inside corners
- curb/wall transitions
- pipe penetrations
- valve penetrations
- drains
- Proper overlap or seam treatment per manufacturer instructions
- Integration with a compatible drain assembly
- Flood-test capability when required by local code
- Use over approved substrates only
To achieve ANSI A118.10 certification, these membrane performance criteria must be met or exceeded:
- Fungus and Micro-organism Resistance
- Seam Strength (tested under ASTM D751).
- Breaking Strength (tested under ASTM D751)
- Dimensional Stability (tested under ASTM D1204).
- Waterproofness (7-day hydrostatic water pressure test)
Inspection and Flood Testing Requirements
Most jurisdictions require some form of shower inspection waterproofing verification before the tile assembly is installed.
The inspection process usually includes:
- visible membrane inspection
- drain connection verification
- waterproof transition review
- flood testing
A flood test should be performed before tiling by plugging the drain and filling the pan to verify it holds water.
It typically requires the shower base to remain filled for at least 24 hours without measurable water loss. Inspectors may also check for leaks around penetrations, outside corners, or adjacent framing areas.
Regional Variations and Best Practices
Local building codes shower requirements vary more than many installers realize.
Some jurisdictions still focus heavily on traditional PVC liner systems, while others routinely approve bonded sheet membranes or liquid-applied systems. Steam showers often trigger additional vapor management requirements that standard showers do not.
Regional climate also influences best practices. Good perm ratings are important for every outside shower wall (regardless of local climate), but in areas with more radical temperature changes, I always recommend a membrane like Wedi Subliner Dry.
This sheet membrane has an exceptional perm rating of .05 perms. That's 10x better than Schluter Kerdi membrane, and most other standard sheet and liquid membranes.
Before an installation, every DIY or Pro should:
- check the local code
- determine you perm rating requirements
- use only ANSI A118.10 certified waterproofing system
- review and follow membrane manufacturer's recommendations
Why Shower Waterproofing Systems Fail
Most shower waterproofing mistakes are not caused by bad products. They come from sloppy installation or installers combining methods that were never designed to work together.
I've torn out showers that looked perfectly fine on the surface but had major concealed waterproofing failures underneath. In most cases, the problem traced back to a handful of preventable shower installation errors.
Common Waterproofing Shortcuts That Cause Shower Failures
- No Pre-slope
- Incomplete Coverage
- Water Vapor Sandwich
- Not Sealing Penetrations
- Wood Framed Curbs and Benches
- Mixing Products
Combining Water-in, Water-out & Under-tile Systems
- Interstitial Condensation
- Poor Drain Integration
- Poor Niche Installs
- Skipping Flood Test
No pre-slope
As I've already explained above, if you're installing a traditional liner (or hybrid) system for shower floor waterproofing, you're already asking for trouble. If you install it incorrectly, it will make things a lot worse.
One of the most common shower installation errors in traditional liner systems is installing the waterproof liner flat on the subfloor with no pre-slope underneath.
Instead of the slow and steady deterioration associated with these liner systems when they're installed correctly, this type of mistake accelerates the rate of deterioration by several times.
Incomplete Coverage
Incomplete membrane coverage is a shower waterproofing mistake that can easily create hidden failure points.
Incomplete coverage means:
thin liquid membrane application
- bubbling on liquid membrane surfaces
- missed corner seam tape
- no prefab corners installed
- exposed fastener penetrations
- poorly bonded overlaps
- Poor bonding from foot traffic
Important Coverage Rules
If you're applying liquid membrane, make sure all corners are covered with mesh tape before applying the membrane liquid.
If you're applying a sheet membrane, ensure that you use a manufacturer-approved seam tape that's 4-6 inches in width (example: Kerdi Band).
Make sure you also adhere seam tape with a new batch of slightly thinned-out mix of approved thinset, with 1/8-inch square notch trowel (or equivalent) to ensure a secure bond.
These membrane pieces are less forgiving than applying the membrane body, so if your mix has been sitting around awhile, don't use it for the seam and corner tape. Mix some fresh stuff.
Based on manufacturers recommendations, you can often attach seam tape or prefab corners with their own polyurethane sealant material instead of thinset mortar. Some installers prefer this strategy to eliminate the chance of capillary migration, but this requires significantly more curing time, which could delay the setting of tile.
The Water Vapor Sandwich
Waterproofing outside shower walls is much more involved and complicated compared to an inside adjacent shower wall.
Many installers still feel the need to maintain a vapor protection layer between the backer board and the wall studs on outside shower walls. This layer is usually 10 mil vapor retarder plastic sheeting, which is designed to limit moisture transmission into the stud wall.
This strategy is great for every other wall in your home, but not good for the shower, especially if you're also installing a bonded waterproofing membrane over top of your backer board (under the tile layer).
If you decide to employ this two-layer approach, water vapor can easily become trapped between these layers. This is referred to as the water vapor sandwich.
As you already know, if the vapor condenses into water within this layer, you've got big problems.
Not Sealing Penetrations
I see this mistake all the time. Some contractors just don't believe that penetrations need to be sealed with prefab pipe and mixing valve collars. I disagree.
All penetrations should be sealed with these sheet membrane products, regardless which system you are using. Even liquid membrane manufacturers like RedGard sell collars to protect pipe penetrations.
Wood Framed Curbs and Benches
In the past, shower remodelers never had a choice about the structural materials used in shower construction, so highly water exposed areas like benches and curbs were always built with wood or steel framing.
If a membrane breach occurs, liquid water will damage the curb structure and subfloor quickly, the same way it does with shower pans.
Moisture damage can even occur without a membrane breach, due to vapor diffusion.
Even a small amount of moisture can cause swelling in wood curbs and benches, leading to cracked grout lines and tile detachment. Galvanized steel structures last a bit longer, but they will also eventually suffer from corrosion.
Contractor's Note: Always construct shower curbs and benches with prefab foam building board, or simply use the complete foam curbs and benches available from Schluter Systems, Wedi, Laticrete, and other established brands.
Mixing Products
Mixing incompatible waterproofing products creates some of the most difficult failures to diagnose.
Many installers combine drains, sealants, membranes, tapes, or adhesives from different manufacturers without verifying compatibility.
Many of these combinations work out perfectly fine, but others do not, simply because the installer makes the wrong assumption about a particular product's purpose and/or application technique.
I always stick with the complete ANSI certified systems and follow their recommended installation strategy. This reduces installation errors and eliminates guesswork.
Combining Liner & Under-tile Systems
This shower waterproofing mistake is made when a hapless installer decides that two shower floor waterproofing systems must be better than one. Not only is the effort of installing a pan liner system, or drain flashing system completely redundant, these systems can actually create unanticipated new problems.
A common problem in many showers is a backup of water in the drain line, causing water to pool on the shower floor. If this kind of backup occurs, even temporarily, it can cause water to enter the weep holes and weeping channels in your clamping drain. I call this problem the "Reverse Weeping Effect".
Instead of water exiting the weep holes in traditional pan liner or hybrid drain flashing systems, water gets pushed into the weep holes via hydrostatic pressure and pulled into the weeping channels via capillary action, as water floods the space between the drain body and clamping ring. It then gets pulled into the system even further when it contacts the pea gravel and/or mud base.
When the mud base (or divot) gets wet, it also starts a cycle of fungal growth and deterioration, similar to the standard mud base installation.
This problem is not necessarily an inevitable result of this hybrid install, but it is very likely to happen if the drain backs up, even temporarily.
Interstitial Condensation
Another potential problem with this installation strategy is the risk of interstitial condensation.
If the shower happens to be on a second floor, and the lower floor temp. is relatively cool, then the mud base may become cool enough to condense the water vapor that diffuses into it from the wet shower above.
It is yet another way that this hybrid approach can trap moisture between the two waterproofing layers and cause the same deterioration problems described in the section above.
Definition:
Interstitial Condensation occurs when moist air permeates through elements of the building fabric, across which there is a temperature difference, when warm, moist, internal air moves towards the cooler outer parts of external walls, driven by a pressure difference. If the temperature drops sufficiently, the dew point may be reached within the fabric and condensation will occur.
Poor Drain Integration
Proper installation and integration of the shower drain assembly to the waterproofing membrane is crucial, as it connects the waterproofing shower system to the drainage system, ensuring effective water management.
The drain assembly can be a common source of leaks, even if you’ve installed an under-tile membrane system with the correct bonded flange drain, so the membrane needs to be bonded perfectly to the drain.
My priorities:
- Using only the manufacturer approved bonded flange drain, NEVER a clamping ring collar drain (with either pan membrane or drain flashing methods)
- Correct thinset consistency and coverage on flange to ensure a secure membrane overlap bond.
- The membrane fully covers the bonding flange (3 inch overlap)
- No gaps or voids
If this connection isn't done correctly, water will travel down the drain body and into the substructure. This is one of the few areas where even a small installation error can lead to an immediate leak point.
I only ever install the bonded flange drain that belongs with the particular system I choose to install. If you don't do this, the drain assembly won't fit right, and you'll void the manufacturer's warrantee.
Drain Coupling Problems
Even though this is technically part of the drainage assembly rather than the waterproofing system, it's a common cause of under-shower water leaks, so it's worth mentioning.
This type of leak is caused by not correctly attaching the vertical waste drain to the shower drain assembly under your shower. I actually see this quite often.
Sometimes the drain pipe is too short and not fully seated into the drain hub. Sometimes the pipe was just friction fitted into the hub and the plumber forgot to solvent weld it. I've also seen banded couplings that were fitted improperly, and others that were overtightened during install, causing them to eventually fracture.
All of these were basically caused by a sloppy plumbing job. In other words, poor workmanship; a disturbingly common theme in shower installations, and in the industry in general.
Poor niche installs
A poorly build custom niche is one of the most common install errors when remodeling a shower.
Niches and shelves can be a great addition to most showers, if constructed correctly. But niches can also concentrate water exposure, so they require precise waterproof detailing to avoid probelms.
Some common custom shower niche waterproofing mistakes include:
- not sloping base of niche
- poorly sealed seams and corners
- fastener penetrations (custom niches)
- missing perimeter reinforcement (especially horizontal niches)
- Niche installed in outside wall (high vapor condensation risk)
- Installing niche in the splash zone (membrane never dries)
- Installing the wrong shelf (more seams and corners)
I slope all horizontal surfaces slightly outward, and fully integrate the waterproofing around every corner and seam. These details directly affect long-term durability and reduce callbacks. See my complete shower niche guide for more info.
Critical Waterproofing Areas Around a Shower Niche
Contractor's Tip: This is one reason that many contractors now prefer prefab foam niche products with in-grout niche shelving, and even safer options like the prefab, finished shower niche. They pretty much eliminate waterproofing transitions and reduce long-term leak risk (and callbacks) compared to fully site-built niches.
Skipping flood test
Skipping the flood test saves almost no time and creates major risk.
A shower can appear fully waterproof while still having:
- pinholes
- weak drain connections
- corner separation
- membrane damage
I always perform a flood test before the tile assembly covers the system. Finding leaks after installation usually means demolition, not repair.
How Long Does Shower Waterproofing Last?
How long does shower waterproofing last? In a properly built shower, the waterproofing system should last for decades. I've seen well-executed waterproof assemblies that look and function great for 10 to 15 years or more without major issues.
Lifespan by system
Different systems have slightly different durability profiles, but basically all ANSI certified membranes, if installed correctly, will have a similar lifespan since they're all tested to perform well when installed under tile, in a shower environment.
Traditional liner systems can also perform adequately for many years if the slope, liner / drainage pan, and drain integration are done perfectly. However, these are not lifetime systems (see explanation above).
In contrast, modern sheet membranes and liquid-applied systems offer excellent waterproofing durability shower performance when installed according to manufacturer specifications and should easily last for decades with virtually no deterioration.
The durable under-tile membrane systems share a few characteristics:
- proper drain integration
- monolithic waterproof coverage
- reinforced transitions
- compatible system components
- low perm ratings
Signs of failure re: water leak
Early signs of waterproofing failure are often subtle.
I look for:
- persistent grout discoloration
- recurring mildew odors
- loose tile in and around the shower
- swelling at adjacent trim or drywall
- moisture staining outside the shower
- cracked sealant at transitions
- Water damage on lower floor ceiling
Once water escapes beyond the waterproofing layer, concealed structural damage can develop long before the visible symptoms become severe.
Signs of Failure Re: Wall Assembly
Another type of failure that's much more difficult to identify, is when water vapor from the shower space penetrates into the shower wall cavity and condenses into water. This is not a failure of the tile assembly per se. It's a failure of the wall assembly behind the tile layer, and it includes the waterproofing membrane.
If any of your shower walls are outside walls, you must choose the correct, bonded waterproof membrane system with an appropriate perm rating, to prevent water vapor from condensing in the wall cavity. The location in the wall assembly layers where this occurs is referred to as the Dew Point.
Dew Point: When water vapor saturated air penetrates the shower wall and moves toward the outside layers of the wall structure, it cools causing vapor density to fall, and relative humidity (RH) to rise. As the air continues to move and cool, it reaches a temp. where RH is 100 percent and water vapor condenses into liquid water.
Past the Membrane
In addition to the membrane, other wall components can help avoid condensation problems in the wall.
Adequate wall insulation is required in the stud cavities behind the tile assemble to increase the thermal gradient in this space. This is super important because it directly affects the location of the dew point.
As you can imagine, this becomes quite complicated due to the various factors involved. That's why I always recommend that every DIY remodeler, and every inexperienced Pro consult your local building inspection office, or a pro with extensive knowledge in this area, during the planning stage of you shower remodel.
Ignoring this could result in the wrong material choices and/ or the wrong installation strategies, resulting in the same water damage problems mentioned previously.
Cost of Shower Waterproofing
The cost to waterproof a shower varies widely depending on the system being used, size of the shower space, complexity of the layout, and installation quality.
In most professional remodels, waterproofing represents a relatively small portion of the total shower budget, but it is one of the highest-value parts of the assembly.
Material Costs by System
Traditional liner systems usually have the lowest material cost. PVC or CPE liners, clamping drains, and associated components are relatively inexpensive, but they require more site-built detailing and proper slope preparation.
Liquid-applied membranes typically fall into the mid-range category. Material costs include:
- membrane thickness (how many coats)
- reinforcement products (fiber mesh tape)
- primer requirements
- total coverage area
- mixing valve and pipe collars
Sheet membrane systems generally carry higher upfront material cost because they include:
- bonded membranes
- specialty drains
- seam tape
- preformed corners
- mixing valve and pipe collars
Many contractors (like me) prefer sheet membranes for their controlled membrane thickness and superior perm ratings.
Labor Costs (Contractor vs DIY)
Labor cost usually exceeds material cost in a properly waterproofed shower. In other words, there is a lot of careful work involved so you need to be confident that you have the skills and experience to tackle this job before deciding to forgo the contractor approach.
Professional waterproofing work requires:
- substrate preparation (not always)
- membrane application
- drain integration
- seam reinforcement
- flood testing
- cure time management
Complex layouts with benches, niches, multiple penetrations, or steam applications increase labor significantly because every penetration and corner requires the installation of membrane tape (or mesh tape), mixing valve and pipe collars, and prefab membrane corners.
Cost of Failure
The financial impact of waterproofing failure is usually far greater than the original shower waterproofing cost.
Once water escapes beyond the membrane layer, repairs often involve:
- replacement of entire tile assembly including tile backer
- mold remediation
- drying the substructure (big delays)
- framing repairs
- adjacent room wall board replacement
A failed waterproof assembly can easily turn a modest DIY labor and/or materials savings into a multi-thousand-dollar rebuild.
Choosing the Right Waterproofing System for Your Project
For most modern showers, bonded sheet membrane and foam board waterproofing systems are generally considered the most reliable in terms of long-term performance, because they offer consistent membrane thickness, integrated waterproofing components, and fewer opportunities for installation error.
However, the best shower waterproofing system always depends on the project type, the shower location in the home (any outside walls), installation experience, and layout complexity.
KISS Strategy
As a professional I usually take the simplest and safest approach in my shower builds. If the shower is located on the perimeter of the house (outside walls), I will basically always suggest using a sheet membrane with the best perm rating (lowest perm).
If the shower has no outside walls, I'm a little more open to the homeowner's budgetary concerns but initially, I will always suggest the Wedi foam panel shower system. I've installed this system many times in regular showers and curbless shower (walk in shower) installs, as long as all the shower walls were interior adjacent.
However, foam board shower systems are a bit more costly than most standard, non-foam waterproofing systems. I think the Wedi system in particular, stands out in terms of performance vs cost.
Choosing the Right System - Table
| Project Type | Recommended System |
| DIY shower with interior walls | Foam board or liquid membrane |
| Exterior shower wall | Low-perm sheet membrane |
| Steam shower | Ultra-low perm sheet membrane |
| Curbless shower with interior walls | Foam Board System |
| Budget remodel | Liquid membrane system |
If you're planning a custom shower remodel, this is the stage where waterproofing decisions become permanent. Drain selection, membrane type, niche layout, and storage integration all affect long-term durability.
I always recommend finalizing waterproofing strategy before tile selection or layout begins.
Best Systems for DIY Projects
For most advanced DIY installers, I generally recommend foam systems if the shower has only inside walls because it's just easier and there is no extra waterproofing step after backer board install.
If budget is an issue, I usually recommend a liquid membrane because it's a bit less intimidating and more convenient to the average DIY renovator, and these jobs don't require ultra-low perm ratings.
Liquid-applied systems can work well for DIY projects, but they require careful attention to wet film thickness, cure times, and reinforcement in the corners and penetration.
I frequently see DIY waterproofing failures caused by membranes applied too thin or inconsistently, so I always emphasize the importance of patience, and following the application instructions carefully.
However, if the shower has any outside walls, I will always recommend a standard backer board product with a low perm sheet membrane system, because low perm ratings are much more important, and membrane consistency and coverage is easier to verify visually:
- overlaps are visible
- membrane coverage is easy to confirm
- preformed corners/ seals protect high risk zones
Best Systems for Professional Installations
As I mentioned before, I usually take the easiest, and safest approach to most shower builds (with outside walls), simply because I like to avoid the complex calculations and discussions with homeowner needed to justify the extra cost to of eliminating the risk of vapor condensation in the shower wall.
In professional installations, system selection usually depends on install time, workflow efficiency, and project specifications.
Many contractors prefer bonded sheet membrane systems for:
- predictable membrane thickness
- integrated drain assemblies
- vapor management control
- reliable flood testing performance
However, liquid-applied membranes remain common in some custom work because they adapt well to irregular layouts, curved surfaces, and complex penetrations.
I choose systems based on how well they maintain continuous waterproof coverage throughout the entire assembly, not based on brand loyalty alone.
Waterproofing a Steam Shower
When you're planning this type of project, you need to be certain that your steam shower waterproofing membrane installation skills are excellent. If this isn't you, then you won't be able to handle the steam shower specific detailing required, and you should not attempt this project.
In steam showers, water vapor diffuses into the surrounding walls via a vapor drive force that's much stronger than any normal shower, due to very high temperature and vapor pressure.
This vapor diffusion force is difficult to manage for ordinary waterproofing membrane systems, so an ultra-low perm sheet membrane is required to keep the majority of the vapor out of the shower wall, and prevent it from condensing inside the wall cavity.
For this project, you'll need:
- steam shower membrane (.05 or lower)
- whole room vapor control
- ceiling vapor-proofing
- steam-specific detailing
You can also expect to waterproof (vapor-proof) the entire room that surrounds the steam shower, since vapor pressure and temperature will also be elevated in these areas.
You should also locate your steam shower in an area with only inside adjacent walls. The vapor drive force is too high to consider building it with any outside adjacent walls, especially in Northern regions with larger seasonal temperature swings.
Shower Storage and Waterproofing (Often Overlooked)
Storage features add convenience to a shower, but they also introduce some of the most common waterproofing failure points in the entire assembly. Every niche, shelf, bracket, or accessory increases waterproofing complexity and creates additional transitions that must remain fully sealed over time.
I pay close attention to these details because poorly integrated shower storage is a major source of concealed leaks and callbacks.
How Niches Affect Waterproofing Complexity
Waterproofing a custom shower niche (not prefab) requires far more detailing than the rest of the shower wall, but it is possible to build a waterproof shower niche with a bit of care and attention.
A niche creates:
- multiple inside corners
- horizontal surfaces
- overlap transitions
- additional seam intersections
These areas concentrate water exposure and slow drying and the bigger the niche, the more problematic these issue become. If the waterproofing is botched, water can get behind these weak zones and directly into the wall framing.
I always slope niche bottoms slightly outwards to prevent standing water. If the bottom is not sloped or even inadequately sloped (not 1/4 inch per foot), this could be very bad news over the long run, if the waterproofing was not completed carefully and correctly.
Even when the niche bottom waterproofing has been done perfectly, the tile surface never gets a chance to fully dry, especially when the shower is used twice a day by one or more family members. This is often exacerbated by a textured surface with multiple grout lines where water tends to pool.
This amounts to a brutal assault on the waterproofing membrane under the tile surface. In other words, you'd better waterproof these surfaces carefully, and get it right the first time.
If you'd like more info on shower niche options and installation, check out my Complete Shower Niche Guide.
Waterproofing Around Shelves and Accessories
Shower shelf waterproofing becomes more complicated whenever fasteners or penetrations pass through the waterproofing layer.
Some screw-in floating shelves, glass shelf clips, door hardware, and accessory anchors all create potential leak paths if they need to be secured to the wall framing behind the tile assembly and the waterproofing membrane.
This attachment requires drilling deep enough through these layers to reach the wall stud, which causes a breach in the waterproofing layer. I avoid unnecessary penetrations whenever possible, but when they're required, I ensure that:
- penetrations are fully sealed
- compatible sealants are used
- keep shelf mounting holes away from corners, board seams
If tiled niche shelves are preferred over the more popular low profile shelf style, this also increases leak risk by introducing many more corners and transitions that are difficult to access, and must be carefully waterproofed.
Best Practices for Leak-Proof Storage Integration
The best leak prevention strategy is to eliminate shelf mounting holes altogether and installing prefabricated niche product whenever possible.
For reliable storage integration, I try to:
- install only prefab foam niches (like Kerdi SN and Wedi Niche)
- install only in-grout shelves (corner shelves and niche shelves)
- keep niche install location away from the splash zone
- apply a bonding agent in all screw holes
- use pure silicone to seal screw hole penetrations
Most storage-related failures are caused by breaches in both the tile layer and waterproofing layer; when tiled corners have not been caulked, and when waterproofing has been incorrectly attached, or skipped altogether.
Key Shower Waterproofing Takeaways
- Waterproofing failures are usually installation failures
- Surface-applied waterproofing systems outperform traditional liner systems
- Exterior shower walls require careful vapor management
- Drain integration is one of the highest-risk leak points
- Flood testing should never be skipped
- Niches, curbs, and benches require extra waterproofing attention
- System components from different brands should not be considered compatible
- Proper waterproofing dramatically reduces long-term repair costs
Frequently Asked Questions About Shower Waterproofing
Do I need to waterproof cement board?
Yes. Cement board is water-resistant but not waterproof, so it must be covered with a waterproofing membrane.
Can I tile over drywall?
No, drywall is not suitable for wet areas even when protected by a waterproofing membrane. However, you can tile over it in low moisture areas like a kitchen backsplash or feature wall.
What is the best waterproofing system for a tiled shower?
Surface-applied sheet membranes are the best for outside adjacent shower walls. Foam backer board is generally considered the best for interior adjacent shower walls.
How long should shower waterproofing dry before tile installation?
Depends on the product, but typically 24-48 hours for liquid membranes. Always follow manufacturer guidelines.
What happens if a shower is not waterproofed correctly?
Water can get into the substructure and/or water vapor can condense in the shower wall. Both can cause fungal growth, rot, and structural damage.
Is RedGard enough to waterproof a shower?
Yes, Redgard is enough to waterproof a shower as long as you follow the manufacturer's application instructions, reinforce all corners and seams with mesh tape, and only install on interior adjacent shower walls.
What is the best waterproof membrane for a shower?
My favorite is Wedi Subliner Dry due to its very low perm rating however; there are several good sheet and liquid waterproofing system options. Your choice will depend on your budget, structural conditions, local climate, job specifications, skill set, and brand bias.
How thick should shower waterproofing membrane be?
Membrane thickness varies depending on whether sheet or liquid, but vapor permeance is the important factor to account for, not membrane thickness. Generally, membranes with low perm ratings for outside walls--higher perm OK for inside walls.
Do shower walls need a vapor barrier?
A vapor barrier should not be included in a shower wall assembly if a surface applied under-tile waterproofing membrane is also installed. Moisture can get trapped between the two layers.
Should shower waterproofing go on top of or behind cement board?
Waterproofing should only be applied to the surface of the backer board in order to separate the tile layer from the backer board.
Can water get behind properly installed shower tile?
Yes, but only if the membrane surface under the tile becomes a "dew point". This means that the temperature on the membrane is low enough to allow water vapor to condense. More commonly, water gets behind tile through unsealed cementitious grout, and cracks in the grout lines.
Can mold grow behind shower tile?
Yes, when thinset coverage is poor, and when water enters via poorly sealed and cracked grout lines. This can also occur when the wall structure is constructed in a way that allows water vapor to condense behind the tile.
Do steam showers require different waterproofing?
Yes. The increased temperature and vapor density in a steam shower creates a much stronger vapor drive than an ordinary shower. This requires a waterproofing membrane with ultra-low vapor permeance (perm rating) to prevent vapor condensation in the wall cavity.
Can I mix waterproofing systems from different manufacturers?
No. You will always void the manufacturer's warrantees if you don't stick with their system exclusively. It is technically possible if you really understand these systems well, but it's not worth the risk in my opinion.
What perm rating is recommended for shower waterproofing?
For interior adjacent shower wall waterproofing, .75 perms is adequate. For exterior adjacent shower walls, .20 perms or less would be the safest for most US climates (assuming 2x4 or 2x6 fully insulated stud walls). For steam showers, I would recommend .05 perms or less (sheet membrane only).
What kind of shower system is required for a walk in shower waterproofing?
I would recommend a foam shower system for walk in shower waterproofing because the shower pan is paired/ integrated into the system, which eliminates shower pan construction and waterproofing, the most difficult part of any walk in shower installation.
Should the floor outside my shower be waterproofed?
In the course of your shower remodel project, if you decide on removing the flooring surrounding your bathroom shower, and redoing the tile, you should indeed install a waterproof tile underlayment like Schluter Ditra before you lay your tile.

About the Author
Steve G is a professional bathroom remodeling contractor with extensive hands-on experience building and waterproofing custom showers. As co-founder of Redblock Industries, he specializes in designing durable, high-performance shower systems and stainless steel shower storage solutions.
Steve has installed dozens of shower wall systems using cement board, fiber cement, and modern waterproofing membranes, giving him real-world insight into what works — and what fails — over time. His content focuses on helping homeowners, advanced DIYers, and contractors build longer-lasting, problem-free showers.
Learn more about Redblock Industries’ approach to product design, affiliate relationships, and transparency on our Affiliate Disclosure page.


