
Learning how to tile a shower is not as complicated as most people think, but the installation quality depends heavily on layout planning and proper installation technique.
In this guide, I'll walk you through the professional methods I use to install shower wall tile, shower floor tile, niches, corners, and movement joints while avoiding the most common shower tile installation mistakes.
You'll also learn:
- how to plan a clean tile layout
- how to avoid lippage and uneven grout lines
- how to achieve proper thinset mortar coverage
- how to tile a shower floor correctly
- how to prevent cracked grout and loose tile
- all the details to improve the durability of your entire installation.
Whether you are a contractor or an advanced DIY remodeler, the goal is the same: build a shower tile installation that looks clean, drains properly, and still performs years from now.
Quick Answer: How to Tile a Shower
Tiling a shower involves:
- Assessing flattenness of shower wall, repair if necessary
- Assessing rigidy of subfloor, reinforce if necessary
- Assessing Waterproofing integrity, repair if necessary
- Planning the tile layout carefully
- Drawing horizontal reference lines on wall
- Installing shower floor tile first
- Installing back wall wall tile
- Installing tile trim
- Installing side waall tile
- Grouting and sealing movement joints with silicone
A successful shower tile installation depends on substrate and waterproofing intrity, as much as it does tile layout, technique and design.
Topics (with links):
- Understanding the Basics
- Correct Shower Tile Installation Sequence
- Why Shower Tile Installations Fail
- Types of Tiles Suitable for Shower Walls and Floors
- Essential Tools and Materials
- How to Tile a Shower - Preparation
- Waterproofing Membrane Essentials
- How to Tile a Shower - Step by Step
- Finishing Touches
- Cleaning Tips
- Troubleshooting Common Problems
- Common Problems and Maintenance
- FAQ's
- Conclusion
- Comments
Understanding the Basics
Before diving into the details of how to tile a shower, it's crucial to grasp the fundamentals.
When approaching how to tile a shower wall, you need to start out with a solid, flat framing surface. Then you need to install a rigid tile backer board (cement board or equivalent) and waterproof the whole thing meticulously. Then you can feel confident installing tiles on the shower wall.
Before you lay your shower tile on the shower pan, you also need to pay attention to a few important things. It's critically important to be sure that the shower base has adequate framing support beneath. Any deflection in the substrate can cause tile and grout cracking and loose tiles (de-lamination). Basically, a disaster.
If the shower pan is a prefab, you need to carefully waterproof the pan/wall margin. The surface of these prefabs are essentially waterproof so you generally don't need to worry about the pan itself. You do, however, need to be concerned about the wall-pan margin and the drain assembly. The wrong drain assembly, or a shoddy drain installation, can lead to disaster as well. Just make sure you carefully follow the manufacturer's install instructions.
The steps prior to tiling matter more than most people realize. Every step of the shower build helps create a better quality, and more attractive tile installation:
- framing affects backer board flatness, which affects tile registration
- waterproofing layer can provide decoupling advantages
- waterproofing can enhance mortar bonding
- layout planning affects tile alignment
- tile installation affects water drainage and reliance on membrane
If one stage is rushed or skipped, the problems usually compound into tile installation issues later.
Correct Shower Tile Installation Sequence
- Ensure substrates are flat and floor is reinforced
- Inspect waterproofing and repair if necessary
- Plan your tile layout
- First row dry-fit test on floor and walls
- Shower pan tiling
- Shower wall tiling (back wall first)
- Grout the tile
- Seal and caulk
This sequence is considered best practice because each stage protects the next one. Structure and waterproofing must be inspected and repaired, if necessary before tile installation begins.
Layout lines must be finalized before mortar is mixed. Floor tile is usually installed before wall tile to ensure correct surface water flow pathways.
I also strongly recommend dry-fitting critical tile rows before installation begins, especially when using large format tile, patterned tile, niches, benches, or linear drains. Small layout adjustments early in the project can prevent major visual problems later.
Shower Tiling Stages and Common Mistakes:
| Stage | Purpose | Common DIY Mistake |
|---|---|---|
| Assess flatness of framing | Prevent lippage | Ignoring bowed studs |
| Determine framing rigidty | Prevent Substrate flexure | Grout Grout cracking, Loose Tile |
| Dry-fit layout | Avoid sliver cuts | Installing without planning |
| Tile shower floor | Create drainage base | Poor drain symmetry |
| Tile shower walls | Complete vertical surfaces | Not leveling first tile row |
| Grout and silicone | Seal the tile assembly | Grouting corners |
Why Shower Tile Installations Fail (And How to Avoid Failure)
Most shower tile failures are not caused by the tile itself. They usually start with moisture management problems, movement issues, or installation shortcuts hidden behind the finished surface.
I regularly see failures caused by:
- missing waterproof membranes
- poorly built shower pans
- inadequate thinset application
- grouting instead of caulking the corners
These problems often stay hidden until mold growth, swelling, staining, or structural damage becomes visible outside the shower.
Skipped Waterproofing
One of the most common shower waterproofing failures come from skipping the waterproofing.
Cement backer boards are water-resistant, but they still absorb and transmit moisture. Without a proper waterproofing membrane, moisture can eventually reach the framing, insulation, and surrounding materials behind the tile assembly.
Around niches and benches is the most problematic in terms of waterproofing. This is where many leaks occur when waterproofing is missed or installed incorrectly.
Improper Shower Pan Slope
A shower floor that does not slope properly toward the drain will eventually develop standing water problems.
Even small low spots can create:
- slow drainage
- mineral build-up
- mildew growth
- slippery surfaces
- persistent moisture exposure beneath the tile assembly
The shower floor should maintain a consistent slope toward the drain of 1/4 inch per foot to prevent standing water. This becomes even more important when installing large format tile or linear drain systems where drainage tolerances are tighter.
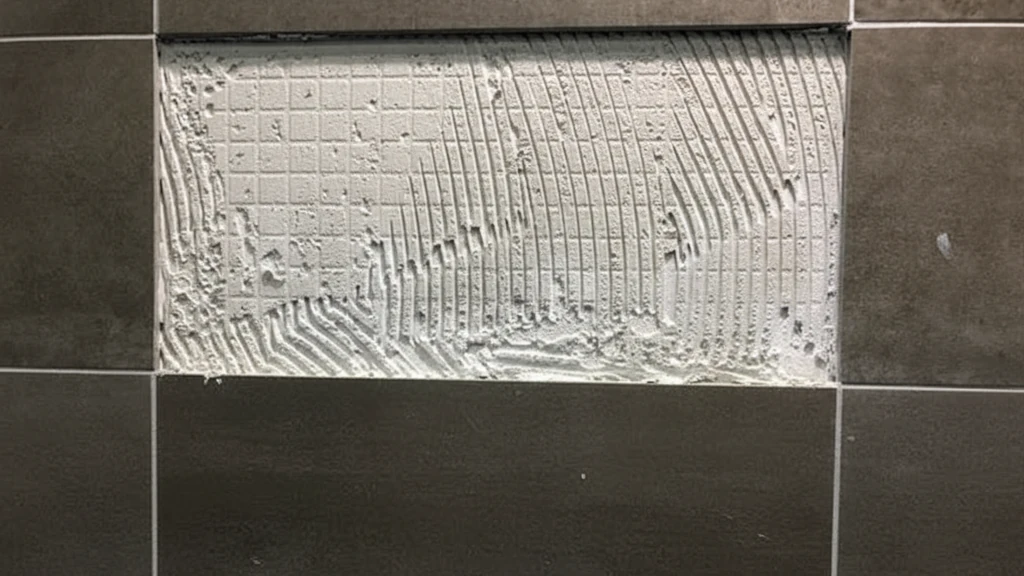
Poor Thinset Coverage
Poor mortar coverage is one of the leading causes of loose tile and premature tile failure.
This usually happens when:
- the wrong trowel size is used
- mortar is mixed improperly
- tiles are not back-buttered
- mortar skins over before tile placement
- installers fail to collapse the mortar ridges correctly
In wet areas like showers, proper thinset mortar coverage is critical because voids beneath the tile can trap moisture and weaken the bond over time.
Large format tile installations are particularly sensitive to coverage problems because air can more easily get trapped underneath, especially when the tile is cupped slightly, or when mortar ridges change direction under the tile.
Tile Movement and Cracking
Tile assemblies constantly expand and contract from:
- temperature changes
- moisture exposure
- framing movement
- structural settling
Movement joints in the shower are basically only the wall to floor margins. Because the wall assemblies and floor assemblies are constructed differently, and are on different planes, they move differently when exposed to the stresses mentioned above.
I commonly see cracked grout lines where installers decided to grout the corners instead of using flexible silicone sealant in these corners.
Skipping the Flood Test
After the waterproofing is completed and before you begin tiling, it's always a good idea to flood test the pan by filling it with water to confirm there are no leaks. Even if you are confident with your installation, you should always complete this step.
I am embarrassed to admit that in my early years as a remodelling contractor that I made this mistake, and paid dearly for it... literally ($$).
Common Tile Installation Failures - Table
| Failure | Common Cause | Result |
| Cracked grout | Substrate flexure | Water intrusion |
| Loose tile | Poor thinset coverage | Tile failure |
| Mold growth | Grout not sealed | Stains, grout damage |
Types of Tiles Suitable for Shower Walls and Floors
When most people learn how to tile a shower, they're often confused about what type of tile to install on their shower wall, and shower floor.
The most popular choice is Ceramic tile because it's often the most affordable and has the widest array of styles. It's not as moisture resistance as porcelain tiles but can still be a reliable choice along with a good waterproofing membrane.
Porcelain tiles, a denser relative of ceramic tiles, offer exceptional durability and moisture resistance, making it ideal for both shower walls and floors.
Most stone tiles are not manufactured like ceramic and porcelain tiles. They're cut out of solid stone slabs to create granite tiles, marble tiles, slate tiles and travertine tiles.
Aside from granite, most stone tiles are quite low density, so they absorb moisture more readily (see image), so they stain more easily. As such, these tiles need to be sealed regularly after installation with a good stone/grout sealer
Ad: Some of the text links above are Amazon affiliate links. See affiliate disclosure page for details.

Glass tiles are super popular because of the huge array of colors, unique transparent appearance, and moisture impervious nature. Since glass is completely non-porous, it also allows for less dependence on under-tile waterproofing membranes when combined with a good pre-sealed grout or epoxy grout.
Tile Type Comparison Table
| Tile Type | Moisture Resistance | Maintenance | Best Use |
|---|---|---|---|
| Ceramic | Low-Moderate | Low | Shower walls |
| Porcelain | Excellent | Low | Walls and floors |
| Marble | Moderate | High | Walls and Floors |
| Slate | Moderate | Moderate | Accent areas |
| Glass | Excellent | Low | Feature walls |
Essential Tools and Materials for Tiling a Shower
Every shower build or remodel is always a little better off with porcelain tiles and epoxy grout (or another type of pre-sealed grout). The reason is pretty simple. Using porcelain tiles and epoxy grout are widely recommended for their superior water resistance and low maintenance.
Using a utility knife to score and snap cement board is an effective method for cutting it to size for shower installations, but you can also use an angle grinder with masonry wheel if you can handle the dust.
A laser level is a useful tool for ensuring that tiles are installed level and plumb during the tiling process but an old-fashioned spirit level also does the trick if you don't mind cleaning the thinset off of it after every job.
Below is a complete list of tools and materials generally used in every one of my tiling jobs.
Tools:
- Measuring tape, Spirit level, Chalk line
- Utility Knife
- 1/2" Notched trowel
- Grout float
- Rubber mallet
- Spacers/leveling clips
- Bucket, Grout Sponge
- Wet saw
- Snap Cutter
- Angle Grinder
- Diamond Hole Saw bits
Materials:
- Cement board, Fiber Cement Board, Glass Mat backer board
- Waterproofing membrane,
- Thinset mortar
- Shower tiles
- Pre-sealed grout
- Tile trim
Ad: Some of the text links above are Amazon affiliate links. See affiliate disclosure page for details.
How to Tile a Shower - Preparation Stage
Assessing the Shower Build
This just means checking out the framing and other shower system components to see if everything looks Ok before proceeding. You don't want to have any regrets after you put so much time and effort into your tiling project when you find out later that the waterproofing wasn't done correctly, or your shower floor framing defects too much.
If you're planning to do only a partial remodel of your shower before starting your planned tiling project, you should really "check under the hood" first. You might need to do a few things to correct past mistakes made by a previous contractor.
Things like, waterproofing integrity, excessive deflection of the shower floor, or inadequate stud density in the perimeter shower walls are typical examples.
I'll cover a brief overview of these necessary preparations below, but if you'd like to do more of a deep dive into this topic, feel free to read my DIY walk in shower blog post.
Is your Cement Board Flat?
Preparing to tile a shower can involve repairing and/or fortifying the wall and floor framing. This step is as crucial as the tile installation itself.
Before I begin to lay shower tile, I always inspect and reinforce the wall and floor framing and replace any damaged, or missing support members. This can be a super easy process, or it could take days of repair and prep.
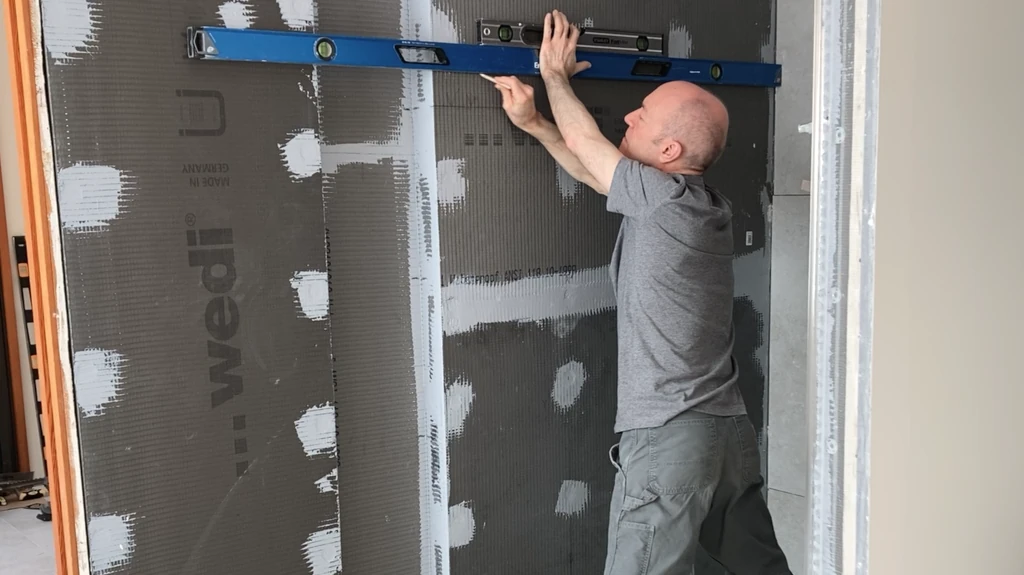
In addition to ensuring the structural rigidity of the stud wall, it's also important that the stud plane is flat before installing cement backer board (or equivalent), to avoid one of the biggest tile installation problems - Tile Lippage. To avoid this problem you need to eliminate as many of the high or low spots as possible on the stud plane.
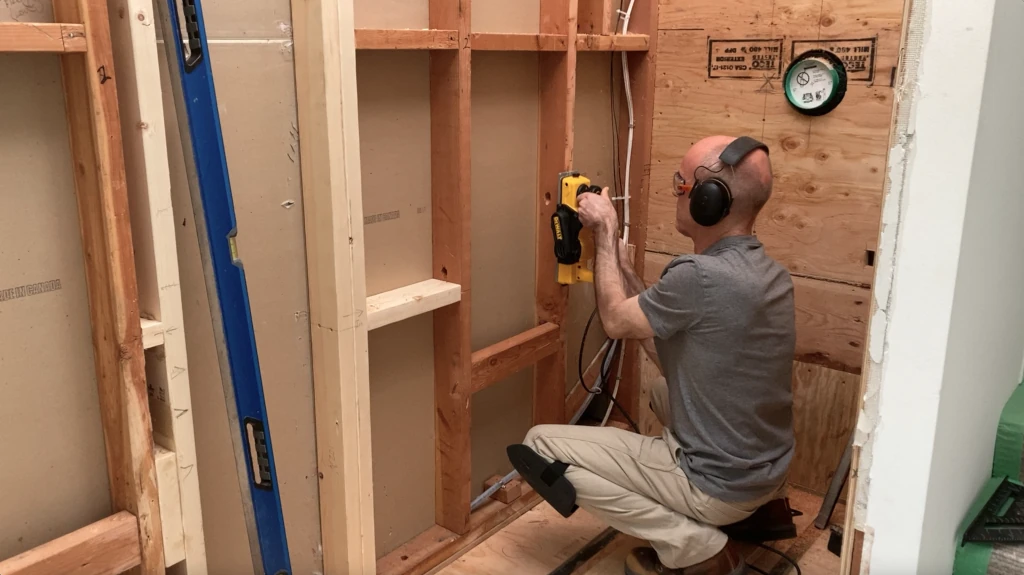
This might involve replacing warped studs to remove the low point, or planing down the high points of existing studs. Although I've found that most people seem very motivated to avoid this task, but I'm telling you that this tedious task will be one of the most important ones in the entire project. Check and double check the stud plane!
![]()
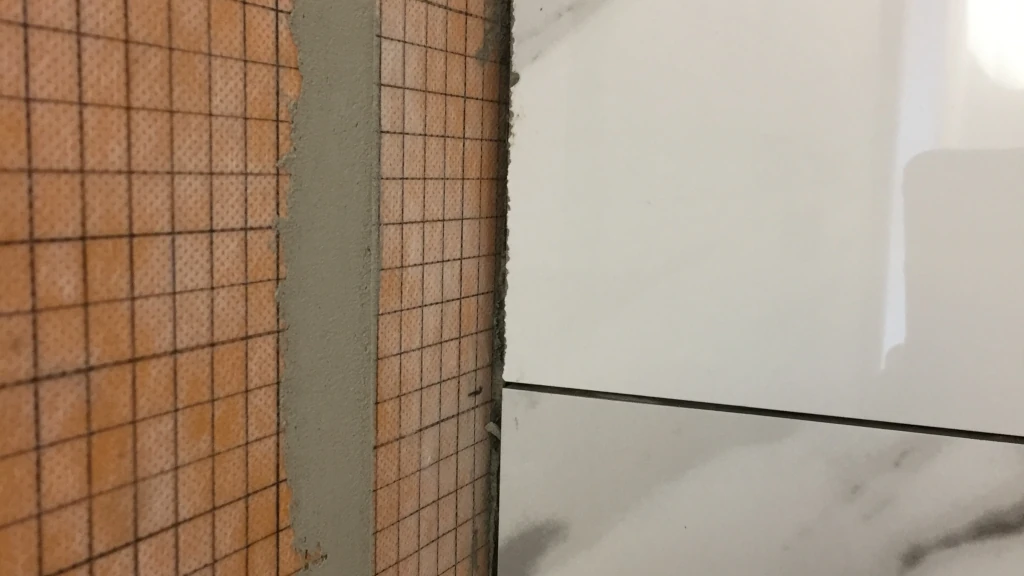
Specifically, lippage occurs when a tile is installed over a raised area (or bump) in the substrate, which raises the tile above the rest of tile plane. When it's raised above the tiles around it, the edges will not line up with those of the surrounding tiles (see image).
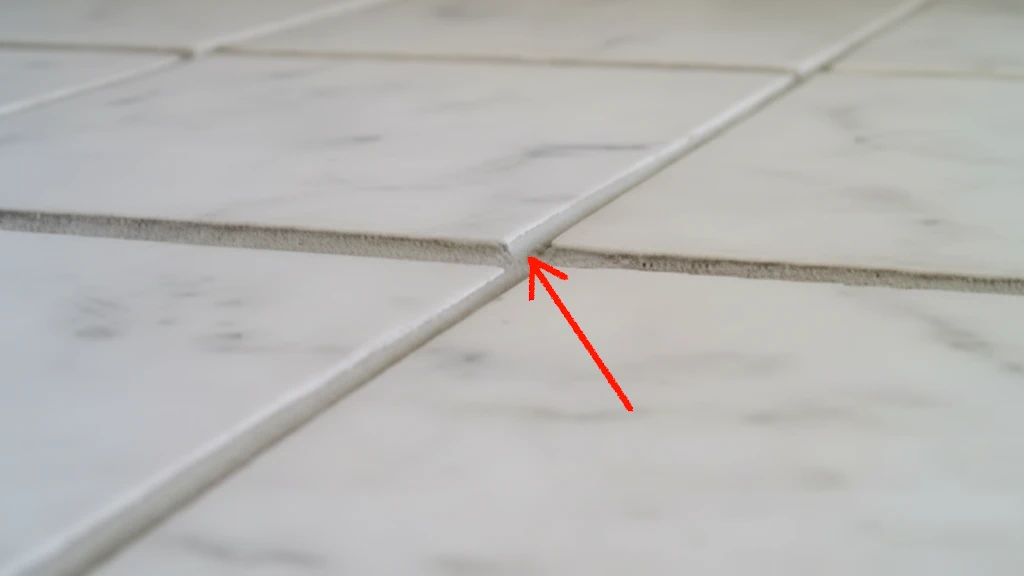
Avoiding Tile Lippage
There are ways to reduce lippage when you're laying shower tile, including laying smaller tiles, or establishing a thicker mortar bed. But the only way to truly eliminate tile lippage is to even-out the stud surface prior to backer board installation. In the image, you can see me flattening the stud surface with an electric planer.
Once this is done, you can confidently install your cement backer board over the wall framing, knowing that when you install your tiles they'll line up perfectly with no lippage.
Contractor Tip: NEVER use drywall instead of tile backer board on the shower wall framing. It absorbs moisture like a sponge and is not structurally rigid enough to support the tile assembly, even if you install a waterproofing membrane over it.
Waterproofing Membrane Essentials
Waterproofing your shower enclosure is essential to protecting your investment and preventing water damage and mold growth in your walls.
Many contractors will start this process by installing a vapor barrier over the outside facing wall studs before installing the backerboard. Trust me... this is a terrible idea if you're also planning to install an under-tile waterproofing membrane. Have you ever heard of the water vapor sandwich? This would be it.
A sheet or liquid waterproof membrane over the backer board and shower pan is arguably the most important part of any tile assembly. If you've installing cement board (or other cementitious backer board), this is an essential next step.
With both types of membranes, you also need to be sure to reinforce seams and corners. If you're applying a liquid membrane you need to use only alkali-resistant mesh tape to the corners and apply at least one extra coat of the liquid membrane over the mesh tape. With sheet membranes, be sure to apply the corner and seam tape carefully, according to the manufacturer's instructions.
Contractor's Note: All my recommendations in this article follow TCNA (Tile Council of North America) professional guidelines and ANSI tile installation standards. That means, if you follow my instructions you'll never have to worry about proper framing support, waterproofing, drainage, movement accommodation, thinset coverage, or code compliance... needless to say.
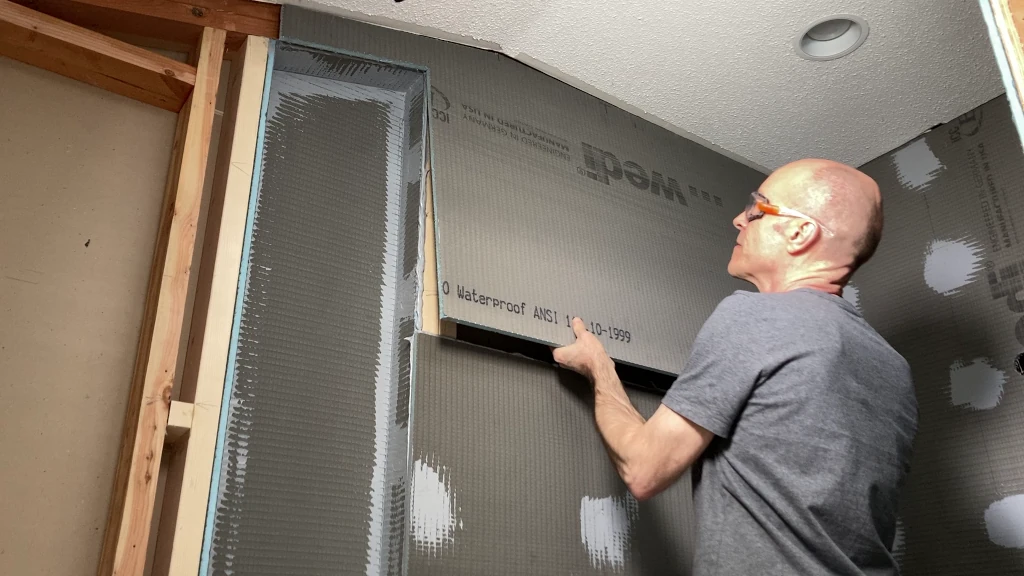
Foam Board Waterproofing
Waterproofing is usually not necessary if you're installing foam shower board shower panels such as those from. You can see me installing them in the image below (Ad: Text link above is an Amazon affiliate link. See affiliate disclosure page for details).
These panels are made of closed-cell foam so they are considered waterproof and can reduce moisture permeance without the need for an additional membrane, as long as you're installing them on an interior shower wall. Relying on these panels for waterproofing an outside shower wall would be a big mistake because the perm rating for these panels is not adequate for most climates in the US.
How to Tile a Shower - Step by Step
Step 1: Planning Your Tile Layout
Tiling a shower requires a meticulous approach to waterproofing and layout to ensure a long-lasting, leak-free finish. So, my advice is to make sure you spend some time on layout planning or you'll definitely regret it later.
Floor Tiles:
You should always consider doing the shower floor tile installation first. This means that you should tile the floor (and grout if possible) before beginning to lay any wall tile. This way, the perimeter floor tile cuts are covered by the wall tiles, and it offers an extra measure of protection against water getting under the floor tile to the substrate.
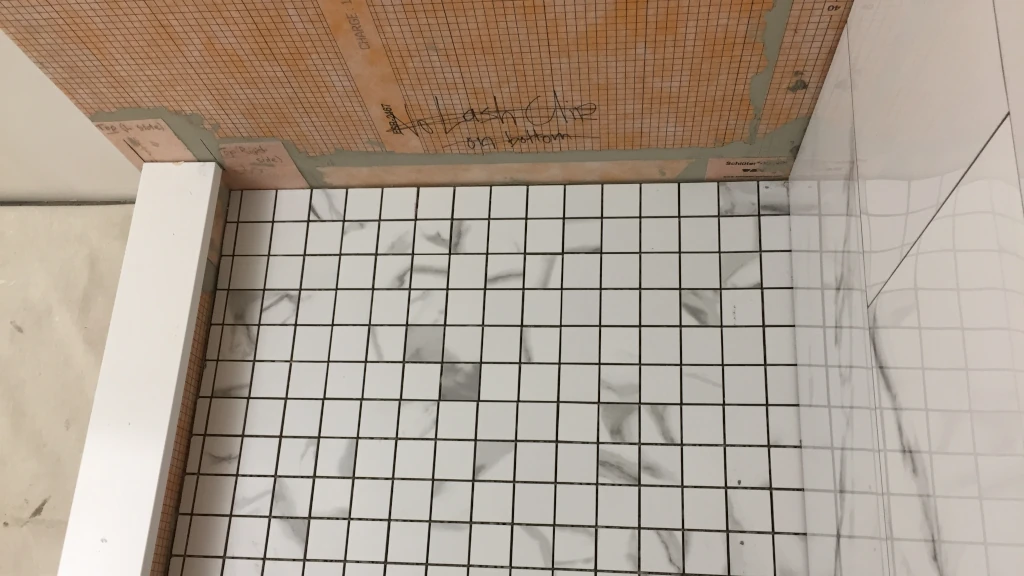
The floor tile layout won't be that important if you're installing smaller mosaics, because it's often less important to create symmetry with these smaller tiles. You do however, have to pay attention to how the mosaics are oriented around the drain. Spend some time on this.
Measure out & cut these tiles around the drain first. Then dry fit them to make sure they're perfect before mixing any mortar. Since the drain is always in plain view, any sloppy tile cuts here will stand out like a sore thumb.
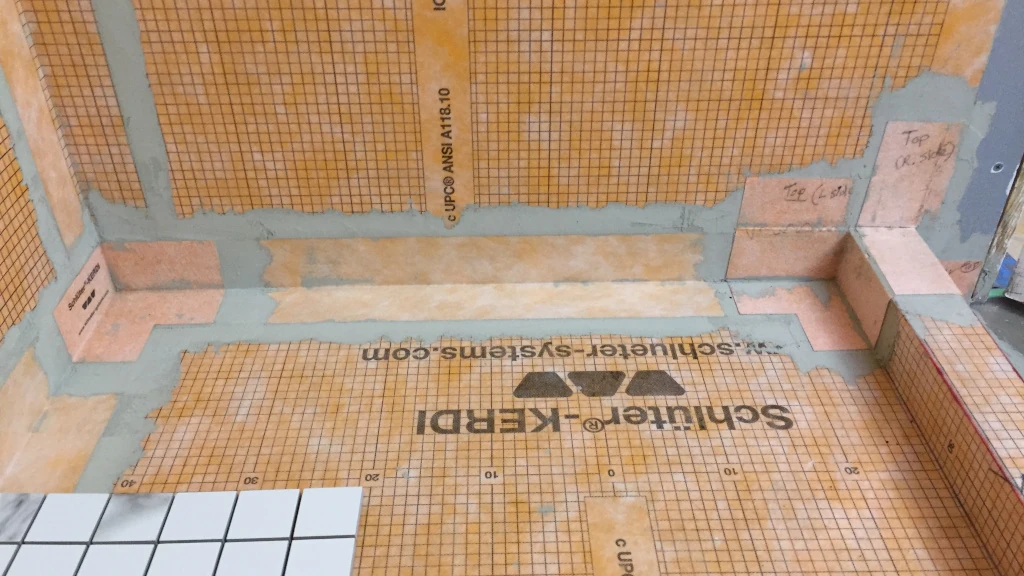
With larger tiles however, planning the layout is extremely important because symmetry is your goal here (especially around the drain and perimeter). So spend some time measuring the pan and laying out your tiles to see how best to orient your tiles. (see image below).
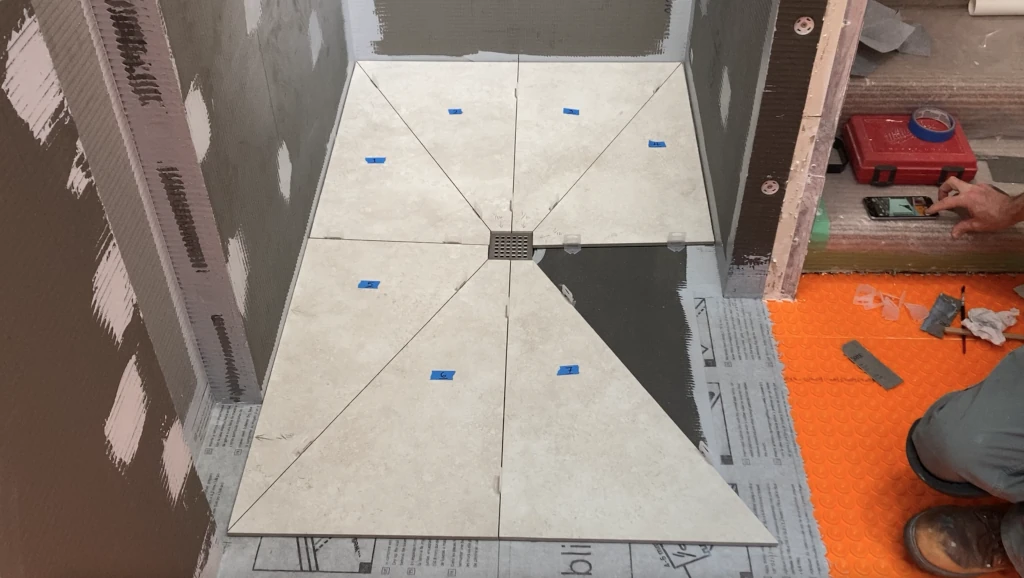
Always leave ¼ inch gap at the edges of your shower floor tile installation, where it meets the shower wall.
Then fill this gap with silicone sealant before grouting the floor, and before tiling the walls. These corners are important movement joints, so silicone belongs here, not grout.
Wall Tiles:
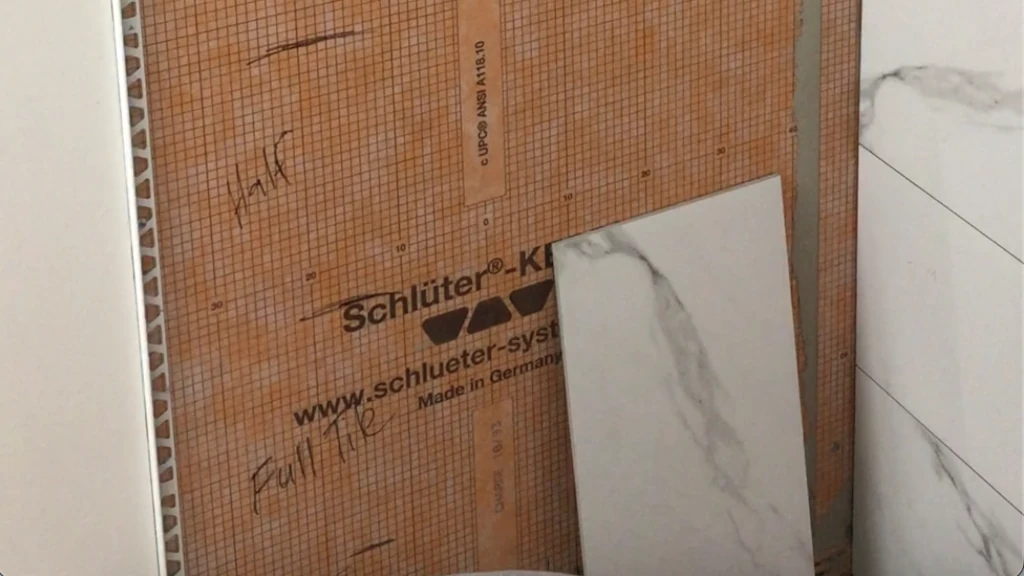
Before laying shower wall tile, I always start by measuring the height and width of each shower wall to figure out how many wall tiles will fit on each wall without creating what I call the "sliver cuts".
These are the awkward thin tile cuts that you end up with on one side of the wall, or above or below the shower niche. These cuts will happen when you neglect to plan out the arrangement of tiles on the wall before starting to lay them.
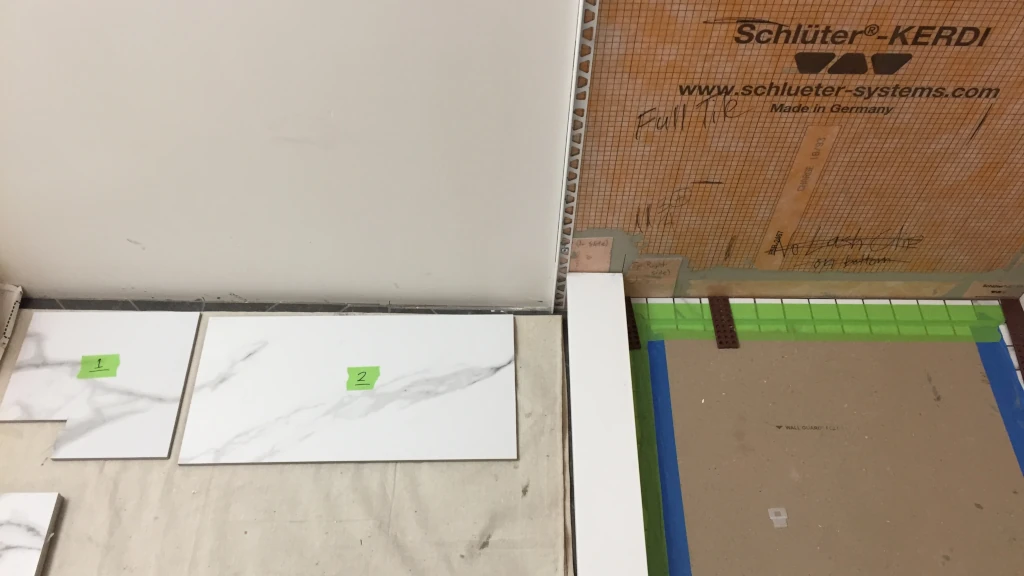
Planning means choosing the tiles your going to use (especially important if they have a repeating pattern), cutting them, and numbering them. In other words, don't try to do this job on the fly (see image).
Use a level and a straight edge (or chalk line) to mark some horizontal lines across each wall to be tiled. I usually space these lines about 2 feet apart but exact spacing is not important. You only use these H lines as a reference, to ensure that your top row of tiles is level and straight relative to your lines.
To prepare for setting the wall tiles, I usually cover the tiled shower base with some brown Rosin Paper to protect it (Ad: Adjacent text link is an Amazon affiliate link. See affiliate disclosure page for details).
Step 2: Thinset Mortar - Types, Mixing, Trowels, and Application
First off, I would recommend that you stay away from any premixed tile mortar, mastic or tile adhesive. These products are great for decorative tile work like your kitchen backsplash, but generally not a good idea for structural tile installations like the shower floor and shower wall.
I usually prefer to use modified thinset rather than unmodified. Modified is simply a mortar that contains polymers (plastics) in addition to the cement and sand in the unmodified version.
The biggest benefit of polymer modified mortars is that they generally have a longer pot life (longer time in bucket) than unmodified mortar. They're also easier to work with on vertical surfaces because they're more sticky with less slumping.
There are many good thinsets out there, but I often use Schluter All-Set, simply because it's the mortar that Schluter Systems created for use under their Kerdi sheet waterproofing membranes.
Mixing Thinset:
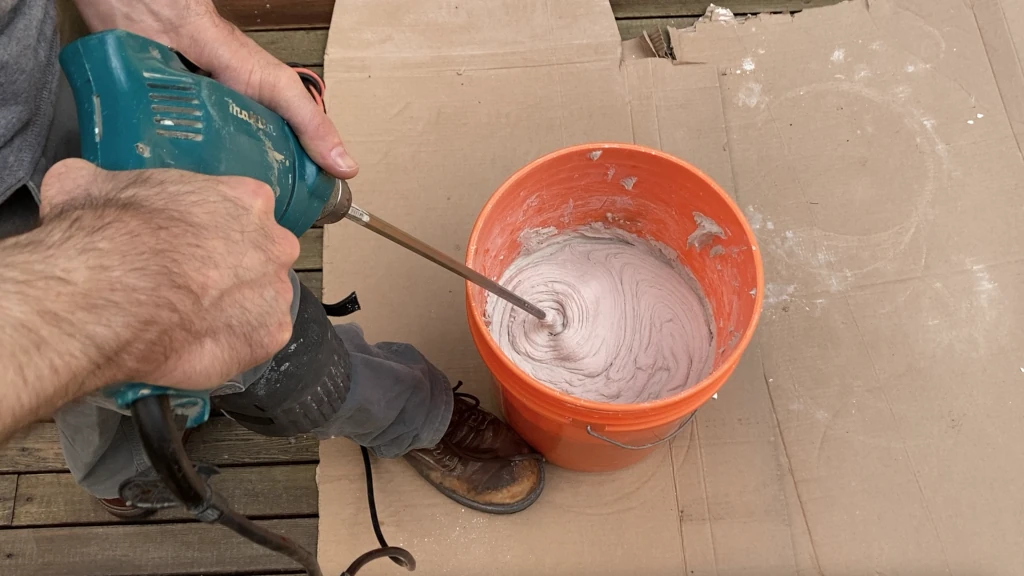
I always pay close attention to mortar consistency. Although most people (including professionals) don't seem all that worried about thinset mortar thickness & consistency, it's actually very important. Thinset mortar that's too thick or too thin can compromise tile bonding and reduce compression strength.
I also recommend that you mix small batches of thinset mortar to avoid waste and ensure that the mortar remains workable within its open time (pot life).
Thinset mortar should be mixed to a creamy, lump-free consistency that holds ridges without slumping.
Contractors Tip: The common reference to "consistency of peanut butter" is not helpful at all. If you want to know exactly how to mix thinset, check out my post: How to mix Thinset.
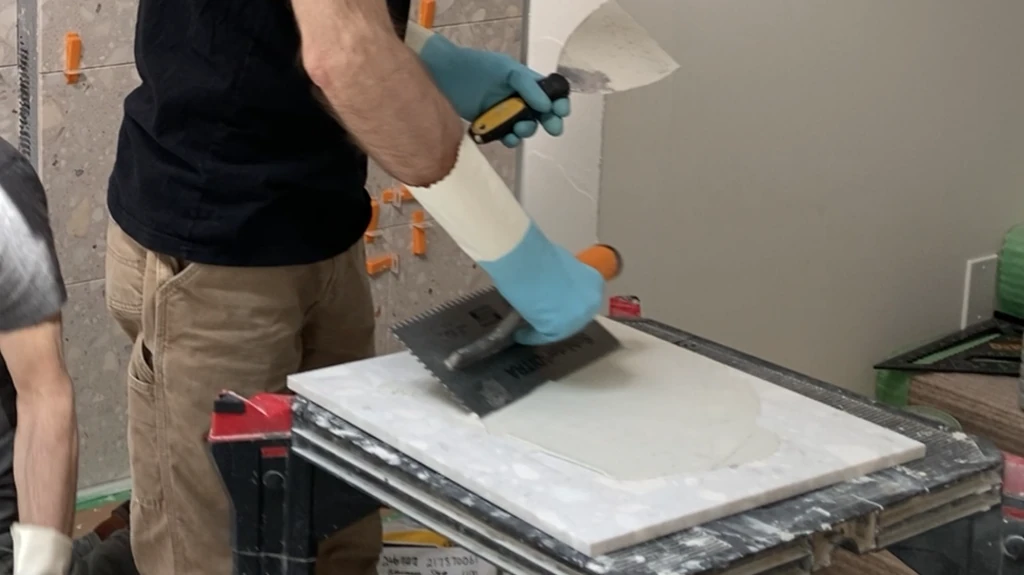
The Correct Trowel for Thinset:
When applying thinset mortar, it is important to use the correct notched trowel.
I mostly prefer to use a 1/2" square notch trowel (see image) when I'm laying one foot square tiles or larger. The larger notch size allows for more vertical tile movement when installing on uneven substrates.
As I mentioned above, an uneven substrate is going to cause tile lippage problems, so a thicker mortar bed will allow you to better match the tile edges over uneven surfaces. For tiles under 1 foot square, I will use a 1/4" x 3/8" or 1/4" x 1/4" trowel. For mosaics, I usually use a 1/8" V-notch.
I also routinely use a 2 inch wide margin trowel to help spread thinset into the corners because the flat side of the notched trowel is a bit awkward and inefficient.
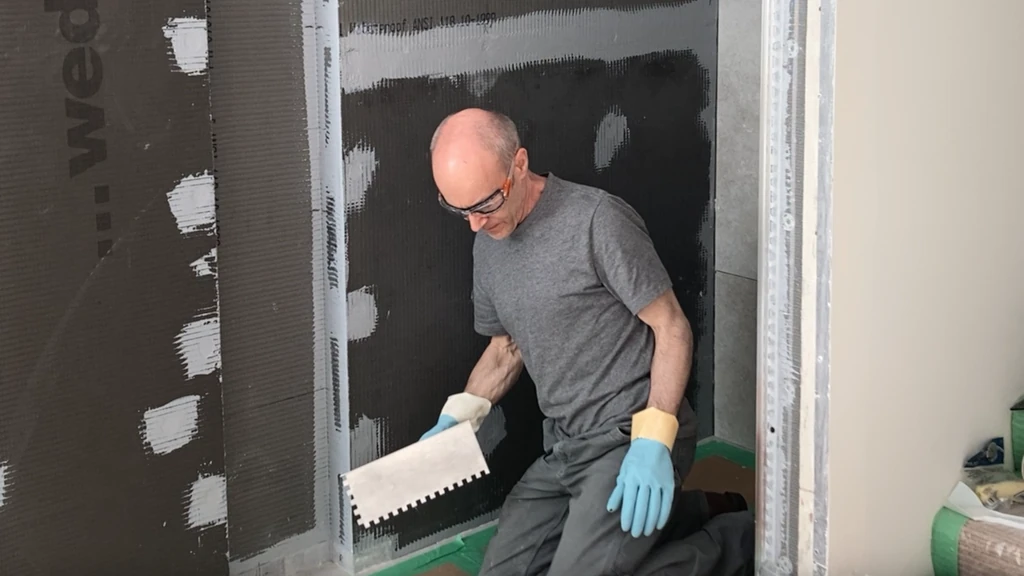
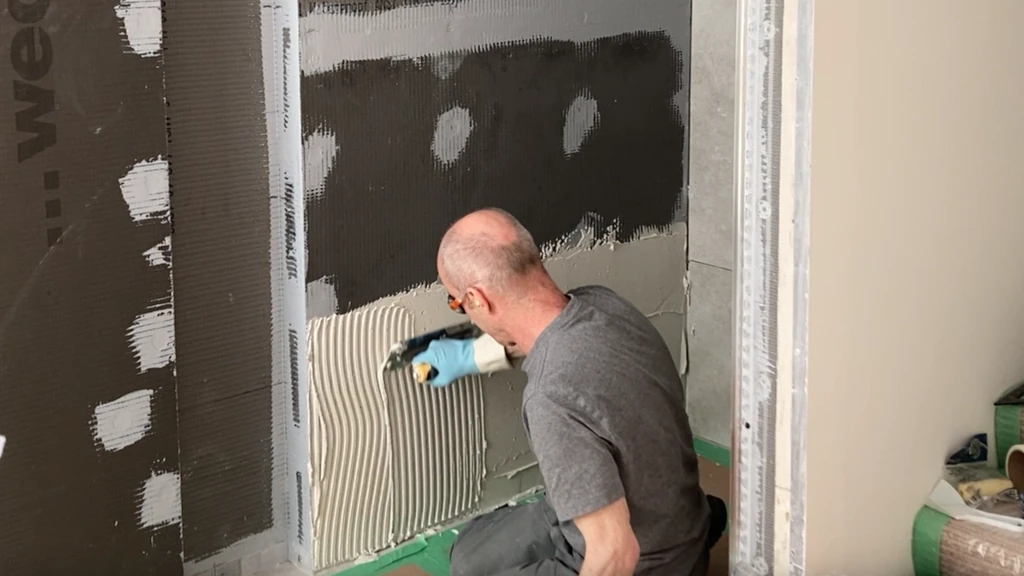
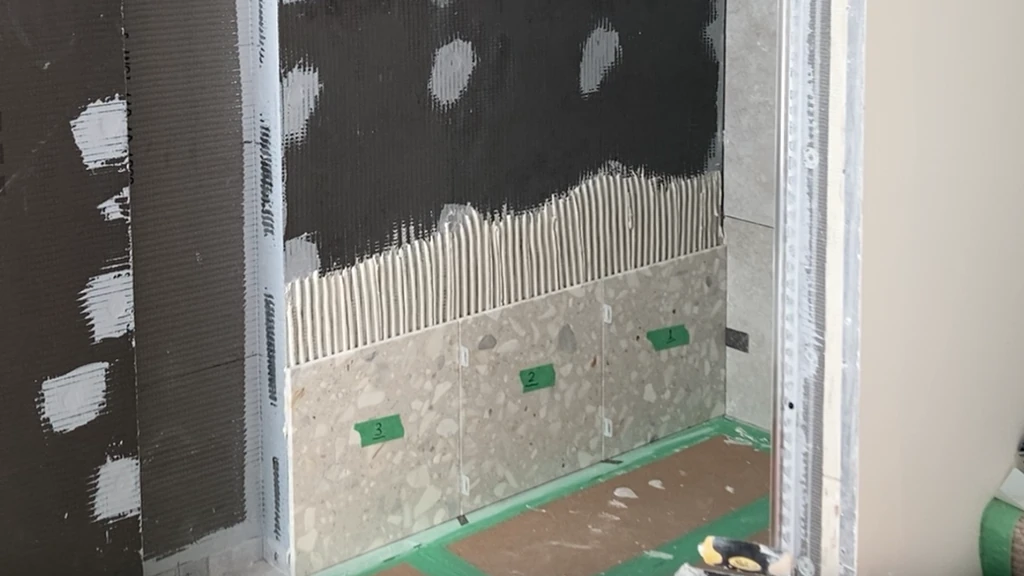
Spreading Thinset Correctly:
When applying thinset mortar, it is important to use the correct notched trowel and hold it at a consistent 45-degree angle to ensure proper adhesion and avoid lippage.
Spread it using the flat side of your notched trowel, just slightly thicker than the trowel notch depth (1/2" deep for 1/2" notched trowel), covering a small section at a time. Avoid spreading too much mortar at once, as it will dry out before you notch it and embed the tiles.
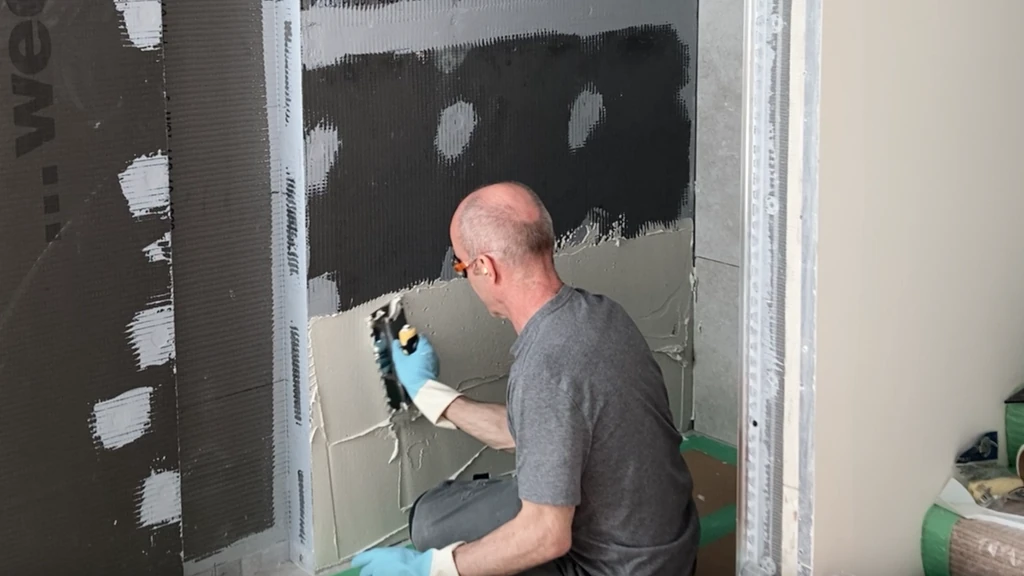
Then with the notched side of the trowel angled roughly 45 degrees to the surface, sweep your trowel across the thinset in a single direction. This allows the raised areas of mortar to collapse and spread over the substrate and the back of the tile.
If the trowel lines change direction under your tile, air between the notches may not escape. With air is trapped under your tile, mortar lines won't collapse fully, which reduces thinset coverage.
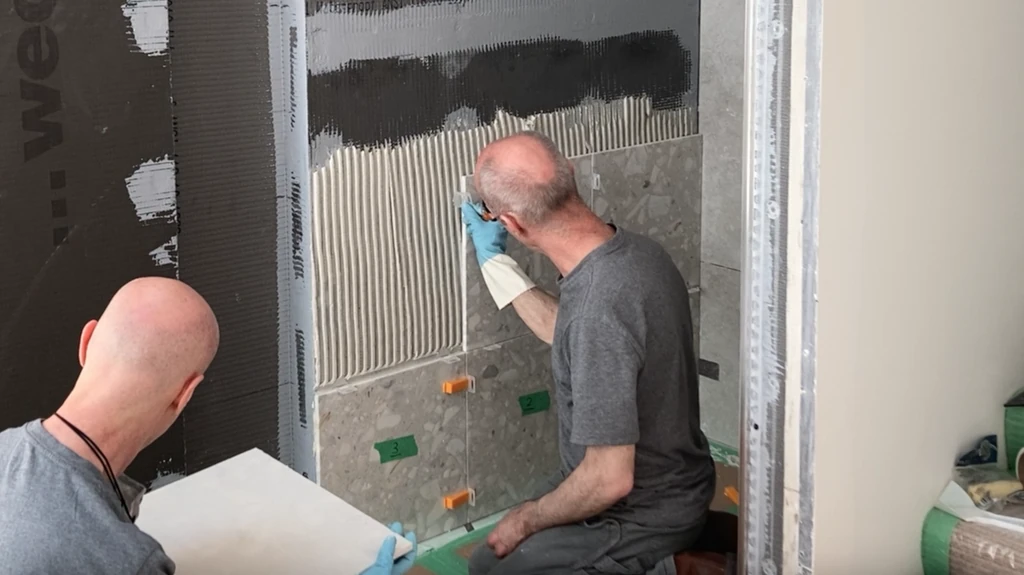
Back Buttering Tile:
Another important step is to back-butter your tiles before setting it into place, especially if you're installing lower density ceramic tiles. Back buttering is simply applying a thin scratch coat of fresh mortar to the back, before setting it into place.
Many types of tiles can extract water out of the mortar after setting, so there's always a risk of a poor tile adhesion, especially if the mortar has skimmed over. So, make sure you ALWAYS back-butter your tiles! You can see my brother Dave back buttering in the image below.
If the tiles are too large to handle, you can use a back-buttering tool called the Back Butter Buddy. It makes back-buttering your tiles a little easier and it's available at most tiling wholesalers or online (Ad: Text link above is an Amazon affiliate link. See affiliate disclosure page for details)
Step 3: Cutting Tiles
To install your tile correctly, and to create a beautiful and satisfying result, you need the cut lines on your tiles to be as accurate and smooth as possible. To accomplish this, I would recommend that you get yourself a wet saw and a good snap cutter.
You can probably get away with just a wet saw with a good diamond cutting blade (see materials list), but it's really best to have both, especially when you're cutting larger tiles. The wet saw just takes too long to make long cuts, and you're always at risk of breaking a tile before, during, and after cutting.
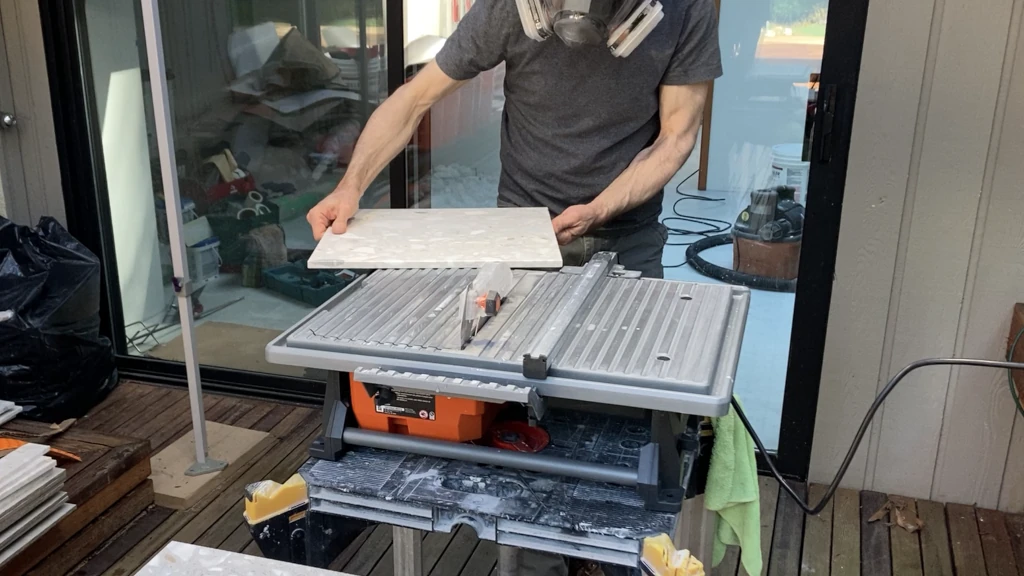
Safety First
Remember to ALWAYS use eye AND ear protection. The shards of tile that come from cutting porcelain are like tiny knives - you don't want to get these in your eyes, needless to say.
And I can tell you from personal experience that most of the "cool" guys on the jobsite that can't be bothered with ear plugs are all at least partially deaf. Don't be stupid. Eye and ear protection should always be your highest priority.
Cutting Holes in Tile:
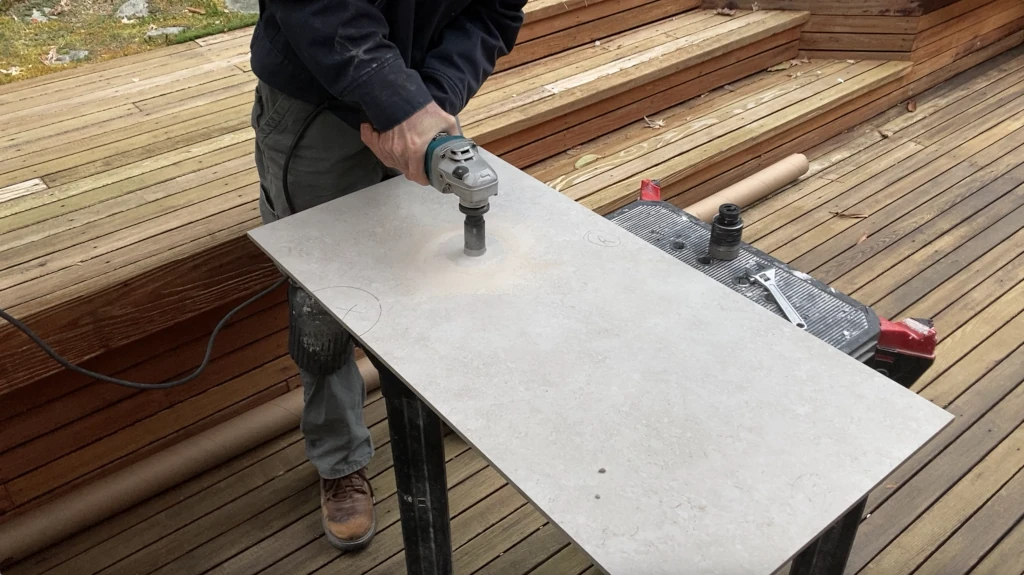
And for cutting round holes for valve bodies, shower heads, etc., you really need an angle grinder with a set of diamond hole saw bits (see my materials list). This tool takes a bit of getting used to, but it's essential for fast and efficient hole cutting into porcelain or ceramic tiles.
And don't use a tile nipper - too many broken tiles. Best to use your angle grinder (with diamond hole saw bits) for curved cuts and holes, or you can use your wet saw for curves on outside edges.
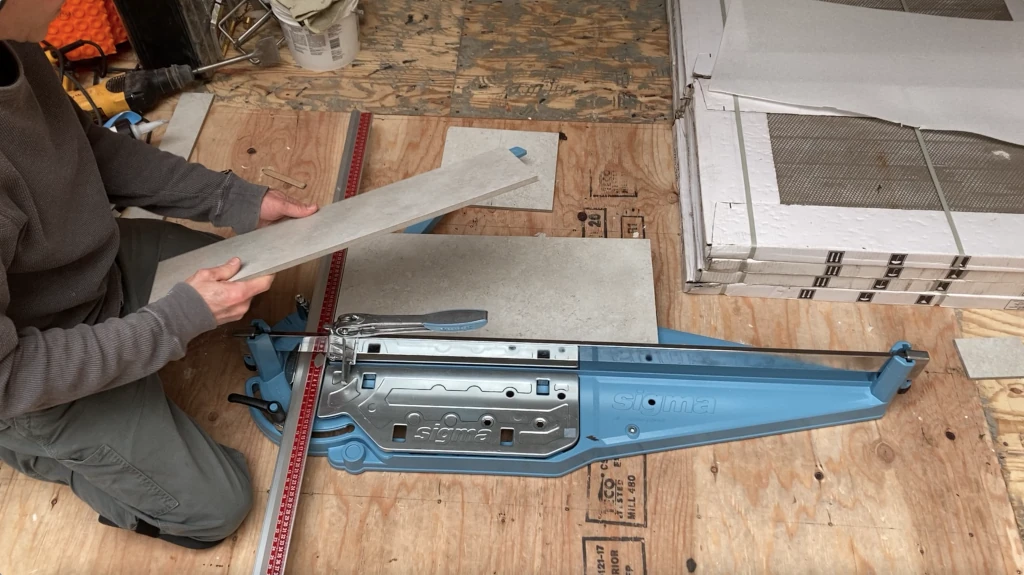
Dry-fit Before Mixing Thinset:
Before I start laying the shower pan tile, I cut, dry fit, and number all of them as a general rule, especially if they are larger than 4".
Keep in mind that this effort is not part of your tile layout planning. This is an important pre-install step that ensures that the first few rows of tile are perfectly level and that the tiles at the end of these rows are the correct size.
Contractor Tip: When laying out tiles, ensure to account for the widths of the grout lines to maintain a consistent and visually appealing pattern.
For the wall tile, I always cut, dry fit, and number, at least the entire bottom row before mixing any mortar. This can be a bit awkward, but I believe it's essential to prepare properly for the rest of the wall tile installation. Your goal is to create a perfectly flat (and level) first row of tiles, so that all the rest of your tile rows will line up well.
Waterproof Shims
To do this, you'll need to prepare some thin, waterproof shims to place at various locations under these tiles to correct for variations in the shower base tile below (see installation section below).
Contractor Tip: My go-to shims are melamine countertop samples from my local home store. I usually just grab a few dozen of these free samples from my local home store. You'll find them in the kitchen cabinet section right next to the kitchen displays. For thinner shims, I use spent utility knife blades.
Back Wall Row End Tile Cuts
Because the back wall tiles will likely be the first shower wall you tackle (see installation section below), your cuts don't have to be very smooth or accurate here (see image). It also means that your cut edges will be at the side wall where they'll be concealed by the side wall tiles. Get it?
When the back wall tiles are done you can measure and pre-cut the side wall tiles. And because your tile trim is already in place (see install info below), and the back wall tile is already installed, these rows will be easy to measure and cut to length.
Step 4: Laying Tile
Shower Floor Tiling
As I mentioned earlier, when I lay shower tile I always do the shower floor tile installation first because this provides a solid and level foundation for the wall tile installation. Even better...grout the shower base tiles as well, prior to laying wall tiles.
This allows you to effectively "water seal" the shower floor before wall tile installation. The reason for this is simply--water running down the finished wall tile will settle at the surface of your shower pan tiles, rather than moving down to the membrane surface. Prioritizing keeping the water away from the membrane is important.
The technique will vary depending on the size of tiles you choose. If you choose smaller mosaic tiles, the process is a bit easier because symmetry is not as important. But as I mentioned earlier, you'll need to focus on setting the tiles around the drain very carefully. The perimeter tiles will not need to be as accurately cut because they'll be covered by the wall tiles after it's installed.
Tile cutting and setting procedure for shower floor tiles is the same in most ways as shower wall tiles. The big difference is in planning and setting the first row of wall tiles. This can take a fair bit of time and cause a bit of frustration when you do it the first time. In this sense, floor tiling is a fair bit easier.
Installing Tile on Shower Curb:
When installing tiles in a bathroom shower, shower curb tiling is always one of the bigger challenges for the diy tile installer (unless you're installing a curbless shower, that is). It's only a small part of your tiling project, but it's a very exposed part, so your tiling expertise (or lack thereof) is right up front for all to see.
The challenge of shower curb tiling is that there's two inside, and two outside corners. The outside corners especially, require very careful cutting and tile edge trim installation that some DIYers are not confident with. There are a few good shower curb tile ideas out there, but here's one technique that I think is the very best....
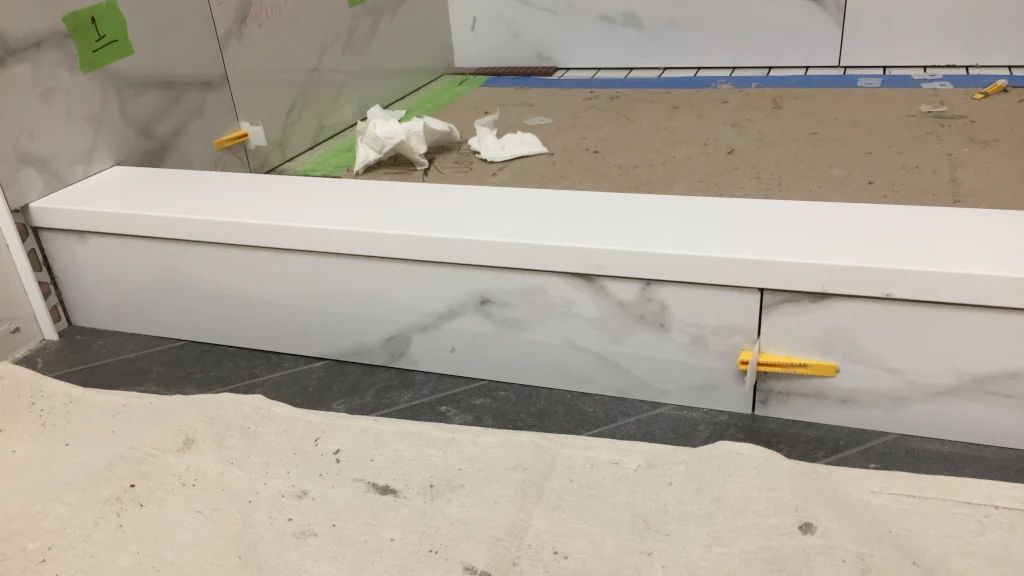
Install a solid stone cap on the top of the curb! You can install a solid marble, granite, or quartz slab, instead of installing tile! Afterwards, you can decide whether to use the same type of stone for the sides of the curb or simply lay tiles there instead. Either way, it's a lot easier than tiling the whole curb.
Not only does this strategy allow you to skip some difficult curb tiling, but it also allows you to carry a fancy design element from the bathroom vanity top, over to the shower area.
Shower Wall Tile Installation
With your shower wall prepped, and your tile layout completed, it's time to start laying shower wall tile.
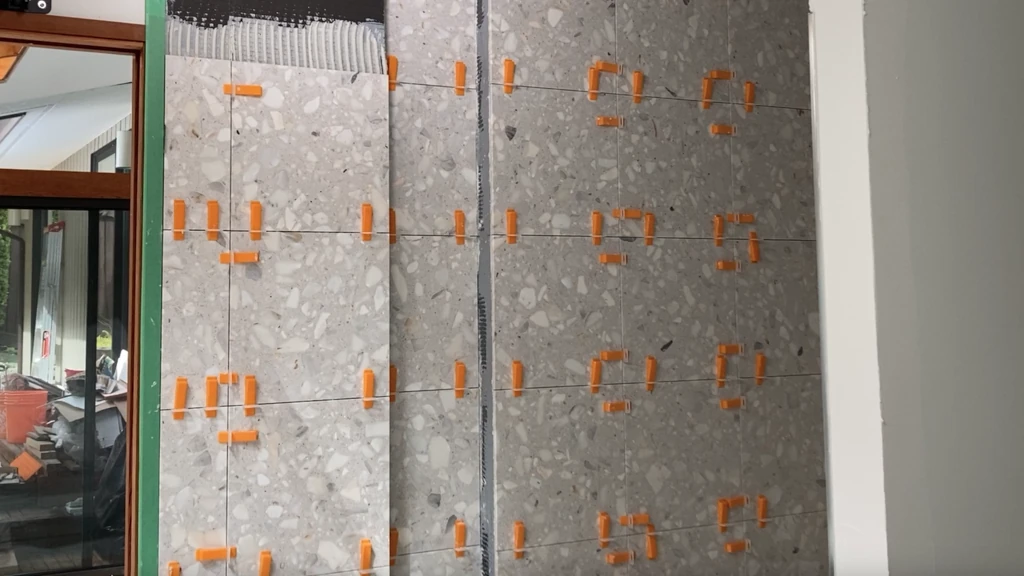
I always recommend using a tile levelling system to reduce tile lippage, and to simply make the job a little easier and less stressful. These clips serve as both tile spacers and lippage reducers.
I use the QEP Extreme clips for every one of my tiling jobs because they are decent quality (see image below). The last thing you want is for these clips to fail because you cheaped out. Tile setting is already stressful enough (Ad: Text link above is an Amazon affiliate link. See affiliate disclosure page for details).
Tile Trim First
Unless you're finishing the edges of your tile installation with bullnose tile, you'll need to install some kind of tile trim on the vertical edges of your shower wall tiles. You may also be installing some trim on the outside corners of your shower curb if you're not installing a solid stone curb cap.
I recommend that you install the vertical pieces of tile edge trim before you start installing the side wall tiles. If you've planned your wall tile layout carefully, and dry fitted some tiles beforehand, you'll know exactly where to place your trim to make your wall tile cutting and setting as easy as possible.
Fixing your tile trim in place beforehand also provides you with a firm, finished vertical edge to push your tiles up against so your tiles don't drift out of plumb as you move up the wall.
I usually place my trim 1″- 4" (horizontally) beyond the tub edge (or shower pan edge), but this is totally up to you as long it's beyond the tub or shower pan edge. Draw a vertical pencil line on both side walls of your shower enclosure where you've chosen to mount your trims.
Then simply glue them in place using a tiny amount of polyurethane adhesive every 6″ or so along the trim. You can fix the trim in place with small pan head screws until the glue dries (Ad: Adjacent text link is an Amazon affiliate link. See affiliate disclosure page for details).
After your trim is firmly in place, and all your shims are prepared for levelling your first row, you can start laying the back wall tile. If you want more detail on this, check out my Tile Edge Trim post.
First Row Tile Installation
To achieve a level and visually appealing layout, it is recommended to start tiling from the back wall and work towards the front, minimizing the visibility of imperfect cuts in corners. In other words, the R & L edges of all the rows will be covered by the side wall tiles when they're installed.
As I mentioned earlier, this means that your row end cuts don't need to be particularly smooth or accurate (see image in the tile cutting section above). It also means that your exposed cut edges will end up on the side wall where they're not as easy to see.
The first row is the most important to ensure that all your rows are level and straight. As I mentioned earlier, you'll need to gather some waterproof shims to place under your first-row tiles to accomplish this (see image).
Application Strategy:
Spread your thin set mortar in preparation to set your bottom row. It won't take long for you to get a feel for how much mortar to spread, but the goal is not to spread too much so it skims over (dries) before you apply your tiles. If it's slightly dry to the touch, you need to remove it, and remix back into the mortar bucket.
Remember to back butter each full tile before setting them into the mortar. Set your first row tiles gently into the mortar bed (without twisting), ensuring that the mortar ridges collapse but not too much to cause thinset to spew out of your grout lines. Although twisting the tile after setting is a common suggestion among tiling pros, it assumes that you're not back-buttering (BB) your tiles. If you BB your tiles, you'll already have the perfect mortar bond so twisting is pointless, and can actually trap air under the tile.
Press each tile into place until its surface is approximately flush with the surrounding tiles, separating them with leveling clips/spacers, and place your leveling shims under each of these first-row tiles where appropriate. Don't forget to place your levelling clips after you set each tile. These clips slide in under each tile edge so you can't put them in later!
Importance of Tile Leveling Clips
As you progress setting the first row you can insert the levelling wedges in place, but only about 3/4 the way in. Pushing them all the way into their clips will bind the tiles together too much at this stage. You still want the tiles to move independently so you can tighten up the grout lines.
As soon as the entire row is set, check for level (against your H reference lines), and place a plastic or wooden spacer at the L side of your row, pressed up against the L side wall. You can now use a prying tool on the R side of the row to tighten the tiles up against the leveling clips/spacers to tighten up the vertical grout line spaces.
Then fix all the leveling wedges in place fully. Check for any tile lippage and adjust accordingly. A rubber mallet is very useful at this stage because some light hammering can re-liquify the mortar slightly to allow the leveling clips to do their job.
Check for level once again, and readjust the tiles with your prying tool if the grout lines need tightening once again, paying special attention the shims you placed under this row earlier. They can sometimes fall out of place when the tiles shift.
After this row is complete, the rest will go like stink, since this row is perfectly level and flat. 😆 That's the way to lay shower tile!
Required Experience - DIY vs Pro
| DIY-Friendly | Requires More Experience |
|---|---|
| Mosaic floor tile | Large format wall tile |
| Basic grout application | Linear drain layout |
| Tile trim installation | Miters and outside corners |
| Small porcelain tile | Marble slab curb caps |
Step 6: Apply Surface Grout, Seal Tiles
After the thinset has cured for at least 24 hours, it's time to apply grout into the grout lines. When grouting, it's always best to mix small batches at first until you know your abilities and speed, starting with about 2 inches of grout in a 5-gallon bucket.
You can choose to mix your own grout if you prefer, but I prefer to use a premixed, pre-sealed grout called Mapei Flecolor CQ when I apply grout. I've been using this grout on all my shower tiling projects for many years now, and I really love it (Ad: Text link above is an Amazon affiliate link. See affiliate disclosure page for details).
Grout Application Strategy
Application of this grout is similar but not exactly the same as a standard sanded or un-sanded grout. Scoop up some grout and apply using a rubber float (grout float), working diagonally across the joints to ensure complete joint fill with no voids, especially around the drain area.
The difference with this pre-sealed grout is that you should only grout a few square feet at a time, or about 5-10 minutes of grouting time (depending on ambient temp.). After applying grout, remove excess grout with a damp sponge, rinsing frequently and avoiding excessive pressure that could pull grout from the joints (rigid square sponge, included with Flexcolor CQ).
You should also ensure to maintain a wet tile surface while sponging. You don't want to leave any opportunity for this grout to firm up. It is VERY difficult to remove this stuff if you've left it for even 20 minutes so to avoid a messy job, you must be organized and efficient with this process.
Make several passes, cleaning the sponge regularly in between, until any resistant material (grit) is removed from the face of the tiles. Do not worry about removing the "cloud" of solvent left on the surface at this stage but I can tell you from experience that you will regret it if you don't remove all the grit as frequently as possible.
You should also try to spend excessive amounts of time spreading and cleaning in the corners, at tile ends, and around protrusions like the shower valve.
These areas are time consuming, so make sure to focus only on the job at hand. Make sure the grout lines are filled, then move on. You want to ensure complete coverage, but you don't need get it perfect on the first pass.
When the grouting and initial cleaning is complete, thoroughly rinse out your sponge and fill a new clean bucket of water. Use this to clean the entire grouted surface again to reduce the solvent haze from the tile surface.
You should be prepared to clean the tile surface one more time after the grout lines have set up a bit more (2-3 hours depending on ambient temp.). A moist microfiber rag does a great job to clean off this final haze.
Grout Sealing
If you decide not to use a pre-sealed grout, sealing the grout lines is an important next step. You'll want to seal your grout lines every two years, even if you're using a very good quality sealer.
I recommend either Stonetech Bulletproof or Drytreat Stainproof sealers. They are both fantastic sealers and you don't want to cheap out on your grout sealer (Ad: Text links above are Amazon affiliate links. See affiliate disclosure page for details).
Expansion joints (better referred to as movement joints) should be filled with 100% silicone caulk instead of grout in corners and joints to allow for movement without cracking. In other words, do not grout change-of-plane joints (90-degree corner for example). They should be filled with flexible, 100% silicone caulk instead.
Grout Comparison Table
| Grout Type | Water Resistance | Maintenance | Best For |
|---|---|---|---|
| Cement grout | Moderate | High | Budget installs |
| Pre-sealed grout | High | Low | Most showers |
| Epoxy grout | Excellent | Very low | Premium showers |
Finishing Touches
In-Grout Shower Storage:
I constantly run into clients that are desperate for more storage in their showers. Some include it as a last step when they realize that they forgot to include adequate shower storage into their shower remodel plan. Others want to re-build or re-tile their showers with that primary objective in mind.
A shower niche (or two) can be a great way to achieve this when you're building a new shower, but you this it has to be included into your shower remodel plan because of stud cavity width and utility interference restrictions, etc.
Some people also prefer not to install a shower niche because they don't like the look, or the idea of a recess in their shower wall. For these people, in-grout shower shelves are the ideal solution, specifically, an in-grout corner shower shelf (see image).
You can install these before grouting, or after the tiling and grouting is complete. They install quickly and easily by any DIY tiler, with no screw holes!
If you want more info on different types of shower storage, please check out my shower shelves
image
Caulking the Corners:
Applying some high-quality silicone caulking to the vertical corners (between adjacent walls), and the horizontal corners (at the shower pan/ wall margin), is essential to maintaining water tightness in your shower.
Even if you've checked all the boxes and installed a under-tile waterproofing membrane, you still need to make sure that water doesn't get behind your tiles.
Start with a good quality 100% silicon sealer like Mapei Mapesil T and a silicon shaping tool. I recommend using the tool because spreading silicon in the corners may sound easy, but it's not. I've seen many good DIY tile installations ruined by a sloppy silicon application (Ad: Text links above are Amazon affiliate links. See affiliate disclosure page for details).
How to Clean and Maintain Shower Tile
After the job is complete and your shower is in service, maintaining the appearance and durability of your tiled shower requires regular cleaning and simple maintenance. After each shower, consider wiping down the tiles with a squeegee or microfiber rag to remove excess water and prevent soap scum and mineral build-up.
For routine cleaning, a mild dish soap solution and a soft-bristled brush works great. For heavier cleaning jobs, I always recommend using baking soda (yes, baking soda) or OxiClean powder, dissolved in warm water (Ad: Adjacent text link is an Amazon affiliate link. See affiliate disclosure page for details).
OxiClean kills bacteria and removes mildew stains as well as bleach does but doesn't stink like bleach. It's also safe to use on metal trims and fixtures unlike bleach, which over time corrodes metal, breaks down grout, and basically destroys everything.
Common Problems and Maintenance
Even with careful planning, DIY tiling projects might present unexpected challenges. Loose tiles, often resulting from inadequate adhesive application, can often be fixed by removing the loose tile, applying fresh adhesive, and resetting the tile in place.
Grout discoloration, another common tiling woe, can stem from factors like improper sealing, harsh cleaning agents, or excessive moisture. Addressing this involves re-grouting or deep cleaning the affected areas, followed by the application of a high-quality grout sealer to prevent future staining.
How to Fix Loose or Cracked Tiles
If you've installed your tiles correctly, you should never see any loose or cracked tiles in your shower. But if you're doing some maintenance on an existing shower, you can replace any loose tiles if you are careful. First step is to carefully remove the grout surrounding the tile using a grout saw and/or utility knife.
Next, tap the tile carefully but firmly on it's surface with a hammer to crack it in several places. Avoid hammering in the same place - your objective here is not to smash it to bits because you risk damaging the membrane and backer board behind it. This is a careful process, so do not attempt if you're not confident you can pull it off.
After the tile shows several cracks, gently pry up the pieces with a small pry bar. DO NOT pry against the adjacent tiles because you will chip or break them. Once all the bits of tile are removed, scrape any old mortar from the substrate using a chisel or putty knife.
Mix a small batch of fresh thinset, and apply a layer to the back of the tile using the appropriate notched trowel. You must also wet the substrate adequately with a thin layer of fresh thinset to ensure a good bond. Then press your new tile firmly back into place, ensuring it's level with the surrounding tiles. Allow the mortar to cure completely, then re-grout.
Avoiding Grout Discoloration and Staining
Preventing grout discoloration and staining is crucial for maintaining a fresh and pristine look in your finished, tiled shower. One of the most effective strategies is grouting with a pre-sealed grout.
If you've installed a regular sanded or non-sanded grout, you'll need to seal the grout lines right after installation (after the grout fully cures). Grout sealers create a protective barrier, repelling moisture and stains.
I always use one of these two grout sealers (both are fantastic): Stonetech Bulletproof sealer or Drytreat Stainproof sealer (Ad: Three text links above are Amazon affiliate links. See affiliate disclosure page for details).
Additionally, employing a gentle touch during cleaning is essential (using the method in the Cleaning Tips section above). Harsh chemicals like bleach, and abrasive cleaners, can strip away the grout sealer and actually stain and/or erode the grout, leading to more discoloration and damage.
FAQ's
What is the correct order to tile a shower?
I always start with the shower pan tiling. Laying the floor tile right to the edges of the shower pan (with ¼ inch gap for expansion) keeps it below the lower edge of the wall tile. This creates a "drip edge" which allows shower wall surface water a clearer pathway to the drain.
What are common shower tiling mistakes?
- Not flattening the substrate prior to tiling
- Neglecting to install a waterproofing membrane
- Not thoroughly planning the tile layout.
- Not using the correct trowel notch size.
- Not dry-fitting and levelling your first row.
- Not using tile levelling clips
- Not using pre-sealed or epoxy grout
Is it hard to tile a shower by yourself?
Not if you prepare well. That means doing some research and planning beforehand. It also means practicing laying some tile in a test area before you attempt to tackle the shower tile installation.
What do you put down before tiling a shower?
Shower tile should only ever be installed on a shower-rated waterproofing membrane, unless you've opted for foam backer board panels, which have built-in waterproofing (no-membrane required on inside shower walls).
Where should you start when tiling a shower?
You should lay your shower floor/ pan tile first. This creates a waterproof foundation where all the water from the wall can settle and flow down the tile surface towards the drain. After the floor is tiled and grouted, start tiling the back wall first.
Can I tile over existing shower tiles?
Tiling over existing shower tiles is not ideal, but it is possible. Removing the old tile is always best because it allows you to assess the condition of the substrate, and ensure proper waterproofing. However, if you're confident with the integrity of the substrate, a product like Mapei Eco Prim Grip can do the job.
How long does it take for shower tiles to set before using the shower?
It's essential to allow ample drying time for both the thinset mortar and the grout before subjecting your newly tiled shower to water. Wait at least 24-48 hours for the thinset to cure, and follow the grout manufacturer's recommended drying time, typically another 24-72 hours.
What is the best grout to use in a shower?
Epoxy grout or pre-sealed grout are by far the best, due to their exceptional waterproofing qualities and resistance to mold and mildew growth. They are also more durable and stain-resistant than traditional cement-based grouts, making them an excellent choice for showers.
How do I prevent mold and mildew in my tiled shower?
A pre-sealed or epoxy grout can largely prevent mold & mildew in the grout lines, but regular grout needs to be sealed once a year. It also helps to improve ventilation, use a squeegee to remove water, and clean regularly.
Should shower tile go all the way to the ceiling?
In most modern shower designs, running tile to the ceiling improves waterproofing protection, reduces drywall exposure, and just looks better.
What size trowel should I use for shower tile?
Large format shower tile typically requires a 1/2-inch square-notch trowel, while smaller wall tiles may only require a 1/4-inch notch. Mosaic shower floor tiles often use a 1/8-inch V-notch trowel.
Can I use mastic in a shower?
Mastic is absolutely not recommended for wet shower environments because of inadequate bond strength and it can soften with prolonged moisture exposure. A proper thinset mortar is the preferred choice.
Do you grout or silicone shower corners?
Shower corners and change-of-plane joints (movement joints) should be sealed with 100% silicone rather than grout to allow movement and reduce cracking.
What tile is safest for shower floors?
Small-format porcelain mosaic tile is often considered the safest choice because the additional grout lines improve slip resistance, but textured porcelain tile of any size is also a good option.
How flat do shower walls need to be before tiling?
For large format tile (24-inch square), shower wall substrates should generally not vary more than 1/8 inch over 6 feet to minimize lippage problems.
Can porcelain tile be used on a shower floor?
Yes. Porcelain tile is one of the best materials for shower floors because it’s dense, durable, and highly water and vapor resistant.
How much thinset coverage do shower tiles need?
Wet area tile installations should achieve near-complete (95%) mortar coverage to minimize voids that can trap moisture behind the tile.
Should you back butter large format tile?
I actually recommend back buttering tiles of every tile size and type before setting (except maybe penny mosaics). Back buttering basically guarantees proper coverage of thinset and good mortar transfer, which maximizes bond strength.
What causes tile lippage in showers?
Tile lippage is usually caused by uneven substrates, warped tiles, inconsistent mortar thickness, or improper tile leveling techniques.
Can I tile a shower over drywall?
Standard drywall should never be used behind shower tile because it’s vulnerable to moisture damage. Shower-rated backer board systems are recommended instead.
Conclusion
Since laying shower tile is such an important part of every shower remodel, I thought it was important to create a comprehensive shower tiling post. I really hope that I've accomplished that, and you were able to get some useful information and strategies from it.
I remember what it's like not having any idea how to approach my first tiling job, oh so long ago 🙁 , and I'm determined to help you guys avoid some of the struggles I went through. So please let me know what you think of my how to tile a shower post in the comments below, and please ask me any questions you like.
Good Luck with your project!

About the Author
Steve G is a professional bathroom remodeling contractor with extensive hands-on experience building and waterproofing custom showers. As co-founder of Redblock Industries, he specializes in designing durable, high-performance shower systems and stainless steel shower storage solutions.
Steve has installed dozens of shower wall systems using cement board, fiber cement, and modern waterproofing membranes, giving him real-world insight into what works — and what fails — over time. His content focuses on helping homeowners, advanced DIYers, and contractors build longer-lasting, problem-free showers.
Learn more about Redblock Industries’ approach to product design, affiliate relationships, and transparency on our Affiliate Disclosure page.
Related posts

The Complete Guide to Shower Waterproofing

Cement Backer Board for Shower Walls: Complete Guide, Pros, Cons & Comparison (2026 Update)

Comments
9 reader comments
Allissa �
Steve, Almost at the finish line with my long-time-coming honeycomb shower and still looking back to your articles as the holy grail. Every time something seemed harder than it should be, I go back and reference your article and, without fail, find the exact advice I needed and forgot. Excited for the second project, whenever that is, to see how much easier I can make it. Thanks for impassioning other to diy tile! Controversial topic- how do you finish the bottom edge of tile, where it overhangs tub flange? Leave it to drip? Grout, calk? I understand not wanting the moisture to trap there, but as that was the very first row I ever tiled (and they all had to be cut, because I was using the hexagon mosaics point up&down), I do not have an even space from one end of the tub to the other. It differs by about 1/4”, which I would love to hide if possible. Any advice? Thank you, again!
Steve �
Hi Allissa, Thank you for your comment AND for your kind words! It’s so great to hear that you got some useful info from my post! Yes, the tile/ tub margin is always a difficult one for most DIYers. The gap between the tile and tub should never be grouted with regular cementitious grout. The difference in expansion/ contraction of the tub vs the tile means that the grout will eventually crack and break away. Your best choice is to use only 100% silicon caulking to fill this gap (not the acrylic, or blended acrylic silicons). Mapei has a whole bunch of colored silicons that perfectly match their grouts. This is what I end up using for most of my jobs because I’m almost always grouting with Flexcolor CQ (I love this stuff). Be proud of your accomplishment and don’t worry too much about the 1/4″ variation. It won’t really be noticeable after the gap is siliconed. Good luck! Steve
Heather �
Great advice with loads of top tips! I just have a few questions about whether silicone or grout should be used on internal corners. For a walk-in shower, you seem to suggest silicone but our installer says he always uses grout. Please advice. Also, should silicone be used above a bath corner where there is no shower above the bath? Finally, should silicone or grout be used between ceiling and wall tile? Thank you.
Steve �
Hi Heather, Thank you for your comment! I am not really against grouting the inside corner of the shower if you prefer that look. I just think it is a slightly inferior option for the following reasons. This corner is the most difficult to grout and it takes a lot of extra time during the grouting process. It is also kind of messy because it’s impossible to get a clean edge during sponge cleaning. Unless your tile installer spends a bunch of time and energy on this corner, the grout line usually looks sloppy when it’s done. Also… this corner needs a bead of silicon regardless if it’s grouted or not. That is why I try to eliminate the corner gap when setting these tile. Because silicon adheres MUCH better to tile than grout (even if it’s sealed), the silicon bead will last much longer and protect the corner much better from moisture absorption. It also tends to look better because any rough tile cuts can be concealed under the silicon bead. I also think that a grout line in the corner doesn’t look very nice, even if it’s done perfectly. Just my opinion. In the corner of a tub with no shower, it is always a good idea to have the same installation as above. It might be a little overkill, but it will ensure that your walls are protected from water damage from splashing. I generally cut my wall tile as tight to the ceiling as possible to avoid any grout lines up there. I then apply a very tiny bead of silicon. It’s not really necessary for water protection but just finishes it off nicely. Good luck with your project! Steve
Allissa �
Hello Steve! I have a great appreciation for your series of shower remodeling how-to’s; they are perfectly thorough and incredibly well written. Rarely can I make it through long DIY articles, but your excellence at your profession really shows. So, thank you! I am planning to use hex tiles to make a honeycomb style tub surround (point down) with a “live edge”. For this style, would you still recommend the lash system clips for levelling? I will not have a straight edge on top or bottom. Furthermore, what is your advice for tying in the tile to tub? I purchased the Mapei silicone caulk to match my grout. Lastly, do you recommend cutting ones own holes for plumbing in the waterproof membrane (I went with NobleSeal)? Thank you so kindly for any further advice. Allissa
Steve �
Hi Alissa, Thanks so much for the compliment. I’m happy that you got something useful from my posts… even if they are a bit lengthy. The use of levelling clips is very laborious with six sided tiles. If you are meticulous, and your wall is relatively flat, you should be able to get away with no levelling clips. The hex (honeycomb) design also confuses the senses, making tile lippage far less noticeable. I always prefer to use levelling clips but it may not be practical for you unless your tiles are 6″ or larger. If I understand you correctly, you want a live edge on the margin between the tub and the wall tile. The live edge at the top of the wall wouldn’t really be a problem as long as this edge was out of the “splash zone”, but I don’t really know how this would work on the bottom. I hate to ruin your plan but I don’t really think this is a good idea even with a water resistant grout. The tile edge must follow the tub edge so it covers the gap between the backer and the tub mounting flange and consistently overlaps the flange. This straight edge acts as an initial waterproofing barrier and a drip edge. As for plumbing penetrations in the membrane, you should use the Noble pipe and valve seals. Good luck with your tiling job! Steve.
Donny �
Can I tile my bathroom floor first over to where the new shower will be built later?
Steve �
Hi Donny, Thanks for the comment! I would not recommend it. It doesn’t mean that it’s not possible, but you are basically asking for trouble. Floor tile install should be one of the last steps if you want to get the best result. For example, if you install an acrylic base, the front skirt of the shower base must be supported well along its entire length. If there’s floor tile beneath it, this front skirt will be exposed at the bottom and will have to be trimmed out somehow. And if the floor is not level (it never is), then there’ll be a gap between the floor and the base. This will not look pretty and it also results in more work. If you install the base on the subfloor the way it was intended, this mess would be covered up by floor tile. If you are installing your own mortar bed shower base, it’s even more important that the curb and the mesh under your mortar bed is attached to the subfloor. As for a preformed foam shower base; these are not designed to be installed over tile. For this reason alone, a nonstandard install would be a bad idea. I know you are trying your best to get the shower floor done and out of the way, but unfortunately I think it’s best if you complete the shower first. Good Luck! Steve
Rob �
Steve, I have read and reread all of your blog posts and they’re incredibly helpful. I hope that more homeowners will be able to quickly find them. Working full time, I’ve been in the middle of a complete bathroom renovation for months with only time on the weekends to work. I’m finally nearing the end, as the shower walls are almost up. Just curious how you handle Schluter trim with a large format 3/8″ thick tile and a 1/2″x1/2″ trowel (1/4″ thick thinset) since the deepest Schluter trims normally available are 1/2″. I ended up having to shim the trim off the wall by 1/8″ with stainless steel washers to accommodate the tile and thinset, with a small gap between the trim and wall that I will caulk and paint later. Thank you for taking time to write all of the articles and I look forward to more content. Sincerely, Rob
Steve �
Hi Rob, Thank you for the comment and the compliment! I’m so happy that you’ve got some useful info from my posts. I have run into the same problem many times before when there are limited trim depths available at my local tile wholesaler. I discovered that when the only trim available is the “Jolly”, you are stuck with the 1/2″ depth because that is the max depth for this product. However, their “Schiene” trim is available in a huge range of depths. This product is almost identical to the Jolly (I still don’t know what the difference is), but you just need to know where to buy it because not every store will carry them. Since you’ve already used the 1/2″ trim, I would suggest you do some mudding magic outside the shower (alongside the trim) instead of caulking the gap as you’ve suggested. With a little finesse, you should be able to taper the mud out about 10-12″ so that you cover the gap. This takes a bit of mudding skill but I think you can do it if you carefully mask off the trim before you start. Even if you make a bit of a mess, you should be able to sand it to look pretty good. Just a suggestion. 🙂 Congrats on your accomplishment so far! And good luck with the rest of the project! Steve
Lacey �
Hi Steve, I came across your blog and really really appreciate your thorough explanations to inform people hiring professionals for work or going DIY. I am going the DIY route myself and am trying to learn as much as I can about all the steps for installing a tile shower floor. I purchased 7×8 inch porcelain hexagon tile for the shower floor for a second floor bathroom remodel. I think a linear drain with two slopes (one from each side) would work best for my tile choice rather than a “bowl” style slope to a drain where my tiles may not lay squarely on the sloped floor. I have a few questions I hope you can maybe share your experience and insight on. Is the right layering plan for the shower floor plywood->cement board->sloped mortar base->waterproofing membrane ->mortar->tile? Do you have any tips for sloping the mortar base so it slopes correctly and smoothly for the tile and proper drainage? Can the mortar for setting the tile and for sloping the shower base be the same? Thank you again for such a great blog! Lacey
Steve �
Hi Lacey, Thank you for your comment! I’m impressed that you decided to take on the job of installing your own mud base. This is a scary job for most DIY’ers! I think it’s only appropriate to warn you that doing a mud base is a fairly involved job. It’s not particularly difficult but it’s also not the typical DIY job because it requires some skill, some patience, and some confidence. If you want to go for it (and I encourage you to), here is an excellent video from Schluter Systems about installing your own mud base and covering it with Kerdi membrane. Your install will be slightly different with a linear drain but most of the strategies and principles are identical. You will simply be creating flat (planar) surfaces on each side of your center drain rather than the continuous slope they created in the video. Here’s another option to consider if you decide not to tackle the mud base. You could instead install a preformed foam shower base from Wedi. I like the Wedi foam bases much better than Schluter. They are quite expensive, but relatively goof proof and MUCH EASIER than installing your own mud base. The Schluter video will also answer your questions about the “layering plan” for the shower floor and the material recommended for the mud base and setting your tile. This can be super fun and satisfying project for a DIY’er like yourself, so I hope you enjoy it! Good Luck! Steve
David M �
I read every word you wrote, what terrific explanations you made throughout , great job!!!! Would you explain how you attach the L shaped metal trim at the end of the shower side wall, I’m confused on how to set this metal sluter strip.
Steve �
Hi David, Thank you for your comment! It unfortunate that I can’t send you a link to one of my install videos, but I haven’t got them uploaded to my blog quite yet! Installation of these trims are pretty straightforward once you get the hang of it. Basically you just need to visualize the cross hatch area of the trim being placed underneath the outer edge of your shower wall tile. As such, the trim that borders your tile will need to be the right depth to cover the edge of the tile, but not too high to protrude over the tile surface after install. This is easy to determine by measuring your tile thickness and adding a small amount for the thinset beneath. The thinset thickness will vary depending on your tile size, and the consequent notched trowel required for that size of tile. You can ask a tile retailer about this or simply Google it. Follow the install directions in my post and you should be ready for tile install. The advantage of installing the trim first is to ensure that your edging is perfectly plumb, AND to establish an outer edge of your wall tile assembly so you can measure, cut, and number your first few rows of tile before mixing any thinset mortar. Good luck with your project! Steve
Chris �
Wow, lots of information. This must have taken a lot of time to write. I am a homeowner doing this for the first time, so I appreciate all the tips. Thanks for the effort!!
Steve �
Hi Chris, Thanks for your comment and the compliment! I’m super happy to hear that I could provide you with some guidance in your shower remodel project. Good luck and have fun! Steve
Steve M �
Google sends me various articles daily and I guess yours popped up because I was pricing Kerdi for my own bathroom remodel. Read one of your posts, then another, and another, and— you get it. I’m a respected handyman (trying to retire) and a fairly accomplished tile setter. But I like to hear from others who know more than I do. Your advice is right on target. Keep it coming. Steve Myers Honey-Do Home Services
Redblock �
Hi Steve, Thank you for the comment and the compliment! It’s always great to get some positive feedback, especially from fellow professionals. Retirement would be great, but it’s not in the cards for me quite yet 🙁 Thanks again! And good luck with your business… and retirement! Steve