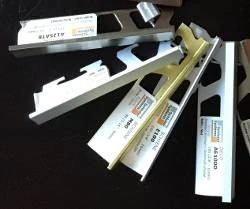
Types of Tile Trims and Edging
There are four main types of tile edge trim that can be used to finish the perimeter of your tiling installations. These include stone trims, porcelain or ceramic trim tiles, as well as
plastic and metal trims. They come in various configurations depending on the product and their use, but the metal
tile trims (metal tile edging) and stone trims are the most popular.
Alternative to Bullnose Tile
If you're not excited about using a standard tile edge trim (TET) profile, you can use real or engineered stone
instead. This is one of the fastest growing tile edge trim ideas, quickly displacing the standard edging options.
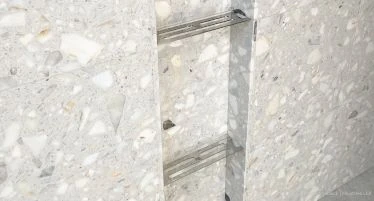
Capping a shower pony wall or framing the inside of a shower niche with polished stone creates a beautiful high end
finish, and also provides a great alternative to bullnose tile. Most of these installations will utilize marble
tile, because they looks great on your shower wall and the edges can be exposed for a very nice look.
Marble tiles are almost exclusively used in this situation because they are very popular and also relatively soft, so
the edges can be polished with relative ease. Only a few minutes of wet sanding is required to create a fine
polished, professional appearance. The image below shows a niche trimmed out with composite marble with polished
edges.
 Redblock Industries
You can also use stone material from a local stone fabricator if you can get your hands on some. This material is
usually used for kitchen and bathroom counter tops so it’s quite thick (a choice of either 2cm or 3cm thickness).
This is a great option for those who prefer the more bold look of a thicker stone.
This option can be relatively cheap if you can find a fabricator willing to give you a few small pieces. This may not
be as difficult as you think because small pieces are a real pain to store for these guys… and they have lots of
these laying around after every job that will eventually be disposed of.
This strategy is becoming much more popular because it creates a very compelling seamless look and is easier to
install than other trims. It can also produce a beautiful modern or classic finish depending on your choice of
stone.
Ceramic (Bullnose) Edge Profiles
 Photo by Reaume Construction
Ceramic trim profiles can have a finished square edge, or more commonly a larger radius bullnose edge. These types of
tile edging were common in modern designs during the 1980’s and early 90’s but are no longer popular in todays
modern bathroom designs.
It's quite common to see these bullnose tiles in more traditional shower designs. The attached image shows a ceramic
bullnose trim being used very nicely around a tiled niche in a traditional bathroom design.
There are also some unique modern trims available today, but they're usually special order items and generally quite
expensive.
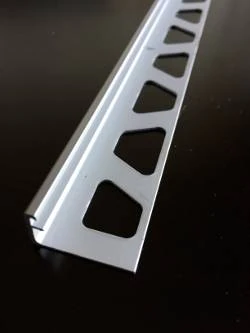
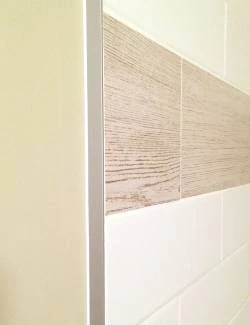
PVC & Metal Edge for Tile
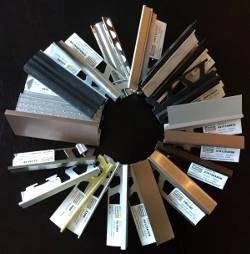
Metal trims and pvc plastic trims come in several profile shapes and colors, but plastic (PVC) is the least popular
because they don't stand up well to abrasion. The metal tile edging is by-far the most common trims used in most
mid-cost and higher end renovations.
They are ideal for high abrasion areas such as floors, but have also become a standard in most shower wall tiling installations.
They are available in the widest range of finishes and profile styles, but the profile with the very narrow top edge
is the most popular (for example, Schluter Jolly).
There are a large selection of Schluter profiles available. You can see them all on the Schluter Systems website.
Most home stores carry Schluter profiles but you can usually only get the Jolly profile without special ordering
them. There are a few more Schluter profile options readily available online.
Finishes - Schluter Trim Profiles
 If you’ve decided to install a metal TET, and you’ve picked the
type and style you want, then it’s time to choose the finish. The most popular metal edge finishes are polished and
brushed stainless steel as well as brushed aluminum and brushed nickel. These are all in the grey color spectrum so
they provide a nice contrast to your tile without being too obvious. Grey is also part of some very common bathroom
color schemes these days.
If you’ve decided to install a metal TET, and you’ve picked the
type and style you want, then it’s time to choose the finish. The most popular metal edge finishes are polished and
brushed stainless steel as well as brushed aluminum and brushed nickel. These are all in the grey color spectrum so
they provide a nice contrast to your tile without being too obvious. Grey is also part of some very common bathroom
color schemes these days.
The gold and brown color colors are not nearly as popular because of current design trends, but also because it's
more difficult to match with your valve and accessory finishes. When using a particular shade of gold for example,
it has to match very closely with that of your fixtures, otherwise these TET's can stand out and look weird.
You should be prepared to select your trim finish well in advance of your tiling project because some finishes are
special order items. You should also be prepared for a wide variation in price. Some of the less popular finishes
can easily be twice the cost (or more) of a more common finish.
The general rule when picking a TET finish is to try your best to match it with your bathroom fixture finishes,
although there are some exceptions. Generally, when choosing your finish you should keep in mind that TET should be
an attractive compliment to your bathroom design, but not a stand-out feature.
Selecting the Correct Trim Depth
 It is not always obvious what depth you should
select for your metal TET, even when you have your tile and trim in hand at the home improvement store. It's a good
strategy to err on the plus side for your trim depth to avoid the terror when you see the tile edge protruding above
the trim during installation. To choose a trim depth that is 1/16” to 1/8″ deeper than your tile is standard in the
industry. A DIY’er should stick with a the 1/8″ deeper trim option to give themselves a bit more of a safety margin.
It is not always obvious what depth you should
select for your metal TET, even when you have your tile and trim in hand at the home improvement store. It's a good
strategy to err on the plus side for your trim depth to avoid the terror when you see the tile edge protruding above
the trim during installation. To choose a trim depth that is 1/16” to 1/8″ deeper than your tile is standard in the
industry. A DIY’er should stick with a the 1/8″ deeper trim option to give themselves a bit more of a safety margin.
Because the anchor leg of the TET sits beneath the tile (the cross hatched flange seen in the image), it's
important to imbed it into the mortar, so it's properly bonded to the substrate. Squeezing all the mortar out
between the tile and TET anchor leg reduces bond strength so try to avoid this if you can.
Another thing to be aware of if you are installing only ceramic tile, is that many people have the tendency to choose their TET depth based on the
thinner outside edge of the ceramic tiles they are using. This will get you into trouble when you have to match the
thicker cut edge against the trim in a staggered tile layout.
If you're installing a waterproofing membrane after you secure your TET in place, you must also remember to
accommodate the membrane thickness in your choice of trim depth.
Remember that you can always add a little extra mortar to raise the tile to meet the trim depth, but you are totally
stuffed if you choose a trim depth that is too shallow.
Tile Edge Trim for Shower - Installation Example
 The example image shows two different tiles installed with a
1/2″ TET. The darker tile is porcelain with a thickness of almost 3/8″ and the surrounding tile is ceramic with a
1/4″ thickness. The ceramic tile has lots of room beneath, requiring 1/8″ thick layer of buildup material beneath to
allow it to match the porcelain tile surface and the TET.
The example image shows two different tiles installed with a
1/2″ TET. The darker tile is porcelain with a thickness of almost 3/8″ and the surrounding tile is ceramic with a
1/4″ thickness. The ceramic tile has lots of room beneath, requiring 1/8″ thick layer of buildup material beneath to
allow it to match the porcelain tile surface and the TET.
However, the TET is the perfect depth for the porcelain tile. It is 3/8″ thick, so when its surface is flush with the
top edge of the TT, the extra 1/8″ beneath allows some room for the TT anchor leg, and for some thinset mortar beneath.
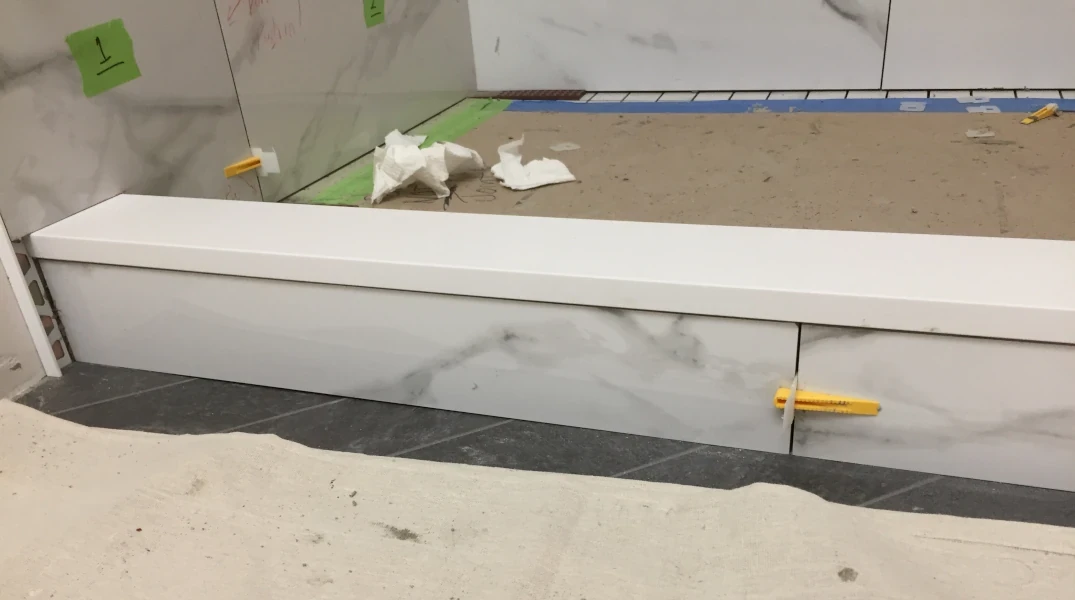
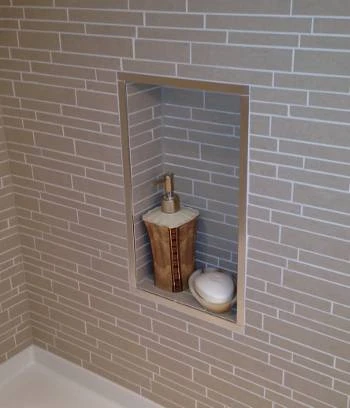
Outside Tile Corner Trim or Niche Trim
When it comes to shower tiling, you may never need to worry about outside corner
trims unless you are installing a tiled shower niche or tiling a pony wall or shower bench. To clarify, outside tile
corner trims are used exclusively for the corner, when two tiled surfaces meet at 90 degrees (see TET around the
perimeter of niche below).
These days it is most common to use a metal TET for these corners but as I mentioned previously, another great
alternative is natural or engineered stone. With stone you can relieve yourself of the burden. Leave the cutting,
edge finishing and installing to your stone fabricator instead. Just keep in mind that stone is quite expensive and
requires a skilled stone fabricator to cut & polish it.
Square Joint or Mitre Joint on Tile Trims?
 If you choose a metal tile edge trim, it must be
installed with skill and precision. This trim piece is usually quite visible and you don’t want someone’s shoddy
work to be on display in your new shower remodel.
If you choose a metal tile edge trim, it must be
installed with skill and precision. This trim piece is usually quite visible and you don’t want someone’s shoddy
work to be on display in your new shower remodel.
Firstly, if you want this installation to go smoothly, you should follow the strategies I have covered in the
sections above. The challenging part will be matching the four corners evenly, with no gaps.
You have two choices: Meet the two pieces of trim in the four corners with a square joint, or use a miter joint (45
degree joint). The first option is clearly the easiest and offers the highest chance of success (see image), but it
does not look as professional as a perfect miter joint.
Another important condition is that you can only achieve a decent square joint when the top of the trim is flat. This
can be achieved quite satisfactorily with Schluter Shiene or Jolly. With other more complex profiles, a
miter joint will be required. If you decide on miter joints for your shower niche outside trim, it’s always safest
to get a skilled and experienced tiling professional to do this work.
Alternative to Tile Edge Trim around your Niche
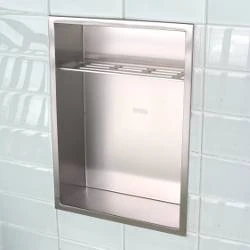 Image courtesy of Redblock Industries
If you want another alternative to installing a shower niche trim and avoid the outside corner installation problem
altogether, you can always install a finished shower niche with a built in tile edge trim. This look isn’t for
everyone but if you like the metallic look of a finished shower niche, it can sure save you a lot of work and also
eliminate the risk of leaks.
Inside Corner Trim
Finishing inside corners is an important part of every shower tiling project, but it is also the most ignored when it
comes to tile edging. There are some challenges to these inside corners and some elegant products and strategies
available to meet these challenges. There are also some very practical and attractive TET's that are not routinely
used in modern bathrooms and showers but are also worth considering.
The Inside Corner Dilemma
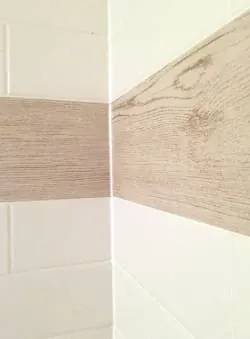 If you are like most tiling contractors, you
will have some issues with finishing inside corners on tiled wall installations.
If you are like most tiling contractors, you
will have some issues with finishing inside corners on tiled wall installations.
When tiled walls meet at a corner, you have a choice of tiling right up against the adjacent tile and relying on a
white silicon bead to seal the corner (see image). Or you can cut the tile to create a grout line on one of the two
walls. The former strategy is the most common mostly because it is simply the easiest of the two. A grout line in
the corner tends to interrupt the visual flow of tile from one wall to the other, and is not generally considered to
be a good look.
Although these are the most common strategies, you can also install an inside corner TET to give your installation a
high-end look. These are extremely uncommon because they are a bit pricey, but I really like this look (see section
below).
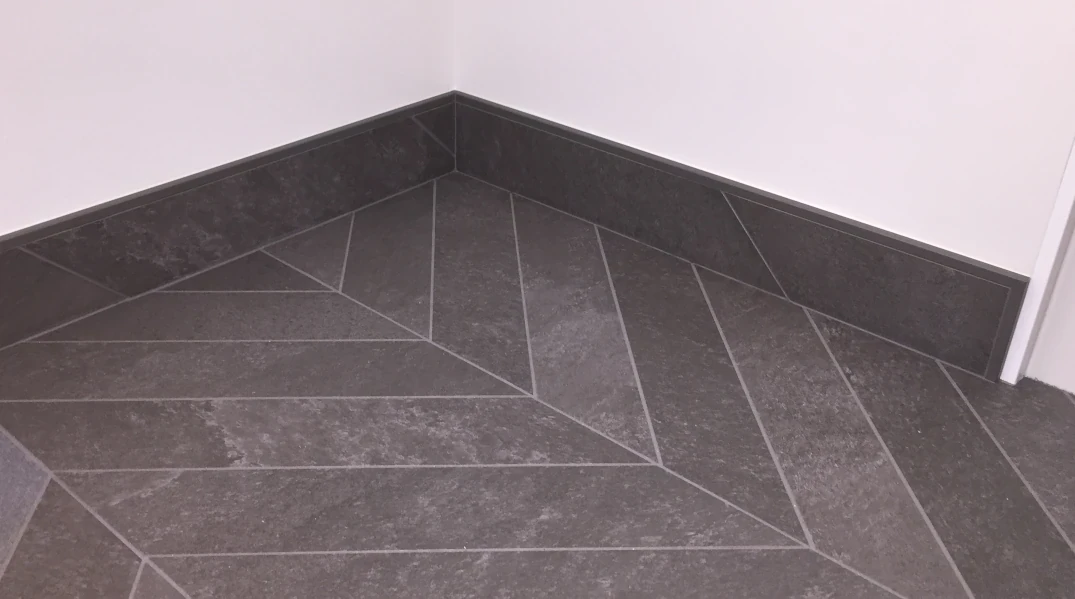
Square Edge Trim on Baseboard Molding?
Most of the standard trims that you’ll see these days are considered straight edge TET's. These have a very thin top
profile which has always been the preferred look for most people until recently.
Square edge TET's (or box edge trims) are a bit more obvious because of their box shape and wider top profile. This
more bold look has been gaining popularity recently. These trims have been around for a long while but a change in
style preferences have increased their popularity recently
Most tiling contractors have tended to avoid these trims simply because you need to cut a perfect miter joint in the
corners for these joints to look nice. And this is pretty difficult to do well unless you use a miter saw with a
steel cutting wheel. I've always liked the look of square edge profiles and suggest them regularly to my clients. I
used them for trimming out the baseboards in a bathroom remodel I did recently (see below).
 Other Interesting Trims
The inside corner TET (also called a cove trim) provides a
professional finished look and is one of the most under appreciated tile trim ideas, in my opinion.
The benefits of this tile edge trim are an attractive metallic or colored finish compared with the standard grout or
silicon corner. It also has a smooth radius making it easier to clean and provides two grout lines, allowing the
corner to be completely sealed.
A baseboard trim is also available for installation outside of the
shower if your floor & wall tiles meet. It has a very thin top profile and various bold metallic finishes, great
for minimalist designs.
There are also some very nice border profile trims designed to be mounted within a section of
wall tiles to create a separation between two different types of tiles, or simply as a bold interruption in the your
tiling design.
There is even a wall profile trim with a shallow track down the middle for
mounting a strip of 1″x1″ mosaic tiles. A very classy look.
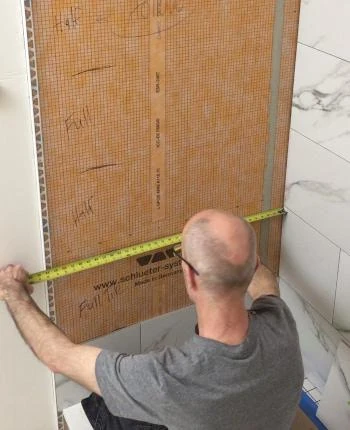
Installing Tile Edge Trim
After installing the waterproofing membrane, tile edge trim installation is always my first shower tile installation
step.
Do not attempt to wedge the trim under the vertical leading edge of your wall tiles while you're installing them.
There are so many things that can go sideways with this strategy if you don't have a lot of experience setting tile.
Fixing your tile trim in place first, provides you with a firm vertical edge to push your tiles up against so your
tiles don't drift out of plumb as you move up the wall. I usually place my trim around 2" or more out from the tub
edge (or shower pan edge) but this is totally up to you as long it's beyond the tub or shower pan edge.
The best way to determine the exact placement of your TET is to measure how far out the shower base (or shower pan)
comes out from the back wall. Then lay out a row of shower wall tiles on the floor (with spacers), until you reach
slightly beyond this measurement without using any cut tiles. If you're lucky, you can adjust the trim position so
no tile cuts are needed. Of course this doesn't always work if you're installing larger tiles, but it's a good place
to start because the distance that your tiles come out beyond the shower pan (horizontally) is relatively arbitrary.
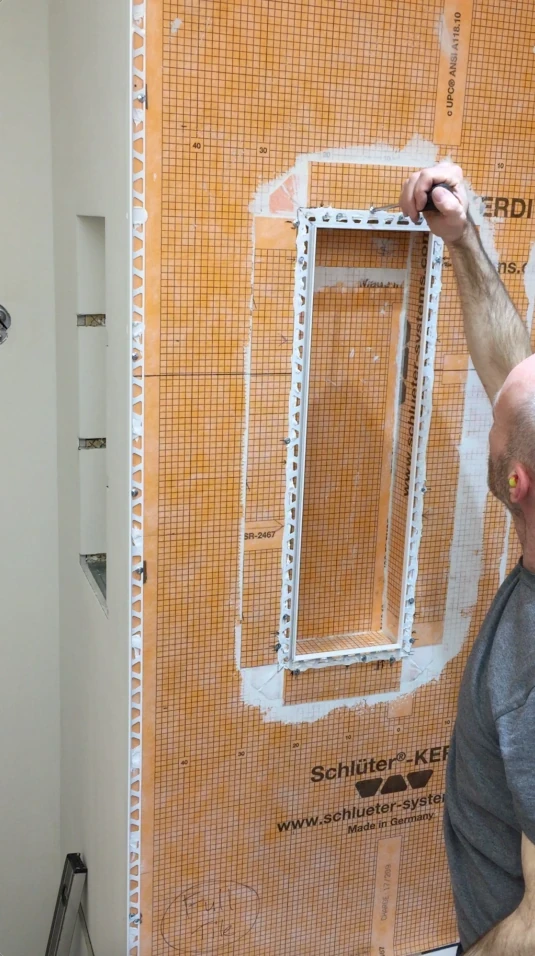
 Draw a vertical pencil line on both
side walls of your shower enclosure where you've chosen to mount your trims. Then simply glue them in place using a
tiny amount of polyurethane adhesive every 6" or so along the trim. Further secure the trim to the wall with 6-8
wafer head screws to allow the trims to follow the undulations in the wall (as long as they are not too severe).
Draw a vertical pencil line on both
side walls of your shower enclosure where you've chosen to mount your trims. Then simply glue them in place using a
tiny amount of polyurethane adhesive every 6" or so along the trim. Further secure the trim to the wall with 6-8
wafer head screws to allow the trims to follow the undulations in the wall (as long as they are not too severe).
As you can see in the image, I fixed the trim to the waterproofing membrane on the edge of the tub wall, and around
the niche. And I attached them with white polyurethane adhesive, and wafer head screws. The screws are removed the
next day when the adhesive dries.
 And if you or your contractor forgets to install any
TET, it may be possible to install it afterwards, but it will not be easy... or much fun. But if you're absolutely
determined to do this, here is the procedure I would suggest:
And if you or your contractor forgets to install any
TET, it may be possible to install it afterwards, but it will not be easy... or much fun. But if you're absolutely
determined to do this, here is the procedure I would suggest:
With an angle grinder with a metal cutting wheel, cut the TET anchor leg (the cross-hatch pattern) down to about
1/4". Smooth off the rough metal burrs on the edges with a metal file. Then use a sharp utility knife (or
equivalent) to remove some of the dry thinset mortar along the tile edge where you want the trim to go, creating a gap under the
tile. Because you've cut the anchor leg down to 1/4", you'll need to remove all the thinset under every tile along
this edge, to a depth of at least 1/4". This will allow you push the trim into this gap, and up against the tile
edge. This will be a *** of a lot of work, and VERY tedious, but it's certainly possible with some time and
patience.
Then you simply glue it in place with polyurethane adhesive. You cannot use thinset mortar to attach the trim after
this modification. Without the crosshatch pattern to imbed into the mortar, it will not stay in place unless
thoroughly glued.
FAQ's
Can you install a tile edge trim after tiling?
Cut anchor leg on trim to 1/4" width, and file off any burrs. Create a 1/4" deep trough in the thinset under the
tiles, where the trim is to be placed. Apply polyurethane adhesive into the trough, place the trim in (anchor leg
first) and push against the tile.
How do you finish exposed tile edges?
Installing a metal tile edge trim is the most common, but you can also use PVC trims, or bullnose tiles for a more
traditional aesthetic. If you choose stone tiles, you also have the option of polishing the edges, as long as you
have the right equipment.
Wrap Up
I hope that this article has provided you with some confidence (even mastery) in the area of tile edge trim. I have
attempted to shown you a range of the most popular and interesting trims, along with a few useful hints to help you
with installation.
If you have any thoughts you'd like to share, any questions about this post, or tile edge trim in general, please
leave a comment below.
This post is for information purposes only and should NOT be interpreted as professional advice. You should always
consult a licensed local contractor before undertaking any remodelling work in your home. Click
here for my full Personal / Professional Disclosure.


