
Choosing the right cement backer board for shower walls is one of the most important decisions you’ll make during a shower remodel. The wrong tile backer board combined with a poor waterproofing strategy can lead to cracked tile, moisture problems inside your wall, or even complete failure of the tile assembly years after installation.
In this guide, I'll give you the straight goods on cement board for shower walls. I’ll break down the four main types of shower tile backer boards — cement board, fiber cement board, glass mat board, and foam backer board, and explain how they actually perform in real showers.
Having installed dozens of shower wall substrates over a couple of decades as a bathroom remodeling contractor, I’ve seen firsthand which systems hold up and which ones fail (and why).
You’ll find a detailed comparison chart, installation considerations, and practical recommendations to help you choose.
In addition to helping you figure out the best tile underlayment for your project, I’ll also give you the details on waterproof shower wall systems, cement board installation, and vapor barrier best practices — all critical for long-term shower wall performance.
So let's get into it.
Quick Answer: Best Backer Board for Shower Walls
Best backer board for shower walls depends on your installation priorities:
- Best overall performance: Fiber cement board
- Best for fastest installation: Foam backer board
- Best budget option: Cement board
- Best lightweight system: Foam backer board
Bottom line: For most shower installations, fiber cement board combined with a quality ANSI A118.10 waterproofing membrane offers the best balance of structural rigidity, durability, moisture resistance, and long-term performance. Foam backer board can reduce installation time on interior shower walls, while traditional cement board remains the best budget option.
Links to Content:
- What Is Cement Backer Board for Shower Walls?
- Why Cement Backer Board Is Used in Showers
- How Waterproofing Works in Showers
- Common Shower Wall Failures
- Types of Backer Board for Shower Walls
- Comparing Shower Tile Underlayment
- Ease of Installation Comparison
- Material Cost vs Labor Trade-offs
- Best Backer Board by Use Case:
- Shower Backer Board Installation Overview
- Bathroom Tile Backer Board – Shower Bench and Niche
- Additional Applications and Performance Attributes
- Common Mistakes When Installing Cement Backer Board in Showers
- Best Backer Board by Project Type: Decision Table
- Expert Summary: Choosing the Right Shower Backer Board
- Key Takeaways
- My Final Recommendations
- FAQ – Cement Backer Board for Shower Walls
What Is Cement Backer Board for Shower Walls?
Definition: Cement Backer Board
Cement backer board is a rigid cement‑based panel installed over wall framing to provide a stable tile substrate in wet areas such as showers.
Cement backer boards (also called Cementitious Backer Units or CBU's) are rigid cement‑based panels installed over wall framing to create a stable substrate for tile in wet areas such as showers.
Cement backer board lacks organic material, which helps it resist mold and mildew growth. They are made of 100-percent inorganic materials that will not rot, shrink, delaminate, or decompose when exposed to moisture.
Fiber Cement Board is also considered a type of cement backer board for shower due to its similar construction.
Cement backer board replaced the original wood and gypsum-based products used for shower wall sheeting because it provides structural rigidity, and secure mortar bonding, which extends the life of shower walls and lowers maintenance.
In most modern showers, backer board works together with a waterproofing membrane to create a tile substrate that's durable and code compliant.
Why Cement Backer Board Is Used in Showers
Secure Mortar Bonding
The most obvious benefit of using cement backer board in showers is to provide a secure bonding surface and rigid tile installation substrate for ceramic, porcelain, and natural stone tile. All backer boards are manufactured with textured / bonded surfaces that allow thin set mortar to adhere securely.
This is why cementitious backer panels have become the preferred wet area substrate for modern tiled shower construction.
Structural Rigidity
Structural rigidity is one of the most important characteristics of a shower wall substrate and one of the core tile backer board advantages. Cement and fiber cement boards provide high compression strength and stiffness, which helps limit wall movement.
If the wall assembly flexes too much, cracking of grout lines and tile edges can occur.
Mold Resistance
Most modern tile backer boards include materials that resist mold growth. This can help reduce biological growth if moisture does reach the board surface.
However, you should always consider this a “bonus” benefit since water vapor management is supposed to happen at the waterproofing membrane, not at the backer board. In other words, mold resistance is kind of irrelevant if the waterproofing was done correctly.
Moisture Resistance
All tile backer boards are designed to tolerate some moisture exposure due to coatings that are applied during manufacturing.
Cement boards can tolerate moisture without deteriorating but can’t really be considered as moisture resistant, and cannot take the place of a waterproofing membrane.
Glass Matt boards have a moisture resistant face but will absorb a ton of water, and quickly disintegrate if this face is breached .
Foam boards, on the other hand are designed specifically to resist moisture penetration.
Still, as I mentioned above, moisture resistance is not the same as waterproofing. A proper membrane system is still required to control water vapor migration in exterior shower walls.
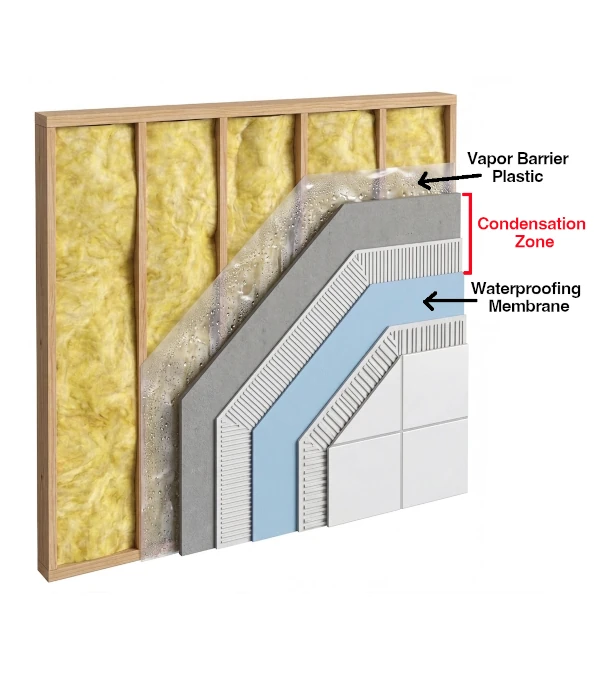
Understanding the Shower Wall Assembly
If we ignore the exterior wall plywood sheeting and cladding, a standard exterior wall includes structural framing, with insulation in between the wall studs. The inside face of the stud wall is usually covered with vapor retarder (plastic sheeting), then a sheet of regular drywall.
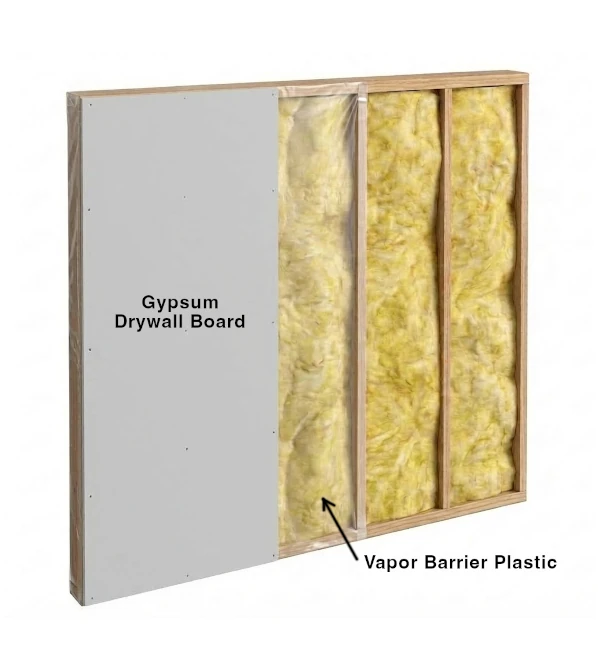
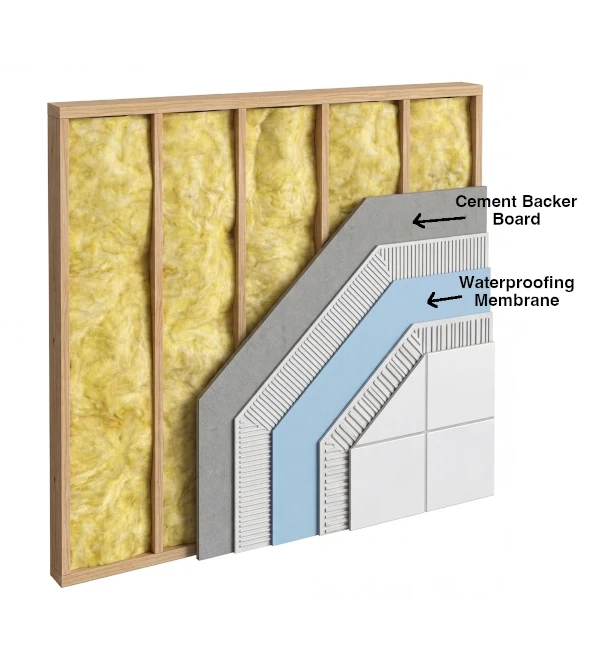
However, the interior side of typical tiled shower wall structure is a little different, with 5 important layers
Tile backer board is the very first layer on the inside of the stud wall (in place of the vapor retarder plastic). Next is thinset mortar, the waterproofing membrane, thinset mortar again, then finally the tile and grout.
This creates a solid, code-compliant waterproof shower assembly.
How Waterproofing Works in Showers
On a basic level, you could always consider your shower wall tile assembly to be “waterproof” if there are no cracks in the tile or grout joints because no liquid water could get through it.
However, water leakage has always been relatively easy to address when the tile layer is carefully installed. Water vapor on the other hand, and water vapor diffusion into the shower wall is whole different thing.
Once you embrace this reality you start to recognize the importance of things like material perm ratings, dew point location and proper building envelope design... as I'll explain in more detail below.
Definition: Perm Rating
A perm rating measures how much water vapor can pass through a building material. Lower perm ratings indicate greater resistance to vapor movement and are often preferred in exterior shower wall assemblies where condensation control is important.
Why Shower Walls Require Waterproofing
Even when you have a perfectly waterproofed tile assembly, and you’ve installed a good under-tile membrane, you cannot prevent water vapor from migrating through the entire assembly and into the wall cavity.
When the other side of your shower wall is cooler, the warm water vapor created in the shower will always tend to move towards it. This is a process called Vapor Drive.
Definition: Vapor Drive
Vapor Drive is the force that propels water vapor through building material layers, from areas of higher heat and humidity, towards areas of lower heat and humidity.
This will occur at a faster rate with a larger temperature difference from one side of the wall to the other (outside shower walls vs inside walls for instance) and if the wall materials are more permeable, but it will always happen to some degree no matter how good your waterproofing technique is.
And if only a small amount of water vapor makes it into the wall cavity, and it’s able to reach the “dew point” within the wall cavity, that’s when the big problems start.
Definition: Dew Point
When water vapor saturated air penetrates the shower wall and moves toward the outside layers of the wall structure, it cools causing vapor density to fall, and relative humidity (RH) to rise. As the air continues to move and cool, it reaches the dew point--a temp. where RH is 100 percent and water vapor condenses into liquid water.
Waterproofing the Shower Backer Board
For the above reason, modern shower systems rely on waterproofing membranes. These membranes do not prevent water vapor migration through the wall materials, only limit it in varying degrees, depending on the type of membrane.
The effectiveness of these systems is less important for interior shower walls, but immensely important for exterior walls because water vapor can easily condense in the stud cavity, especially with larger seasonal temperature changes.
Old-school exterior shower wall waterproofing strategy involves a sheet of plastic sheeting (10 mil or 10/1000 inch thick) attached to the stud face to keep moisture from moving from the shower, through the tile assembly, and into the stud wall cavity.
Modern exterior adjacent shower wall waterproofing strategies involve installing a bonded waterproof membrane (ANSI A118.10) on the backer board surface to inhibit moisture from getting through the tile, thinset, and backer board, and into the stud cavity (TNCA methods B421 and B422).
Definition: ANSI A118.10
ANSI A118.10 is the industry standard that establishes performance requirements for load-bearing bonded waterproof membranes used beneath tile installations in wet areas such as showers.
Backer Board for Exterior Shower Walls
Exterior shower walls need to be constructed differently than inside shower walls. Structure, insulation, waterproofing, and backer board all have to work together as an engineered assembly, if you want to prevent condensation related problems inside the wall.
That means that installing foam backer board on an exterior shower wall is just not going to cut it in this situation due to the poor water vapor permeance ratings (perm ratings) on most standard foam boards.
Common Shower Wall Failures
Even a properly installed tile assembly can fail if the underlying shower wall system is not designed and constructed correctly. Here are the most common causes of failure:
- Missing waterproofing membrane.
- Seams were not adequately reinforced with tape and thinset
- Installing a vapor barrier and waterproof membrane (water vapor sandwich).
- Improper waterproofing of shower niches and benches.
- Inadequate shower wall insulation
- Using drywall as a tile substrate.
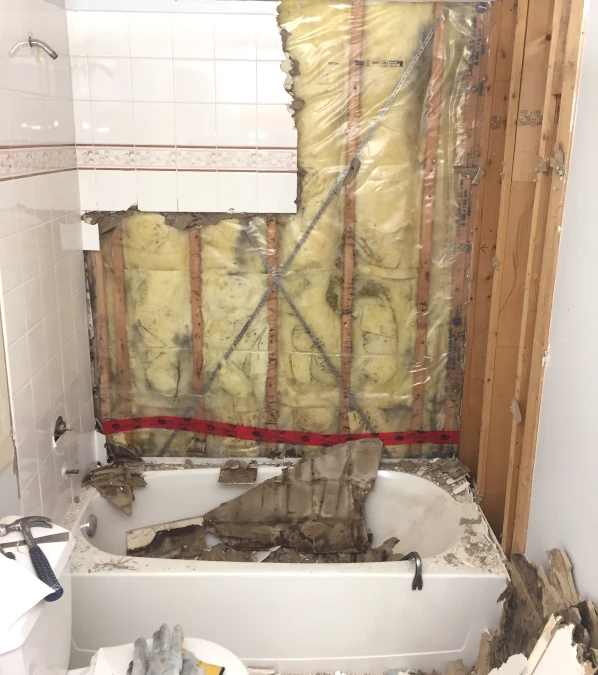
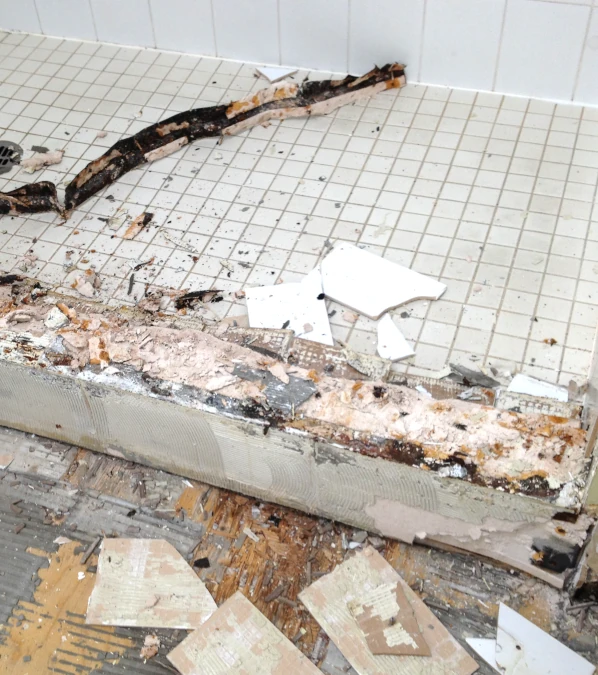
Missing the Waterproofing Membrane
As you can see in the images above, without a waterproofing membrane, these assemblies never had a chance. Once moisture got through the grout lines, there was nothing stopping it from wicking into the drywall paper face and saturating the gypsum core.
From there, mold growth, and a cascade failure of the wall assembly wasn't far behind.
Seams not Reinforced
All joints between backer boards must be taped with alkali-resistant mesh tape and embedded in thinset mortar (cementitious boards) or joined and sealed with an approved joint sealant (foam boards) to prevent cracks and moisture infiltration.
The Water Vapor Sandwich
It might seem counterintuitive on the surface, but when the “modern” and “old-school” waterproofing strategies are combined, there can be disastrous consequences.
If the “dew point” ends up to being in the region of these two waterproofing layers, water vapor will get trapped between them and condense into water.
Because the backer board lives in this gap, this condensation can start a cascade of water and mold-based degradation of the backer board panel, until the entire tile assembly fails.
Not only can this cause significant damage to the tile and wall assemblies over time, it can also cause respiratory health problems for anyone living in the house, due to airborne mold spore exposure.
This type of wall failure causes water retention within the backer board, which can quickly lead to mold growth, tile delamination, and structural damage inside the wall cavity.
Preventing this requires a correctly constructed shower wall combined with a good waterproofing system.
For a deeper breakdown, see our complete shower waterproofing guide.
Improper Waterproofing of Shower Benches and Niches
You need to be very diligent when waterproofing niches made with cement board, fiber cement board, or glass mat backer board because the multiple inside and outside corners and horizontal transitions create high-risk waterproofing zones.
Improperly waterproofed niches have always been one of the most common sources of hidden moisture damage in residential showers.
Inadequate Shower Wall Insulation
In addition to shower membrane waterproofing, a high priority should also be to build (or modify) the exterior shower wall assembly to resists vapor condensation inside the wall.
To do this, you must thoroughly insulate the wall cavity behind the tile backer (spray foam is best). This impedes the free movement of water vapor through the wall cavity, and moderates the temperature change (thermal gradient) within this space to reduce the chance of a dew point forming within the wall fabric.
A solid, well insulated, and well waterproofed outside shower wall means no condensation in the wall cavity, which means no mold, no dry rot, and no damage to backer board and surrounding framing.
Using Drywall as a Tile Substrate
Drywall should never be used as a shower wall substrate in standard shower walls, or any location where there is persistent moisture.
Even with green or blue drywall board, the paper facing is only slightly water-resistant and their gypsum core absorbs water like a sponge. Terrible stuff for a shower area, needless to say.
Types of Backer Board for Shower Walls
There are four primary types of tile backer boards used in modern shower construction:
- Cement board
- Fiber cement board
- Glass mat board
- Foam backer board
- Waterproof Cement Board
These materials are often referred to interchangeably as tile substrate panels, shower wall underlayment, or tile backer systems, depending on the manufacturer and application.
Each material type has different characteristics in terms of structure, moisture behavior, installation difficulty, and cost. Some boards prioritize structural strength while others focus on installation convenience or integrated waterproofing systems.
Understanding these differences is the key to choosing the best backer board for your shower project.
Cement Board
Traditional cement boards are made from cement and aggregate reinforced with fiberglass mesh. The materials are compressed into rigid panels that provide excellent strength and durability when attached to wall framing.
These bullet-proof boards have a long reputation of strength and durability, but they are also heavy and somewhat brittle, making other types of tile backer boards gain in popularity over the years.
Standard 3'x5' sheets of cement board typically cost around $10–$15 per board, making it the most cost-effective backer board option.
Common cement board brands include:
Fiber Cement Board
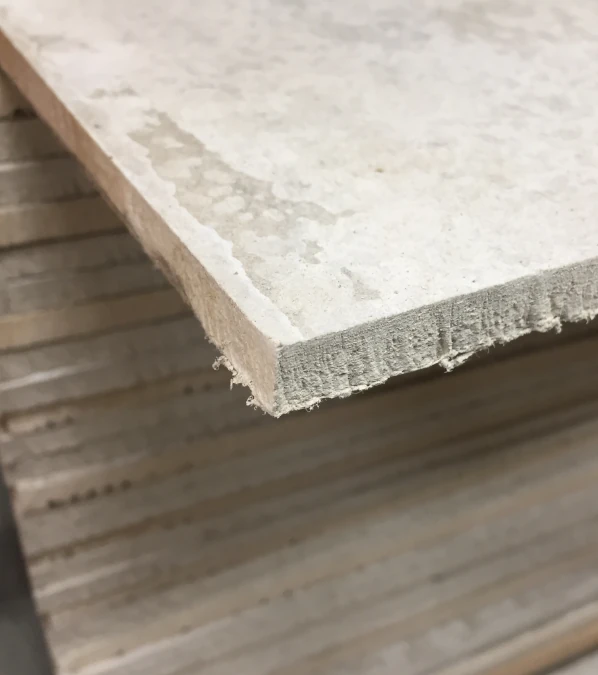
Fiber cement boards are similar to traditional cement boards but include reinforcing fibers that distribute stress, which increases flexibility and reduces brittleness.
Most fiber cement boards combine Portland cement, silica sand, and cellulose fibers.
Like the cement boards described above, they also have a uniform composition. But unlike standard cement board, they're flexible enough to be manufactured in 1/4″ thicknesses as well as the standard 1/2″ thickness.
All FCB's also claim to resist compression, moisture and mold.
These panels can be very similar in price to traditional cement backer board, or as much as 1.5x the cost.
Common fiber cement board brands include:
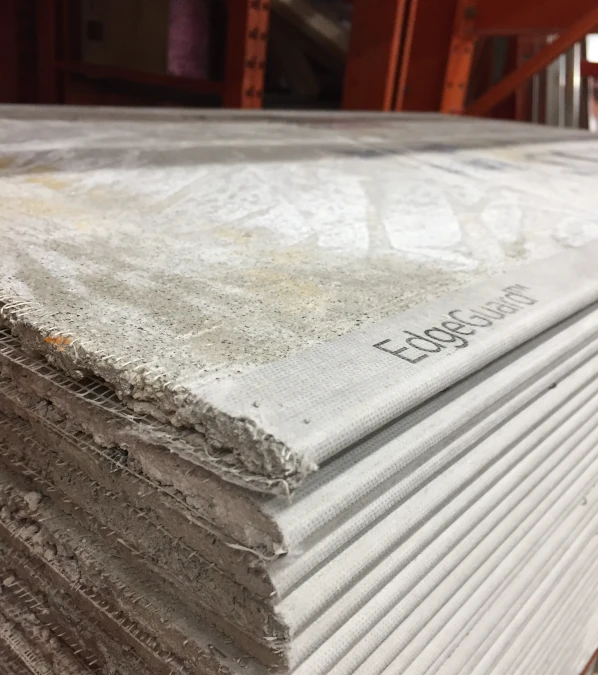
Glass Mat Gypsum Board
Glass Mat Gypsum Tile backer is NOT a fiber cement board or a cement backer board for shower walls.
This distinction matters because glass mat boards are often marketed alongside cement board but can perform very differently in wet environments if your waterproofing strategy is not sound.
It contains no cement; it's a layered product composed of a gypsum inner core with a fiberglass layer on the front and back face of the board.
However, glass mat panels are also NOT drywall boards. They look much like regular gypsum wallboard, but have an entirely water resistant, paper free (mostly fiberglass) surface, and a water-resistant gypsum inner core.
Glass mat TBB's only come in 1/2″ thickness, because they would not be structurally rigid enough if any thinner.
Pricing typically ranges from similar to cement board up to 1.5x higher depending on brand.
Common glass mat board brands include:
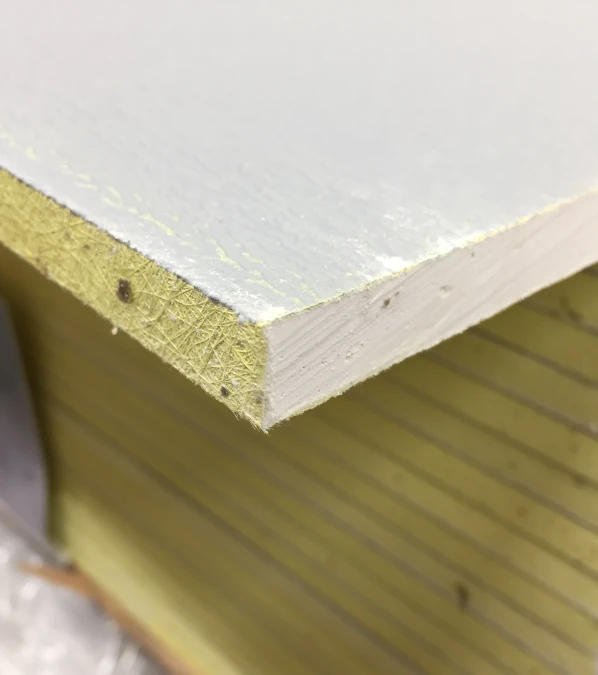
Foam Backer Board
Foam tile backer boards are a completely different beast compared to the cementitious backer boards, and they are often misrepresented, so they deserve a bit more explanation.
Instead of cement or gypsum, foam backer boards are made from extruded polystyrene (XPS) or polyisocyanurate closed-cell foam cores with a bonding layer on both faces.
The layer on each side is reinforced with either fabric/fleece or cement, making it the perfect tile ready substrate for thinset bonding. They are also up to 80% lighter than cementitious TBB's, and are highly moisture resistant.
Although other tile backer board manufacturers market their boards as waterproof, they have no vapor resistance ratings whatsoever (perm ratings). Only foam boards can be considered a truly waterproof tile backer in my opinion, since their perm ratings qualify them as vapor-resistant as well as waterproof.
In addition to 1/2-inch thickness for shower walls, they also come in thicker dimensions for building structural assemblies like shower benches, partition walls and shower niches. The minimum thickness is 1/2″ because like glass mat TBB's, they become far too flexible at thicknesses below 1/2 inch.
Foam TBB's are generally about 4x the cost of cement TBB's.
Cost is often the biggest barrier for DIY installers considering foam backer board for shower walls.
Common foam board brands:
Common “cement-faced” foam boards:
Waterproof Cement Backer Board:
These boards contain small foam bits within their cement matrix which make them less water permeable than other "water-resistant" cementitious backer boards. Some are also a bit lighter as a result, but not all are lighter, for some strange reason.
The manufacturers claim that these boards that these "waterproof" cement boards have been tested to meet ANSI A118.10 standards for waterproofness, showing no water penetration after prolonged exposure, but this is deceptive marketing, in my opinion.
It's not that I think that they are lying, I only question the relevance.
These days, all tile backer boards are highly water-resistant, but not a single tile backer board available has an adequate perm rating to limit vapor infiltration into the wall assembly. In other words, the shower wall requires an additional waterproofing membrane whether the backer board is "water-resistant" or "waterproof", so these "features" are essentially meaningless.
What the foam bits do accomplish is to make these boards more flimsy... too flimsy in my opinion. I also don't really don't care about a reduction in weight.
They are also a few dollars more expensive than standard cement boards.
Common waterproof backer boards:
Comparing Shower Tile Underlayment
There’s no single best backer board for showers — only the right material for your specific project, budget, and installation approach.
Today’s tile backer board for shower options include cement board, fiber cement board, glass mat backer board, and foam backer board. All of them can perform well in a shower when installed correctly, and combined with the appropriate waterproofing strategy.
You should always keep in mind that cement backer board was never designed to be a waterproofing layer, and is only highly water resistant due to additives in the cement and on the bonding surface. Without these additives, it would absorb water quite readily.
From a contractor’s perspective, the biggest differences come down to:
- weight and handling
- waterproofing requirements
- installation speed
- total installed cost (not just material price)
Below is a practical breakdown based on real-world performance.
Cement Board vs Drywall (Shower Applications)
Traditional cement backer boards are not waterproof, but they are dimensionally stable when wet, meaning they do not swell or degrade with moisture exposure. Drywall is not.
There are a few shower systems where drywall is allowed behind a bonded waterproof membrane but personally, I would never install drywall panels on a shower wall unless I'm installing an acrylic shower kit over top of it.
Using cement board, or another tile backer board is now the industry-standard for shower walls.
Cement Board vs Fiber Cement Board
Fiber cement boards (like HardieBacker) are often grouped in with cement board, but they’re not exactly the same.
They’re typically denser and have a smoother surface, which can make them easier to score and snap cleanly. FCB tends to produce finer dust, than cement board but this is basically irrelevant. You need to use a good quality respirator when cutting both materials, especially when using a cutting wheel (lots of dust).
In terms of performance, both provide excellent rigidity and a solid bonding surface for tile.
Fiber cement board is a bit easier to work with because it doesn't fracture around the edges when attaching it to the wall.
In practice, most installers choose between the two based on familiarity and handling preference, not because one is dramatically better than the other.
Comparison Table:
| Feature | Cement Board | Fiber Cement Board |
| Rigidity | Excellent | Excellent |
| Brittleness | Higher | Lower |
| Weight | Heavy | Heavy |
| Ease of Cutting | Moderate | Easier |
| Screw Holding | Good | Excellent |
| Edge Breakage | Common | Rare |
| Cost | Lower | Moderate |
| Waterproofing Required | Yes | Yes |
Cement Board vs Glass Mat Backer Board
Glass mat backer boards are built differently. Instead of a fully cementitious core, they use a gypsum core reinforced with fiberglass mesh.
They’re lighter than cement board and much easier to cut, which can speed up installation.
However, this is where you need to be careful.
Most glass mat boards rely on a moisture-resistant surface layer. If that surface is compromised and water gets into the core, the board can absorb moisture much more readily than cement-based products.
That doesn’t mean they can’t be used in showers — it just means your waterproofing needs to be done super carefully.
They are also easy to damage around the edges which tends to make storage, handling and install a bit of a pain.
They can easily crack and buckle at the edges during install, similar to drywall so again, you need to be extra careful, and your substrate needs to be flat.
Cement Board vs Foam Backer Board
Traditional cement board is heavy, dense, and requires a separate waterproofing step. That means more labor — cutting panels, fastening, taping seams, and then applying a waterproofing membrane.
Hybrid cement boards like PermaBase are essentially cement board with small bits of foam mixed throughout. I know it's confusing, but it's basically just cement board; the only big difference being that it's lighter than traditional cement board.
Foam backer board are completely different.
They are lightweight, easy to cut, and typically come with built-in waterproofing. The only additional “waterproofing” work is sealing the seams and fasteners with some special goo (branded waterproofing sealant).
A big difference is the low perm rating for most foam panels, which means they should not be used on an exterior adjacent shower walls without additional waterproofing… which kind of defeats the purpose of spending the extra money for a “waterproof” board.
However, inside adjacent shower walls are much quicker to put together when using these panels because waterproofing requirements are much less strict.
- Cement board → lower material cost, higher labor
- Foam board → higher material cost, lower labor, inside walls only
For contractors, foam boards often win for interior walls because of speed and super easy shower niche construction/ installation. I have noticed that DIYers can go either way – mostly depends on their budget.
Ease of Installation Comparison
While structural performance is almost always considered the most important performance factor for pros, ease of installation also plays a major role when choosing a tile backer board, especially for DIY installers.
Cement and fiber cement boards are heavy and generate lots of dangerous silica dust when cut, requiring carbide scoring tools or angle grinder (with masonry cutting wheel). And a respirator is absolutely required when cutting these materials to protect yourself from silicosis of the lungs. This means more hassle, more work, and more time spent.
Glass mat boards are easier to handle because their gypsum core allows scoring and snapping similar to drywall. This makes them attractive for installers who want some of the durability of a tile backer board without the cutting difficulty of cement-based products.
Foam boards are the easiest to install. Panels can typically be cut with a utility knife and are much lighter to carry and position on the wall framing. For larger projects, the reduced weight and easier handling can really reduce installation time.
Ease of Install Comparison Chart
| Feature | Cement | Fiber Cement | Glass Mat | Foam |
| Cutting Difficulty | High | High | Moderate | Easy |
| Dust Production | High | High | Low | None |
| Weight | Heavy | Heavy | Moderate | Lightweight |
| Skill Level | Moderate | Moderate | Low-Moderate | Low |
Material Cost vs Labor Trade-offs
One factor many homeowners overlook when comparing shower backer boards is the relationship between material cost and installation labor. This often doesn’t matter so much if you’re doing a diy project in your spare time, but it’s big consideration when you’re hiring a contractor/ installer to do it.
Traditional cement boards are relatively inexpensive but heavier, more difficult to cut, and can crack quite easily during cutting. This can increase installation time and labor costs, but also increase material costs due to replacement of broken boards.
Fiber cement boards are similar to cement boards to cut and install, except board replacement risk isn’t really a factor since these panels don’t usually suffer this type of critical breakage during cutting.
Glass mat backer installs are very similar to foam backer board installation because both just require a utility knife however, glass mat boards often need a bit of trimming after scoring and breaking. This could add a little bit to the install time, but it would likely not be significant.
Foam backer boards cost significantly more per panel, but they install much faster because they’re lightweight, with waterproofing integrated into the board. In many professional installations the reduced labor time can seriously offset the higher material cost.
Just keep in mind that a shower wall substrate made of foam backer board panels can only be considered a complete waterproof shower wall system if your shower has no exterior walls. If exterior walls are involved, additional waterproofing is almost always required.
Material Cost vs Labor Comparison Chart
| Type | Material Cost | Labor Time | Total Installed Cost |
| Cement Board | Low | High | Moderate |
| Fiber Cement | Moderate | Moderate | Moderate |
| Glass Mat | Moderate | Low | Moderate |
| Foam Board | High | Low | Moderate |
Waterproofing Requirements Comparison Chart
| Board Type | Waterproof on Its Own? | Requires Membrane? | Best Waterproofing Method |
| Cement Board | No | Yes (always) | Sheet or liquid membrane |
| Fiber Cement | No | Yes (always) | Sheet membrane preferred |
| Glass Mat | No | Yes (critical) | Surface membrane (mandatory) |
| Foam Board | Sometimes | Depends on location | Seam sealing + optional membrane |
Backer Board Comparison Chart
Below is a complete summary comparison of the four types of tile backer board used in shower wall construction. This chart focuses on structural rigidity, compression strength, moisture behavior, and cost — the four primary performance factors discussed in detail above.
| Feature | Cement Board | Fiber Cement | Waterproof Cement Board | Glass Mat Board | Foam Board |
| Structural Rigidity | Very High (brittle) | Very High | Moderate | Moderate | Low–Moderate |
| Compression Strength | Very High | Very High | Moderate-High | Moderate | Low |
| Moisture Resistance | Low | Low | Low-Moderate | Surface Resistant | Moderate |
| Vapor Permeance (Perm Rating) | Very Poor | Poor | Poor | Poor–Fair | Fair-Good (varies by type) |
| Requires Waterproofing Membrane | Yes | Yes | Yes | Yes | Sometimes (varies by type) |
| Ease of Cutting | Difficult (dusty cutting tools) | Difficult (dusty cutting tools) | Difficult- Moderate (a bit easier than CB) | Moderate (score & snap) | Easy (utility knife) |
| Panel Weight | Heavy | Heavy | Moderate | Moderate | Lightweight |
| Installation Difficulty | Moderate–High | Moderate–High | Moderate | Easy | Easy |
| Material Cost | $ | $$ | $$ | $$ | $$$$ |
| Pro Preference | Common (Budget) | Common (Premium) | Common (based on preference) | Common (Inside shower walls) | Increasing in popularity |
Keep in mind that these ratings represent general tendencies rather than strict rules. Actual performance depends heavily on framing conditions, stud spacing, and the waterproofing system installed.
Best Backer Board by Use Case:
- Best for exterior shower walls: Cement or fiber cement board + sheet membrane
- Best for interior showers: Foam board or fiber cement
- Best for DIY installation: Foam backer board
- Best for heavy tile: All boards
Contractor Insight:
If you're business is building bathrooms and showers, reducing install time and minimizing waterproofing risk is often more important than material cost alone. Choosing the right shower storage system can significantly reduce callbacks and labor hours.
Shower Backer Board Installation Overview
Wall Prep - Shower Installations
Before installing any cement backer board for shower walls, the wall framing must be properly prepared.
Studs should be flat, plumb, and aligned in the same plane. If the framing surface is uneven, the backer board will follow that surface and the finished tile installation will also be uneven.
In other words, even minor deflections in the backer board surface can lead to visible tile lippage, especially with larger format wall tiles.
Installation Rules - All Cementitious Boards
All joints between cement backer boards must be taped with alkali-resistant mesh tape and embedded in thinset mortar or an approved joint sealant to prevent cracks and moisture infiltration.
A small gap should be left between the edges of cement backer boards to allow for expansion and contraction during temperature changes.
Cement backer board should be fastened to the wall studs with corrosion-resistant screws or nails, typically every 8 to 12 inches.
Tile backer boards do not generally require pre-bonding before applying thinset and tile, but the entire surface should always be clean and slightly dampened before applying thinset mortar for tile installation. Thinset can be applied with a notched trowel to ensure good contact between the tile and the cement backer board.
Cement backer board should not be installed directly on the shower pan or tub flange to prevent wicking moisture, which can lead to deterioration and mold issues.
If you’d like more details on Installation of Cementitious Backer Units, you can always review the ANSI code standards for tile installations. Specifically, ANSI A108.11
Cement Board and Fiber Cement Board Installation
As mentioned above, it's very important to use corrosion‑resistant backer board screws when installing cementitious backer boards. I always use Rock-on screws or Backer-on screws.
Drywall screws are not suitable because they can corrode, causing the screw head to break off, compromising it’s holding strength.
I always pre-drill and countersink the screws as well, because cementitious board can fracture and break at the edges if the screw is driven aggressively with no pre-dill or countersink.
Glass Mat Board Installation
Glass mat boards install similarly to drywall but still require proper backer board fasteners.
Care must be taken not to over‑drive the screws. If the fastener breaks through the surface layer, it can lose much of its holding strength.
Foam Board Installation
Foam backer boards typically use proprietary fasteners with large washers that distribute the load across a larger area (about the size of a US 1 dollar coin… remember those?).
The manufacturers of most boards suggest installing a fastener every 8 inches. Fasteners can also be installed by straddling the board seams. This makes it possible to secure two adjacent panels with the same fastener.
Because many foam boards serve as both the tile substrate and waterproofing layer, fastener penetrations must be sealed after installation to maintain the integrity of the waterproofing system.
Another important consideration is stud spacing. Foam boards are designed to be installed on 16-inch stud spacing (or less) to reduce the risk of deflection. In other words, walls framed at 24 inches on center require additional reinforcement to prevent board deflection, grout cracking and possible tile bond failure.
Bathroom Tile Backer Board – Shower Bench and Niche
Before fiber cement backer board for shower was readily available, I was using traditional cement backer board for shower benches and niches, simply because it's super rigid.
But as soon as HardieBacker fiber cement backer board for shower was available at my local wholesaler, I started using it almost exclusively for all the custom shower niches and benches I built.
But eventually I caved to the pressure of building with prefab foam shower components because they basically did the job faster, and without compromise (with some conditions).
Shower Bench Construction
The most important priority when building a bench in your shower enclosure is structural rigidity.
This means solid framing, a rigid cementitious backer board, and a properly installed waterproofing membrane; ideally a low-perm sheet membrane.
A shower bench must be able to carry hundreds of pounds of direct load without flexing. If it flexes (deflects) the grout lines will crack, compromising the integrity of the tile assembly.
These days, most contractors (like myself) avoid the complications of building their own shower bench by simply installing a waterproof XPS foam bench that integrates with the waterproofing membrane.
Custom Shower Niche Construction
Custom shower niches do not carry the same structural load as benches, but they still require solid framing support and a rigid tile backer board.
For that reason, I used to prefer cementitious board such as fiber cement when building custom recessed niches, but I’ve changed my mind about that since cement faced foam backer board panels were introduced.
Cement-faced foam boards can perform extremely well in custom niche installations when they’re well supported, and foam board is soooo much easier to work with.
Where custom niches commonly fail is not structure, it’s waterproofing. That’s why foam niches are so easy, because they’re constructed using sealing adhesives, which usually makes waterproofing unnecessary.
Waterproofing seam tape is also available for joint sealing, but it’s basically redundant with foam niche seams because the sealing adhesives are really effective. As such, seam tape is mostly for board margins, and when niches are constructed with other board materials.
Missing two paragraphs
Prefab Foam Niche Alternatives
Because of the growing demand for shower storage, I have built a fair number of tall vertical custom niches with multiple shelves. I usually construct these niches with cement faced, foam backer board panels like Wedi Board.
But more often than not, I just install a standard prefab Schluter niche, or a Wedi niche. Both of these brands come in several sizes that can meet the needs of most homeowners.
And when waterproof integrity and ease of installation is a priority for a client, I routinely install a prefabricated stainless steel niche or a well-engineered, in-grout, stainless steel corner shelf instead.
Contractor’s Note:
Many of my clients who want shower storage without the waterproofing complexity of a recessed niche, often choose in-grout stainless steel corner shelves instead.
Prefabricated SS niches reduce framing complexity, eliminate waterproofing and tiling hassles, significantly shorten installation time, and eliminate the water vapor permeance problem altogether.
From a waterproofing standpoint, factory-built stainless steel units remove all the common failure points inherent in custom-built recessed boxes (niches). For many homeowners and professionals, that means peace of mind, and fewer call-backs.
Additional Applications and Performance Attributes
Beyond rigidity and moisture resistance, some tile backer boards offer additional performance characteristics that may influence your choice.
Foam boards provide a small amount of thermal insulation, which can be helpful when installing tile on exterior walls or over heated flooring systems. This insulation benefit is more about creating a thermal break, than it is about providing any significant insulating value (R-value).
Cement and fiber cement boards also offer superior dimensional stability and compression resistance, which makes them ideal for additional reinforcement of structural wall assemblies (load bearing walls). Some say that they are also best used for heavier tile installations, but this is not accurate.
Large Format tile
Larger format tiles (up to 24x48 inches) as well as large porcelain panels are becoming more popular for shower walls and floors, but these giant tiles come with some unique installation challenges for DIY’s and pros alike.
One of these challenges is the importance of wall flatness. If you read over my How to Tile a Shower post, you’ll understand how difficult it is to manage tile lippage with larger format tiles. But, in that discussion I wasn’t really talking about 24x48 inch tiles, let alone the larger porcelain panels. I was basically referring to 12x24’s or 24x24’s.
To install these 24x48 (or larger) porcelain beasts, you must trowel an awfully thick mortar bed, for one thing (thicker than ½ inch notch). But if you hope to get anywhere near the 80-90 percent thinset coverage required for a reliable bond, you also need an almost perfectly flat shower wall.
Because of how large and inflexible these tiles are, they also require a very rigid tile substrate. That means a solidly framed stud wall with stud spacing no larger than 16” on center. It also helps to have an extra rigid, fracture resistant tile installation substrate like cement backer board or even better, fiber cement board.
Installing Backer Board Outside the Shower
Cement board is preferred as a tile underlayment in wet areas because it performs far better than plywood, which can warp, rot, and swell. As such, it can also be a great underlayment for ceramic tile or porcelain tile bathroom flooring installations, because of the periodic moisture exposure in these areas.
Cementitious tile backer board can also be great for ceiling reinforcement and to improve tile bonding if you're planning to install ceramic tile or porcelain tile on the ceiling of your shower. It’s also great for decorative tiled feature walls and kitchen backsplashes.
The preferred material (and thickness) for these installations is ¼ inch fiber cement board. The ¼ inch thickness provides the balance of strength and rigidity that’s perfect for applications like these that don’t require the same deflection resistance as a shower wall.
Common Mistakes When Installing Cement Backer Board in Showers
- Installing vapor barrier behind AND membrane on top (water vapor sandwich)
- Using 1/4 inch board on walls
- Using the wrong fasteners
- Improper fastener spacing
- Failing to seal seams and corners
- Failing to thoroughly insulate the stud wall
Installing Vapor Barrier Plastic Sheeting
Installing a sheet of vapor retarder plastic behind the backer board is a terrible idea if you're planning to install an under-tile waterproofing membrane, since water vapor can get trapped between these layers and condense into water.
This problem usually occurs in an outside shower wall when the installer is unaware of the water vapor sandwich problem. An ANSI certified waterproofing membrane should be the only moisture barrier in any outside shower wall.
You can read more about this in my Shower Waterproofing post.
1/4 inch Thick Backer Board Panels on Shower Walls
These panels are designed to be installed as a tile backer for floor tile, not on shower walls.
They do not provide a solid base for shower wall tile installations because they're too thin and flexible to prevent deflection of the tile assembly between the wall studs.
1/2 inch thick tile backer board panels are required for a lasting installation.
Using the Wrong Fasteners
Even when a good waterproofing membrane is attached to the board face, using the wrong fasteners (like drywall screws) can cause corrosion and screw head detachment.
This in turn, can cause backer board movement from the tile weight, resulting in cracked tiles and grout, or complete failure of the tile assembly.
Improper Fastener Spacing
I see this quite often. Installers neglecting to apply the correct spacing between fasteners for reasons I cannot fathom. Another problem I see is not countersinking the backer board screws before driving them in.
I've seen this many times on the job site as well. Hasty installers not bothering to countersink and driving screws too aggressively, causing fractures at the board edges and corners.
Both of these sloppy install strategies can cause the board to move, resulting in the same problems as above.
Failing to Seal Seams and Corners
Skipping joint treatment leaves weak points behind tiles that can lead to cracks in the tile assembly, leaks in the membrane, and eventual water damage.
The industry standard is to apply alkali-resistant fiberglass mesh tape to all seams and corners during cementitious backer board installations. Manufacturer approved seam tape or joint sealant should be applied to all seams and corners during foam board installations.
Failing to Fully Insulate the Stud Wall
Failing to thoroughly insulate the stud wall cavity behind the backer board is a one of the primary causes of water vapor condensation on an outside adjacent shower wall.
Without adequate insulation in the stud cavity, cold outside air can move deep into the cavity, creating a dew point in the wall fabric. See my shower waterproofing post for more information.
Best Backer Board by Project Type: Decision Table
| Project Type | Recommended Board |
| Budget Remodel | Cement Board |
| Exterior Shower Wall | Fiber Cement + Sheet Membrane |
| DIY Remodel | Foam Board |
| Custom Niche Build | Foam Board |
| Heavy Stone Tile | Fiber Cement |
| Fast Contractor Install | Foam Board |
| Long-Term Durability Focus | Fiber Cement |
Expert Summary: Choosing the Right Shower Backer Board
The best backer board for shower walls depends on balancing structural rigidity, waterproofing strategy, and installation efficiency.
- Cement and fiber cement boards offer the highest strength but require full waterproofing systems
- Foam boards simplify installation with integrated waterproofing but are less rigid and often require extra waterproofing on exterior walls
- Exterior shower walls require careful vapor control to prevent condensation inside the wall cavity
For most professional installations, fiber cement board paired with a sheet membrane provides the most reliable long-term performance in shower enclosure construction.
Key Takeaways
- Cement and fiber cement boards provide the highest structural rigidity for shower walls.
- Foam boards are easier to install but generally less rigid.
- Foam boards inhibit water vapor but are best for interior shower walls only.
- Backer boards provide structure, while waterproofing membranes control moisture.
- Glass mat boards can perform adequately when properly waterproofed.
- Both components are necessary for a long-lasting shower wall assembly.
My Final Recommendations
Choosing the best cement backer board for shower walls depends on several factors, including shower location, framing conditions, tile size, waterproofing strategy, and installation preferences.
Cement and fiber cement boards are very popular among professionals because of their structural rigidity and durability, but cement board is still the most popular due to it’s low cost. I still use them on occasion if fiber cement is I’m doing an outside shower wall and there’s no fiber cement board available. Not often in other words.
My preference as a pro has always been fiber cement board (HardieBacker) along with a good waterproofing membrane, just because it does everything that a tile backer is supposed to do, and does it all very well.
But in recent years, I’ve changed my tune a bit by switching over to cement faced foam board (Wedi Board) exclusively for all the interior shower builds because they’re easy to install and offer integrated waterproofing.
Foam boards also make shower niche installations easier because I use Wedi foam niches for all my standard niche installations, and Wedi Board for all my custom niche builds.
Foam board waterproofing is good enough for interior walls, but I do not generally use them for exterior shower walls simply because most require additional waterproofing due to their low perm ratings.
Glass mat boards are definitely an option on interior shower walls, but they require careful waterproofing to protect the gypsum core, so I don’t tend to install them that often.
FAQ – Cement Backer Board for Shower Walls
What is the best cement backer board for shower walls?
In most residential shower applications, fiber cement board offers the best balance of rigidity and durability. It provides higher compression strength than foam boards and is less brittle than traditional cement board. However, the “best” choice still depends on stud spacing, tile size, and whether the wall is exterior. Regardless of board type, proper waterproofing is mandatory.
Is cement backer board waterproof?
No. Cement backer board is moisture resistant, not waterproof. It can tolerate exposure to moisture without deteriorating, but it still allows vapor transmission. A separate waterproofing membrane — either sheet or liquid — must be installed in shower applications.
Do I need a waterproofing membrane over cement board in a shower?
Yes. A waterproofing membrane should always be installed over cement or fiber cement board in a shower. Backer board provides structural rigidity, but it does not stop moisture vapor from entering the wall cavity. Skipping the membrane is one of the most common shower construction mistakes.
What thickness cement backer board should be used for shower walls?
For standard stud walls spaced 16 inches on center, 1/2-inch cement or fiber cement board should be used. Thinner 1/4-inch panels are designed primarily for floor applications and can allow excessive wall deflection when used vertically.
Can you tile directly on cement board without waterproofing?
Technically yes — but it is not best practice. While cement board will not immediately deteriorate, moisture vapor can migrate into the wall cavity over time, potentially affecting insulation, framing, and adjacent materials. Long-term durability requires a membrane.
Is foam backer board better than cement board for showers?
Foam backer board integrates waterproofing and is lightweight, which makes installation easier. However, cement and fiber cement boards generally provide superior structural rigidity and compression strength. The better option depends on performance priorities: structure vs installation convenience.
What happens if you install drywall behind tile in a shower?
If drywall becomes saturated, the gypsum core can weaken and the paper facing can delaminate. Since tile is bonded to that paper surface, the entire tile assembly can detach from the wall when the paper separates from the core. This is why drywall is not recommended for shower enclosures.
Is glass mat backer board good for shower walls?
Glass mat board can perform adequately on interior shower walls when properly waterproofed. However, because it contains a gypsum core, structural integrity can degrade if moisture penetrates the surface layer. Proper membrane installation is critical.
What is perm rating and why does it matter in showers?
Perm rating measures how much water vapor can pass through a material. Lower perm ratings mean less vapor transmission. In shower walls — especially exterior walls — controlling vapor movement helps prevent condensation inside the wall cavity.
What is the most important feature in a shower backer board?
Structural rigidity. If the wall flexes, the tile assembly also flexes, causing cracked tile and grout. Backer boards provide structure, and waterproofing membranes provides moisture control. Both are necessary for a long-lasting shower.
Can cement board grow mold?
Most cement boards inhibit mold growth, but mold can eventually develop on any backer board and surrounding materials, if moisture is present.
How long does cement board last in a shower?
When properly waterproofed, cement board can last decades without deterioration.
Is HardieBacker waterproof?
No. HardieBacker is moisture-resistant but still requires a waterproofing membrane in shower applications.
Do you need a vapor barrier behind cement board?
Never use a vapor barrier behind cement board in a shower. The only acceptable waterproofing is a single layer of sheet or liquid waterproofing membrane applied to the backer board surface.
What is the best waterproofing for shower walls?
Sheet membranes generally provide more consistent waterproofing than liquid-applied systems, especially in high-risk areas like outside shower walls and niches.
Can you use cement board in a shower without RedGard or membrane?
No. Cement board is not waterproof, nor is any “waterproof” backer board vapor-proof. As such, a liquid or a sheet membrane is always required to prevent moisture from entering the wall cavity.
What is the difference between cement board and backer board?
Cement board is a type of backer board made from cementitious materials. “Backer board” is a broader term that includes cement board, fiber cement, foam board, and glass mat board.
Is cement board better than drywall for tile?
Yes. Cement board is far more durable in wet environments because it does not deteriorate when exposed to moisture, unlike drywall.
Do you tape cement board seams in a shower?
Yes. Seams should be taped with alkali-resistant mesh tape and thinset mortar to maintain structural continuity and prevent cracking.
What goes behind cement board in a shower wall?
Typically, nothing. A surface-applied waterproofing membrane is used instead of a vapor barrier behind the board to avoid moisture trapping.
Is fiber cement board better than cement board for showers?
Fiber cement board is generally easier to work with and less brittle, while providing similar structural performance, making it a preferred option for many installers.
Can foam board be used on exterior shower walls?
Foam board can be used, but only a particular type of commercial grade foam board can be used on its own (has a very good perm rating), otherwise additional waterproofing is usually required for most standard foam boards.

About the Author
Steve G is a professional bathroom remodeling contractor with extensive hands-on experience building and waterproofing custom showers. As co-founder of Redblock Industries, he specializes in designing durable, high-performance shower systems and stainless steel shower storage solutions.
Steve has installed dozens of shower wall systems using cement board, fiber cement, and modern waterproofing membranes, giving him real-world insight into what works — and what fails — over time. His content focuses on helping homeowners, advanced DIYers, and contractors build longer-lasting, problem-free showers.
Learn more about Redblock Industries’ approach to product design, affiliate relationships, and transparency on our Affiliate Disclosure page.


Reader Comments
Selected reader questions and replies from the original post.
Barry Redoute · 11/25/2024 -
Hey Steve, thanks for the great info on the TBB. For a shower wall and bench, My question is what sealing method do you use (red guard, etc) on the seams and over the entire board (if any) and screws after installing the fiber cement board (like Hardie backer)? Thank you, Barry
Steve · 11/26/2024 -
Hi Barry, Thanks for your comment! I really prefer sheet waterproofing membranes over liquid membranes any day. My favorite one is Subliner Dry from Wedi. But you can read a lot more about my views on this topic by checking out my waterproofing membrane post. Good luck with your project! Steve
Tyler C. · 6/11/2023 -
Thank you for all your hard work in these articles ! The shower backer board one was literally perfect, it went through every detail and facts. I’ve been reading a lot of different articles online about this subject and when I read yours I knew my answer would be here. Definitely would have paid for this information at the beginning of my journey. Thank you again for all that you’ve written in these pages !
Steve · 6/12/2023 -
Hi Tyler, Thank you so much for your comment! Although my blogging efforts can sometimes be burdensome, it’s comments like yours that really keep me going! Good luck with your project! Steve
Denise · 1/28/2023 -
Hello! Thank you for this informative post. We are considering installing large format tile in our (new construction) bathroom. The tile we’re looking at is 48″x48″ — each tile weighs 50 lbs. The shower is 60″x36″. We’re hoping to DIY the tile installation, but are a bit apprehensive about using such large tiles. Is there a particular backer board that is better suited than another, to support the size and weight of large tiles like this?
Steve · 1/28/2023 -
Hi Denise, Thank you for your comment! You couldn’t go too far wrong installing any tile backer board, as long as it’s installed correctly. The size of the tile isn’t really important because the tile, grout and thinset mortar become a single uniform layer after curing. In essence, one super heavy tile, so the downward (shear) force applied to the backer board is the same with a 48″x48″ tile or a 6″x6″ tile (assuming the same tile thickness). I personally prefer using a cement board like Durock, or a composite board like Hardibacker, simply because these boards adds to the structural integrity and rigidity of the wall assembly. Important side note: I know it might seem like an easy DIY job because each tile covers so much wall area… much easier and much quicker, right?… Wrong! In my experience, the larger the tile, the larger the trouble. Unless the wall is PERFECTLY FLAT, the edges/corners of adjacent tiles will be very difficult to match. I’m talking about tile lippage… in a big way. I am not saying that it’s impossible to accomplish for a DIY’er, but I’m saying that you better be prepared. The correct large format tile mortar, a thick enough mortar bed, levelling clips, back buttering, a rubber hammer. Check out my Tile Installation post for more info. I’m sorry to say that I don’t think this is a DIY job. I would suggest that you hire a professional tile installer for this job. And not just any tile installer… only somebody with experience installing these large format tiles. Sorry for putting a damper on your DIY tile install plans. I just thought you should know what your getting yourselves into. Good Luck! Steve
Dave Palmer · 1/8/2023 -
I have a decorative ring of tiles installed around my shower walls about shoulder high. It’s a row of 4 1x1in glass tiles. The person who installed them had no idea what he was doing. By the time I realized this, it was basically too late. Apparently, he had never installed the thin decorative/mosaic tiles before. Thus, the tiles are recessed. I’m tired of looking at it. I’ve contracted a company to replace the tiles, because I don’t have the experience to do it myself with any degree of certainty that it will turn out well. The person I’m working with, who has 25 years of experience installing tiles is telling me that it will nearly possible to install new tiles in the ring. The reason he says is, my has decided she wants a row of 1 inch tiles, a row of 2 inch tiles and another 1 inch tiles. The guy I’m dealing with (who will not the person to actually install the new tiles) said it will take at least 3 days, one day for each row of tiles. Not sure why that is? Anyway, I’ve done a lot of research about backer boards and your article is the most informative I’ve read. Thank you for that. So my question is this, is it possible to cut 1 inch strips of a backer board to raise the thin 1×1 tiles, install the backer board strips around the ring in the wall where the 1×1 tiles will go, and then install all the tiles at one time? The 2×2 tiles are thicker and don’t need the backer board. To me that seems like the only way to accomplish leveling the decorative tiles with the existing wall tiles. Additionally, with a backer board only 1 inch wide, what would be the best way to secure it to the wall? Do you think the backer board screw would damage the 1 inch strip? Since it’s such a small strip and probably won’t affect the underlying wall, could the strips just be installed using quick set instead? Your opinion would be great appreciated.
Steve · 1/8/2023 -
Hi Dave, Thank you for your comment! I appreciate that you’re trying your best to come up with a solution to this problem, but I would recommend against cutting out a strip of the backerboard. Tile backer board is a significant structural element within the tile assembly, and there’s also likely a waterproofing membrane under the tile layer. For those reasons (and others) it’s not a good idea to cut a swath out of the backer board. I’ve used two approaches to solve this problem: The first is to simply leave the existing tiles in place and apply a new strip of tiles over the existing tiles. Obviously, this technique only works if your existing tile mosaic strip is recessed enough (and your new tiles are thin enough) to allow the tile surface planes to match. It’s definitely worth spending a bit of time looking for a tile with the right thickness (uniform thickness) because of the speed and ease of this technique. There are specific thinsets (and tile surface treatments) that are engineered for bonding tile to tile. Ask you local tile wholesaler what they’d recommend. If the above is not possible, it should only take a few hours of careful work to remove this strip of tile and clean out the residual mortar. You would need to be careful not to damage the waterproofing membrane (assuming there is one). As long as you only hand tools, the backer board should be safe during this process – it doesn’t take much force to separate these tiny tiles from the mortar or to scrape away the excess mortar. I’ve used my trusty chisel to do this, but there are several tools and techniques one could use. After the section is adequately cleaned, I would apply a bonding agent like diluted Weldbond to ensure good thinset (see my Tile Installation post). I usually use Schluter Ditra (comes in two thicknesses), or stainless steel mesh, to raise mosaic tiles to match the adjacent tile plane but there are several other options. Again, you should ask you local tile wholesaler. Good luck! Steve
Dale Stucker · 11/27/2022 -
Hello Steve, Thank you sir for covering this topic so well. Easy to read, conversational, and detailed where needed and I appreciate that. I have a couple questions. One regarding best backer board use when tiling my Delta 17″ tub/shower combo. Also a question for which tiles to set first (end walls or side wall). some background… I installed all of the plumbing for total accessibility from the ‘other side of the stub wall for future servicing should that need arise.) Currently I have my exposed studs covered at the bottom with a 6 inch tall HD self adhesive 1/16 ” rubber membrane attached to the bottom inside lip of the tub. I then covered that with HD plastic sheeting, also from the bottom of the tub lip, over the 6″ membrane, and up to the ceiling. Not pretty to look at but perfectly watertight and usable to shower with until the tile gets installed (Wife insists we don’t stop here; – ). My need to tile came to light when I tried to install the Delta 3 piece surround I purchased when I bought the tub. I discovered that the tubs 60″ side wall was not vertical and was leaning over the tub. That gap would not allow the left end surround section (with plumbing) and the right end(exterior wall) surround sections to mate up properly to the side surround section creating Big gaps at the bottom. I ruled out shimming the wall. Fortunately each wall surface is flat to itself.) 1. Would it be best to thin set the angle cut the end walls tiles first and then thin set the long side wall tiles (row by row going up) tight against the end wall tiles to help cover the angle cuts and present a smoother corner transition on the two corners surfaces? I’m planning to use 12″x24″ inch tiles set vertically. 2. On the other side of the 60″ tub side wall is my laundry room and the washer and dryer are against that same wall. Would it be prudent to use 1/2″ cement board on all three walls over using flexible Kerdi board to help stiffen the walls and help hold the cement and grout together should/When the washer decides to go dancing? Or is there a reason I’m not seeing something that would suggest otherwise? My plan is to leave the membrane and plastic in place under the backer but trim it up a tad to just above the bottom edge of the backer and tile? oh yeah. One more. Our city water here is very hard and we do not use a softener. Which kind of tile surface do you recommend for this type of water? Smooth and glossy tile or something else? Any thoughts on future cleaning of these tiled surfaces would be great.
Steve · 11/29/2022 -
Hi Dale, Thank you for your comment! You have run into one of the most common shower remodel issues… non-plumb and non-square shower walls. I’m sure it’s as frustrating for you as it always is for me. To answer your questions: 1. I always tile the back wall (long wall) in a shower alcove first. Because this wall is the largest, it requires the most time for tile setting and it’s the most visible. As such, you don’t want to have to worry about anything other than keeping your tiles properly spaced and level during this relatively long and fiddly process. Even if the side walls of your alcove are significantly out-of-plumb, the tiles on the R and L sides of the back wall won’t likely require angle cuts (or even clean edges) because they will often be covered by the side wall tiles. I explain this in greater detail in my shower tile install post if you’d like to check it out. 2. I always prefer cementitious tile backer board to the foam stuff every time because it creates a more rigid and unified sub-structure, but there are times when I use foam board. In your situation – especially if the washer/ dryer is connected to the wall, or if the floor is not concrete, I would definitely choose cement backer or Hardibacker. This would of course involve an extra step – applying a waterproofing membrane (especially on the outside wall). See my waterproofing membrane post for my recommendations. As for the preferred type of tile for hard water, you can check out my shower tile install post for that too. Good luck with your project! Steve
Edie · 11/12/2022 -
edie 11_12_2022 I am remodeling old bathroom. I am placing onyx brand solid sheet wall panels and base. what is your recommendation on backer board. I can say 38×38 low profile base weighs 103 pounds and 38×84 inch walls are heavier yet. I would appreciate any suggestions. thanks.
Steve · 11/12/2022 -
Hi Edie, With a semi-rigid, solid surface material like this, I would generally say that the backer board material doesn’t matter. I don’t think you need to worry about the weight of the product. Regardless of the backer material, the silicon adhesion will significantly reduce the weight that bears down on the shower base. And if you follow the install directions, the silicon contact between the backer and the Onyx board will be extensive, so the risk of de-lamination is very low as long as you apply a bonding agent to the backer board surface before installation (to ensure good silicon adhesion). Diluted Weldbond works great for this. Good luck! Steve
Thelo · 8/3/2022 -
Good day, I have heard from several contractors saying fluting wall is the best for the shower wall. Is that right? my understanding the way they do it using a black paper on the studs than install Steel Lath on it and start a layer of mason mortar mix wait until dries than another layer again wait until dries than thin-set mortar on top and the marble tile and grout and call it done. other said black paper on the studs 1/2 hardy backer board than coat it with (Mapelastic Aquadefense Liquid Membrane) than thin-set and marble tile and grout. two different ways and each saying this is the best way. who to believe I don’t know. your advice highly appreciated
Steve · 8/4/2022 -
Hi Thelo, Thank you for your comment! The first is basically an exterior stucco/ plaster finishing technique. I have seen similar methods used in showers in the (distant) past but this was decades ago. The second is an under-tile waterproofing technique engineered specifically for modern showers. It’s been lab and field tested extensively for many years, and has become “best practice” in the industry. Needless to say, I would go with the second option but with a couple of modifications. I would not apply any membrane on the studs before backer board install. Any semi-permeable membrane like “black paper” will only serve as a condensation surface. Secondly, I would not use a liquid waterproofing membrane over the tile backer board. A good “sheet” waterproofing membrane such as Kerdi DS, Wedi Subliner Dry, or Durock sheet membrane would be preferable. There is nothing basically wrong with Aquadefense but most liquid membranes do not compare with these sheet membranes in terms of their perm rating. Thirdly, I would insulate the stud cavities behind your backer board as thoroughly as possible (if it’s an outside wall). If you have a 3 1/2″ stud depth, I would seriously consider spray foam insulation in these cavities to increase R-value and decrease moisture transmission. Here’s more info from my waterproofing post. That’s my two bits! I hope it helps! Steve.
Angela · 6/15/2022 -
Hello! I am wondering how easy it is to remove a Schluter Kerdi shower niche and replace it, or if it’s possible to replace the grouted tiles in the niche itself, along the sides and back, without damaging the integrity of the waterproofing?
Steve · 6/16/2022 -
Hi Angela, Thank you for your comment! It is not easy (or advisable) to remove the niche unless you are planning on removing some wall tile around the niche because the waterproofing membrane around the niche will need to be repaired when the niche is replaced. And if the tile backer board (under the wall tile) is a foam board like Kerdi Board, this will not be possible either. It is also not a good idea to attempt to remove the tile in a niche like Kerdi SN because you will essentially destroy it. Foam board and foam niches are not durable enough to be used twice. It may be possible however, to remove the foam niche and the tiles around the niche, but only if a cementitious backer board (CBU) was installed under the wall tiles. You would still need to be fairly careful removing the wall tile but CBU’s are very hard and quite durable. Sorry for the bad news. Good luck! Steve
Andy - 04-15-2022 -
Steve, I'm ready to install a Tile Redi shower pan for my project. Before it arrived, I hung backer board around the top of the enclosure, leaving the last bit for after the pan is installed. Now that it's here, it seems to be thicker around the walls than my backer board. Do I need thicker backer board to match the thickness of the shower pan walls in order to avoid uneven wall tile at the base where the pan meets the wall? Thanks for the assist!
Steve · 4/15/2022 -
Hi Andy, Thank you for your comment! First of all, you should not have installed your backer board before installing the pan. The installation of this pan is difficult and messy enough even when you follow their directions. As you’ve already noticed, the side walls are 1/2″ thick so only in the best case scenario will your backer board meet flush with the side walls of this pan, which is totally unrealistic. I would suggest that you install the pan flush with the back wall and one of the side walls. If the side wall you choose is not perfectly perpendicular to the back wall, you will have to make it so beforehand. After install, only the other side wall will need to be furred out to make the backer flush with the pan side wall. If this wall is perfectly parallel to the side wall of you pan, you can simply install 1/4″ Hardibacker or 1/8″ panel board (depending on the gap) to furr out the stud wall enough to allow your 1/2′ backer to be flush with the pan. More likely you will need to use a combination of shims, construction adhesive, 1/4″ hardibacker (or panel board), and your 1/2″ tile backer board, to get this wall parallel and flush. This is a very fiddly process so you’ll need to exercise some patience. Don’t worry too much if your finished wall is a bit proud or slightly recessed from the shower pan side wall. You can adjust your tile mortar thickness to accommodate. I hope that helps. Good luck with it! Steve
Jody Meyer · 3/27/2022 -
I am doing research on these boards at our local Lowe’s store and found one brand (Hardieboard) with a version that says it is “100% waterproof cement board”. It claims to have “hydro defense technology” (trademarked). Do you believe that this is actually waterproof? Your article states that foam backer board is the only waterproof backer board. Any thoughts?
Steve · 3/27/2022 -
Hi Jody, Thank you for your comment! This is a marketing tactic more than anything else, since “waterproof” only means that liquid water will not flow through it – not a very impressive claim. The only measure that means anything when it comes to shower wall waterproofing membranes is “water vapor permeance”. A product’s vapor permeance rating (perm rating) represents how much water vapor will pass through it under controlled conditions. Since I can’t seem to find any reference to “perm rating” in any of the promo material or specifications, I am going to guess that its perm rating is too low to consider it a “waterproofing membrane”. My advice would be to always install a waterproofing membrane over your tile backer board, unless you’re installing a foam board product like Wedi Board or Kerdi Board. Btw, foam backer boards have a low enough perm rating to be considered true “waterproofing membranes”, that is why these products can serve as both a backer board AND a waterproofing membrane. Good luck with your project! Steve
Rick in MI · 11/19/2021 -
Steve, I am finishing a basement of a 18 year old Michigan home. The basement walls are poured cement. I used 2″ thick (R10) 4×8′ Owens Corning 250 XPS and spray foam where needed BEHIND my framing around the entire basement, along with the same 2″ XPS plus spray foam, caulk, and a thick layer of spun rock wool in the rim joints. I framed this bathroom with fir to provide additional strength and water resistance, just in case. The plan is to build the bathroom with universal design in mind to perhaps allow ageing parents to rehab there if ever necessary. Plus, my wife and I are both in our late 50s so we could perhaps use this some day also. Anyway, the sloped curb-less shower size is roughly 78×48″ with plans for a 36″ glass door opening (and a total 78″ (36″+42″) glass wall into the shower area. Three walls will be tiled, and the 48″ wall near the entry farthest from the shower heads is an outside wall. As much as I would appreciate the ease of use carrying this into the basement, I am a bit leary of using any of the soft and lightweight materials (Wedi, Schluter, etc) as a backer board, as I am concerned about possible compression from a wheelchair or walker, or falls, being a potential problem. My plan was to use some form of 1/2″ cement board and Redguard with their membrane mesh (in corners) on all three tiled walls and all 4 corners. Because I plan to build a traditional mortar/cement shower pan, I presume this needs to be coated with Redguard also. I am still trying to decide what would be best for the ceiling over the shower? The rest of the bathroom framing is covered with purple board, but the shower ceiling remains open. What backer board do you suggest that I use for the ceiling? Would 1/2″ Schluter or Wedi be rigid enough for the ceiling over the shower, or perhaps a 1/2″ fiberglass option might be better? Or maybe I should just stick with a cement board… perhaps doubling 1/4″ sheets since I will be installing these alone? This shower is not a steam shower and there will be an appx. 12″ opening above the glass wall with a heady-duty exhaust fan centered in the purple-boarded ceiling. Am I missing anything obvious/important? This is the 3rd basement and bathroom I have built, but the first one with a shower. Should be fun! THANKS in advance!
Steve · 11/19/2021 -
Hi Rick, Thanks for your comment! It does sound like a fun project. Firstly, I would say that if you plan to create your own mortar/cement shower pan, it’s very important to install a drain assembly that is compatible with your waterproofing membrane. This is a great video by Schluter systems that shows you how to do this with the Kerdi drain (which is a great option). As for your backer board… I wouldn’t hesitate using 1/2′ Wedi foam backer board on the walls as long as your studs are 16″ on center (or less), and you are not installing tiles smaller than 6″ (long side). Any other 1/2″ cement, fiber, or glass matt boards are also great options. For waterproofing, I always prefer a sheet membrane over a liquid. Even with your thorough insulating efforts, it would still be much safer to use a low perm sheet membrane like Wedi Subliner Dry or Kerdi DS. If you install the Wedi wall boards, you will not need any additional waterproofing on the walls but the shower floor will still require it, of course. The water resistant drywall is usually OK for the ceiling as long as it’s sealed and painted well. Wedi Board would also work great, even if you decide to tile the ceiling. It’s always a good idea to waterproof the wall-to-ceiling margin, whichever board you decide to use. Good Luck! Steve
Dan · 8/29/2021 -
My home was built in the early 1950s and has brick and plaster on the exterior wall. What kind of backer board should be installed over that? Some of the plaster has deteriorated and suggestions have been made to use Durabond to repair it. Is that wise? Your posts are very helpful.
Steve · 8/29/2021 -
Hi Dan, Thank you for your comment! If I understand you correctly, your outside wall is brick (masonry) and there is no stud wall on the inside of your bathroom. If this is correct, there’s no insulation on this wall, which is a big problem. Another problem is that masonry happens to be a very effective moisture condensation surface. One of the biggest problems on any outside bathroom wall is lack of insulation. If there’s no insulation, moisture from the shower will condense on the masonry wall behind your backer board, no matter which backer board or waterproofing membrane you install, especially in the colder months. The way I would deal with this problem is to first cover the masonry wall with sheets of polystyrene foam insulation (I would suggest 1″) from floor to ceiling, sealing all the seams with polyurethane (no gaps). I would then build a stud wall in front of this foam wall and fully insulate this with regular insulation. A slightly easier but more expensive way would be to build your new stud wall against the masonry, then hire an insulation contractor to apply spray foam insulation between the studs. This method is superior because the foam effectively manages moisture penetration, as well as providing a much better R value per inch. If you do either of these options, it wouldn’t matter which backer board you choose. It’s always important to apply a good waterproofing membrane over your backer board regardless. In other words, you can repair your masonry wall for structural reasons, but it’s not a good idea to rely on this kind of treatment (Durabond) to address any of your shower waterproofing issues, in my opinion. Good Luck with your project! Steve
Addy · 6/28/2021 -
Hi Steve! After a ton of research, and the desire not to handle cement backerboard since I’ll be installing my bathroom by myself, I settled on GoBoard, mostly because of availability at my local Lowes. The appeal was that it’s lightweight, and 100% waterproof. Then I came across this article, particularly about your concern for the board’s deflection. I can’t argue with that—I’ve had similar concerns. You can’t have something that light-weight and not have any compromises. I did proactively add blocking to studs where all the GoBoard seams will meet, so that will definitely address deflection issues there. I am still concerned about the center of the board, particularly between the studs, even at 16″ apart. Do you recommend additional blocking? If so, how much additional blocking per sheet? Thanks in advance!
Steve · 6/28/2021 -
Hi Addy, Thank you for your comment! Yes, blocking at the seams is super important with these boards so it’s great that you’ve already taken care of that. Blocking is also great to reduce stud deflection in general, so it’s a great practice no matter what board you are installing. I think a horizontal brace (blocking) at the center of each board between every stud, should do the trick (assuming you’re installing 3×5 boards horizontally). That means that your blocking is 16″ apart vertically, which is ideal. I would also suggest that you make sure your blocking is flush with the stud face so you can screw one fastener into the center of each piece of blocking. Good luck with your project! Steve
G · 6/24/2021 -
This was really helpful! I’m a little confused on one point. My impression is that the Triton board is an MgO board, so although it’s cementitious, it does not contain Portland cement and has somewhat different properties.
Steve · 6/24/2021 -
Hi G, Thank you for your comment! I am not an expert on the Triton board, but it’s one of the more rigid backer boards out there so it basically gets the “thumbs-up” from me. Any rigid backer board is fine as long as you also install a good (low perm) waterproofing membrane over it. I would suggest you check out their website if you want to find out more about this particular board. Steve
RONALD M · 05-19-2021 -
Excelent article. Great summary of a complicated subject, well constructed so that one can make a decision as which product to use with corresponding cost guide. I will save this article for future pending use and as a reccomendation to others. thanks.
Steve · 6/5/2021 -
Thank you Ronald. I really appreciate the positive feedback! Steve
Ralph · 4/20/2021 -
Hello, The small bathroom and laundry room had to be remodeled due to water damage in my doublewide. (Stupid Hot Water Heater). The bathroom had 3/8″ Vinyl on Gypsum Sheetrock Walls. And my Bathtub/Shower Walls were just a thin plastic that was held up to the Vinyl on Gypsum with Adhesive and Plastic Rivets. I was suprised to see that the thin plastic shower walls never leaked through to the Sheetrock. I couldn’t get Vinyl on Gypsum Sheetrock to Replace. I just used Regular 3/8″ Sheetrock and painted 2 coats of primer and 2 coats of paint. My plastic 60″ x 30″ bathtub fits inside the Sheetrock Walls. Meaning the tub flange is exposed and not hidden or tucked under the Sheetrock. Meaning the tub flange doesn’t sit right up against the studs. The Sheetrock is between the Studs and tub flange. I want to screw 1/4″ GoBoard 3′ x 5′ over the Sheetrock to the studs so that I will be out past the tub flange. Then seal the seams per manufacturers instructions. Wait 24 to 48 hours for sealant to completely set up. Then install DumaWall Vinyl Waterproof Wall Tiles with Loctite Power Grab Construction Adhesive and Seal each seam in the DumaWall Tiles with a 100% Silicone has I install the DumaWall Tiles which is Manufacturers Instructions on a Completely 100% Waterproof Seal. My Studs behind the Sheetrock are 16″ on Center. But my thinking is that not tearing out the Sheetrock will help keep the Foam Board more structurally sound. Do you think this will be a good structurally sound, waterproof/water tight seal that won’t leak back to my Sheetrock Walls or Studs? Also is the Foam Board overkill or could I get away with just using one of the other backer board types? I was thinking GoBoard because it’s just easier for one person to install and it’s not a big mess to waterproof it. Just seal the seams and that’s it. Problem is, it’s not that easy to get the GoBoard at my local hardware store. Thanks, Ralph
Steve · 4/20/2021 -
Hi Ralph, Thank you for your comment! I think I’m understanding what you are saying, and it sounds pretty good to me. The GoBoard over your drywall is a fine choice, but it’s expensive. It might be easier/cheaper to use regular tile backer board (any type) and cover with a good waterproofing membrane. As well…I’m assuming that at least one of your shower walls is an outside wall, so it would be best to install a good membrane on this wall like Subliner Dry, Durock Sheet membrane or Kerdi DS. The GoBoard doesn’t have a good enough perm rating for an outside wall in my opinion. The drywall behind your backer board should be protected with either strategy. Good luck with your project! Steve
Jerry · 3/26/2021 -
Hello Steve: Thanks for information. it is very useful for me. I am planing my bathroom now. i will use kerdi-shower tray,Durock cement board,Kerdi waterproofingembrace(one exterior wall,one inside wall).My question is should use Schlutet thin-set mortar laydown tray to the subfloor? can i use Mapei mortar?i already have.and about membrace use it too. Another question is red gard and Kerdi membrace which way is better? thanke
Steve · 3/29/2021 -
Hello Jerry, You can install the Kerdi shower pan with Mapei thinset as long as its unmodified. Mapei has a few unmodified mortars including “Kerabond” and their “Floor Tile Mortar”. I would always use a sheet membrane over a liquid membrane every time. The regular Schluter Kerdi membrane is fine to use on an interior wall but I would install the Kerdi DS membrane on the outside wall if I was you, especially if it’s a 2×4 wall. Kerdi DS has a much better perm rating. Good luck with you shower project! Steve
Morley Walbaum · 3/3/2021 -
Hello Steve Are there any issues with installing Kerdi Board over 3/4″ plywood sheathed stud wall in a shower. I am completely renovating a 6’0″x 10′-0″ bathroom which will have a 3′-0″ x 6′-0″ walk in curbless shower at one end. I would like to install 3/4″ plywood over the 2 x 4 studs (16″ oc) on the 10′-0″ plumbing wall which also includes one of the end shower walls. This is desired for a couple of reasons: 1) mostly for backing for a wall hung toilet (Geberit carrier) and less critical for a wall hung vanity and LED mirror 2) the plywood thickness will also reduce the the length of the 6′-0″ by 3/4″ which is reqd to fit the tile module 3) the plywood at the end of the shower will allow for various locns of the sliding handheld shower head track. Within the shower I will attach 1/2″ Kerdi Board over the plywood but only attach thru the plywood where the studs are located. I will be installing 6″ x 18″ Carrera marble over the Kerdi Board within the shower. I have emailed Schluter but there only comment was to install over open studs not over plywood, – no other explanation even though I have sent further emails requesting Schluter’s reasoning? Not sure why the plywood would not be allowed under Kerdi Board that is only attached at stud locations. Is it that unstable of a material even though its behind a waterproofing membrane on an interior wall? I have purchased all of the materials a while back or I would switch to another product line. Can you shed any light on this? Further: Is it worthwhile to use plywood over a wall hung toilet carrier or is this overkill?
Redblock · 3/3/2021 -
Hi Morley, Thank you for your comment! I fully endorse your decision to use plywood as your first stud wall covering. I have often attached plywood to the stud face to create extra rigidity. I’ve also evened out a non-planar stud wall by attaching ply to a selectively shimmed stud wall to create a perfectly planar surface prior to backer board attachment. This helps reduce tile lippage. I also think it’s perfectly OK to install the Kerdi board over the plywood. You can see in this Schluter video that they are actually OK with attaching Kerdi board over existing drywall so it would be unreasonable for them to suggest that you can’t install it over plywood. Plywood is one of the most awesome building materials ever invented so I would never discourage its use to stiffen up a wall that will have unusual stresses applied to it (like a wall hung toilet). Most wall hung toilets do not technically require this, but I certainly don’t think it’s overkill. In other words… go for it! Good luck with the project! Steve
John mack · 2/28/2021 -
Hi Steve , you have packed a ton of info right there!! I wish you were located in Mytown Canada. We are planning a remake of a small bathroom, maybe with curbless entry, maybe not. A Kerri product appears likely. We are considering a Tile redi pan. One end wall is exterior. At 35 years old construction, we had drywall fail at around year 5-8. For a finished surface on the shower/tub wall, we used vinyl flooring, and it works well! Tons of patterns and colors. My wife painted it, and it still looks like a new install, to me. What products, material would you use for the interior exterior wall rebuilds, and is curbless somewhat ok ? John m . Thankyou for your hard work here! Thank you.
Redblock · 3/1/2021 -
Hi John, Thank you for your comment! I would always suggest using a good tile backer board for any shower wall. Either cementitious or Wedi foam board. If you use regular TBB, I would always suggest a good sheet waterproofing membrane be used as well. This is especially important on any outside walls, even if you decide to install foam board. If you are asking about the finished wall surface, I would always suggest a porcelain tile. Much lower vapor transmission through these compared to ceramic tile. Also a good water resistant grout like Mapei Flexcolor CQ. A curbless shower is always a challenging project for any DIY’er but I would always recommend it because it’s a very satisfying project, and a super cool look! However, you should never do this project without following the rule book (manufacturers install instructions, in other words). There is no room for error with a curbless shower. If you are leaning towards a foam shower pan, I would suggest a Wedi pan. The cement and fiberglass mesh coating makes it so much more resistant to damage during install and during its service life. Good luck! Steve
Richard Goldman · 2/23/2021 -
In your opinion, which mortar has the best adhesion to cured GoBoard Pro Sealant? The product is very sticky when applied, and seals seams and screwheads beautifully. It’s totally waterproof, which is a huge positive. However, I’m a little concerned in areas around windows and doors, where much of the GoBoard is covered in cured sealant, that the tile mortar may not bond well to it. Should I be concerned, and, if so, can anything be done to enhance the adhesion of the cured GoBoard Pro Sealant?
Redblock · 2/23/2021 -
Hi Richard, The GoBoard install instructions suggest that you can use both unmodified and modified mortar to bond tiles to its surface so presumably they are suggesting that both will stick well to the bare board as well as the sealant covered sections. Personally I would only use a modified thinset mortar because it should adhere better to the sealant covered areas than unmodified. I don’t really have a favorite modified mortar. You just have to make sure the one you choose is rated ANSI A118.4 (most are). That’s what Johns Manville recommends. Good luck with your project! Steve
Gene Eckhoff · 2/19/2021 -
Hi Steve, thanks so much for your quick response! I have one other question for you on the same project. The cast iron tub will be on a raised 2×6 platform framed 26 centers to accommodate a trap and drain as this is located in a basement over radiant slab. It has a 3/4” subfloor and I will add 1/2” backer (permabase). I’m thinking it would be more rigid to bond the backer to plywood with thin set and screw. Would you recommend that and if so what size notch trowel? BTW, I decided to go with waterproofing for the peace of mind. Thanks, Gene
Redblock · 2/21/2021 -
Hello again Gene, If I am understanding you correctly, you tub will be on a framed “box” that sits on the concrete subfloor. If so, It must be super strong to take the weight of a cast iron tub filled with water. I would go big on the support. I am not sure what you meant by “framed 26 centers” but if that means 26″ on center, that is not nearly enough. Make it strong…at least under the tub legs. 8″-12″ on center with a 3/4″ plywood deck would be great. Permabase screwed over top with a thinset base would be great as well (apply with 1/4″ square notch trowel). The Permabase would be a much better substrate for tile bonding and it would add rigidity. Claw foot tubs legs deserve extra support because the weight is bearing down on only four small points. And it also wouldn’t hurt to install a waterproofing on this box to keep any standing water from penetrating. Good Luck! Steve
Gene Eckhoff · 2/18/2021 -
Hi Steve, Thank you for your very informative post. I will be installing a tiled wainscoting about 4′ high in an alcove on an interior wall that abuts the furnace room. And was planning on using Durock or permasheild as backer, the tub in this case will be a free standing cast iron clawfoot that will have a curtain track on the ceiling when using shower. Would you still apply a waterproof membrane in this case or would mesh tape and thinset be adequate over seams and fasteners? I understand why it would be necessary in a tub surround or fully tiled shower, but it seems very unlikely that the tile would ever see much exposure to water. thanks so much for sharing your expertise! Gene
Redblock · 2/18/2021 -
Hi Gene, Thank you for your comment! I agree with you. You should not need a waterproofing membrane on that wall if it’s an inside wall, and it’s not going to be exposed to any water. If there is any possibility of splashing against this wall, it would be a different story. Either way, you should consider using a water resistant grout like Mapei Flexcolor CQ. Good luck with your project! Steve
Neil · 1/28/2021 -
Hi Steve, really excellent post, many thanks for taking the time to share your expertise. I’m having my shower re done. Having taken tiles off I’ve noticed the previous installer did absolutely no waterproofing at all, just normal plasterboard. And can see all of the issues that you describe first hand. I’m ripping off the boards and taking it back to studs on one wall, and building a new frame on the other. I’m undecided as to whether to use the foam based tile board or the cement type like hardibacker. I think the foam sounds better in terms of its waterproof nature, but I am concerned over the strength of the wall if these are used. Could I ask, if this were your project in your own house, what board onto the studs would you choose to use?
Redblock · 1/28/2021 -
Hi Neil, Thank you for your comment! I’m happy that my post has been useful to you. In my opinion, foam boards are generally adequate for inside walls, but I always prefer to install a standard cementitious backer board and a good sheet membrane like Wedi Subliner Dry for any outside walls. The Wedi sheet membrane has a .05 perm rating compared to the foam boards by Schluter and Wedi which are around .5 perms. That means these foam boards are 10 times more permeable to moisture! For the reasons mentioned in my post, I believe it’s very important to limit moisture transmission into outside walls as much as possible to avoid condensation in the stud wall. I am also not crazy about the flexibility of foam boards when installed on a wall with 16″ stud width, unless bracing is installed in the wall and you’re installing a cement faced board like the Wedi foam board. Good luck with your project! Steve
Alysha · 1/16/2021 -
I just wanted to give a big Thank You for such a detailed and informative post. Me and hubby are getting ready to reno our 1950’s pepto-bismol, original-plastic-pearlescent-tile bathroom. There is no fan in this room and everything is approx 70 years old. The tiles are falling off the walls, and I’ve finally had enough. I fear the amount of mold hiding behind the walls, so we are planning on taking her down to the studs and only keeping the bathtub. This is our first big solo renovation. While my parents are SUPER DIY and have been very helpful with other (weekend) reno’s, they live 3 hours away. This is not a weekend-only project, so we’re prepping to do most of it solo (with a 2 yr old underfoot, to boot). This post was super informative and helped me understand the differences in backer boards, and which would be best for my situation (durock). One step, out of about 1 billion that I can check off as “I’m pretty sure I understand/made the right choice”. THANK YOU!
Redblock · 1/17/2021 -
Hi Alysha, Wow! I’m super happy that you got some valuable info from my post. It’s very validating and motivating for me as a relatively new “blogger”. Good luck with your project! Steve
Bob Marquid · 1/15/2021 -
Hello Steve, I really appreciate your insight, thank you. My house is a post and beam constructed from an old barn. Our main bathroom shower is a tub surrounded on three sides by walls covered with tongue and grove pine boards. the tub is surrounded by shower curtains hanging from an oval rod suspended above the tub. I’m planning to tile down to the tub on three sides and enclose the front with a glass door. The walls are mostly plumb however, there is a beam that runs inside the wall horizontally about 4 feet above the tub and sticks out about 1/4″ past the surface of the tongue and grove pine on the wall. I’ll need to shim the wall out to make it plumb. Would you recommend that I use a cement board as a sheeting and then apply my foam backer board on top of that?
Redblock · 1/16/2021 -
Hi Bob, Thank you for your comment! If you’re simply furring out the wall and installing foam backer board over top, you really don’t need to install tile backer board. Plywood would be cheaper. Good luck with your project! Steve
D Smith · 1/5/2021 -
Hi Steve, My tiler is replacing our tub surround in a 1970 condo. One side adjoins the building electrical room and another side adjoins our neighbour’s wall. There is 1/2″ gypsum on the opposite side of our studs, then more studs on the other side of that, before the neighbouring walls. The tiler has brought 1/2″ kerdi board to put directly on the studs, and thinset then porcelain 8×12 tiles are supposed to go on top. I am mainly concerned about meeting fire rating which I believe is one hour. Any advice? Thanks, DS
Redblock · 1/6/2021 -
Hi DS, Thank you for your comment! You should probably ask this question to your local building inspector but it’s a pretty safe bet that you need to install a fire rated backer board. Since you are removing the original wall material, you would likely be required to meet the current code standards. I would suggest you install a cement board like Durock cement board because it apparently has a 2 hour fire rating. Kerdiboard does not seem to have any fire rating at all. And if Durock is not available in your area, it’s pretty easy to look up fire ratings for any other brand of cement board online. Good luck! Steve
Michael · 1/5/2021 -
Hi Steve, Can you talk about installing a shower wall drain? The drain we’re going to use in our master bath remodel is the Wall 48 from QuickDrain. Any installation issues I should be concerned with? My primary concern is how reliable it is. Is this particular drain style difficult to install? What, if any, are the risks/negatives of using a wall drain? This drain installation needs to be bulletproof in terms of NOT LEAKING! Can you advise me on how to make sure the contractor we choose does a great job?! Would you be comfortable using an experienced contractor that has never installed a wall drain? Thank you!!
Redblock · 1/5/2021 -
Hi Michael, Thank you for your comment! I will be writing a shower base post that will include info about shower wall drains, but for now I’ll address your questions directly. The installation of wall drains like this one are quite involved, so you should make absolutely sure that the contractor you hire is experienced in their installation. Personally, I’m not really comfortable with the requirement to cut a big notch out of the bottom plate of your shower wall (see install instructions for WALLD48). This plate is important to prevent flex in this wall. I would never cut a notch out of it for any reason. If you cannot fur out the wall enough to allow the drain hole cutout to clear the bottom stud plate, I would not install it. I would also recommend that you not install this wall drain on an outside wall unless the wall is furred out significantly (as mentioned above) to allow for adequate insulation in the wall adjacent to the drain pipe. Good Luck with your project! Steve
brian · 12/14/2020 -
i read if you install hardibacker or some other cementious backerboard then build the mud pan burying the backer board. water will wick up from the shower pan into the walls and curb and start destroying the backer board. if i built the shower pan then installed the backerboard leaving about 1/4″ gap between the mud floor and walls. of course i would red gard everything. is this a good practice or should i put the backerboard onto the mud floor.
Redblock · 12/16/2020 -
Hi Brian, If you are installing a mud pan with a waterproofing system like Redgard you don’t need to worry about water wicking up from the pan into the walls and curb because you are applying your waterproofing membrane over the base and backer board. Any undertile waterproofing membrane like Redgard will essentially prevent moisture from getting into this margin between the pan and walls. I would recommend fiber taping the joint between the floor and walls and apply three coats of Redgard. If you do this, you can install the backer board before you install the pan or afterwards. It won’t cause any problems either way. If you install the backerboard after, you should place the board directly on the mud pan. You do not want any gap between them. Here is a fairly good video showing a mud pan installed with a Schluter Kerdi waterproofing membrane. Good luck with your project! Steve
Ivy Hernandez · 11/9/2020 -
I love your posts – thank you so much! I’m going to hire a contractor to do bathrooms and kitchen. How can I assess whether he’ll use all the best practices you suggest? Like plombing and waterproofing the niche? Just ask?
Redblock · 11/10/2020 -
Hi Ivy, Thank you for your comment, and your compliment! It’s always best to do as much research as you can about products and “best practices” before you hire a contractor, and ask as many questions as you need to feel comfortable with the work they’ll be performing. Any decent contractor will welcome this kind of discourse because they’re proud of their work, and they’ll be happy that a client can appreciate all the work that nobody sees as well as the finished product. Ask your questions……and if they get uptight or defensive, move onto the next one. One of my past clients asked me when we first met “Are you going to install the orange stuff in my shower”. And the answer was yes! (she was referring to Schluter Kerdi waterproofing membrane). She was certainly no expert in the details of shower waterproofing but because of her research, she was able to indicate to me that it was important to her. Of course you will not turn a bad contractor into a good one by asking these kinds of questions, but it will indicate that you’re concerned about the “behind the walls” details and you’ve done your research. I think it makes a big difference. And if you think anything is going sideways during the project, you can always ask me! Good Luck! Steve
Emir Demirovic · 9/1/2020 -
Steve, thanks for the response. None of the shower walls are outside. Do I still need a waterproofing membrane over Durock cement board? Is the membrane made by Durock good option?
Redblock · 9/2/2020 -
Hello again Emir, Yes, it’s always important to install a waterproofing membrane. I have not used the Durock sheet or liquid membranes but both seem like fine options for inside shower walls as long as the install directions are followed. Good Luck. Steve.
Emir Demirovic · 9/1/2020 -
My installer will be using Durock cement board on the walls. What type of waterproofing membrane do you recommend over the Durock board. Thanks Emir
Redblock · 9/1/2020 -
Hi Emir, Thank you for your comment! I prefer Wedi Subliner Dry or Kerdi DS sheet membranes. These two (and a few others) have very low permeability so they are important to use if one of your shower walls happens to be an outside wall. I would suggest that you check out my waterproofing membrane post if you want more info. Good luck with your project! Steve
Roderick James · 5/22/2020 -
I have a contractor and he used Wonderlite backer board. He did not put any liquid membrane on it or anything. He just put the tile on top of that. Is that safe? He also built a niche, but behind the niche is just drywall, not the Wonderlite backer board…he cut through that to build the niche. Is that appropriate?
Redblock · 5/22/2020 -
Hi Roderick, Thank you for your comment. Although I haven’t installed Wonderboard Lite, I believe that it’s a decent tile backer board. However, your contractor should have installed a waterproofing membrane. I would never build a shower surround without applying a sheet or liquid waterproofing membrane to the tile backer board surface. There is an extremely high chance that moisture will condense in the shower wall if there is no membrane, especially if it’s an outside wall. If your contractor built a custom niche, the niche box should have a 2×4 frame around its perimeter with plywood backing. Then the Wonderboard should be attached to all the interior surfaces and a waterproofing membrane applied. An even easier strategy would have been to build the 2×4 niche frame only, then attach a premade (prefabricated) foam shower niche to this framing (no plywood backing needed). These foam niches come in various sizes so there is really no need to build a custom sized niche unless you insist on unconventional sizing. Sorry for the bad news. I know that it’ll be uncomfortable talking to your contractor about this so I wish you good luck! Steve