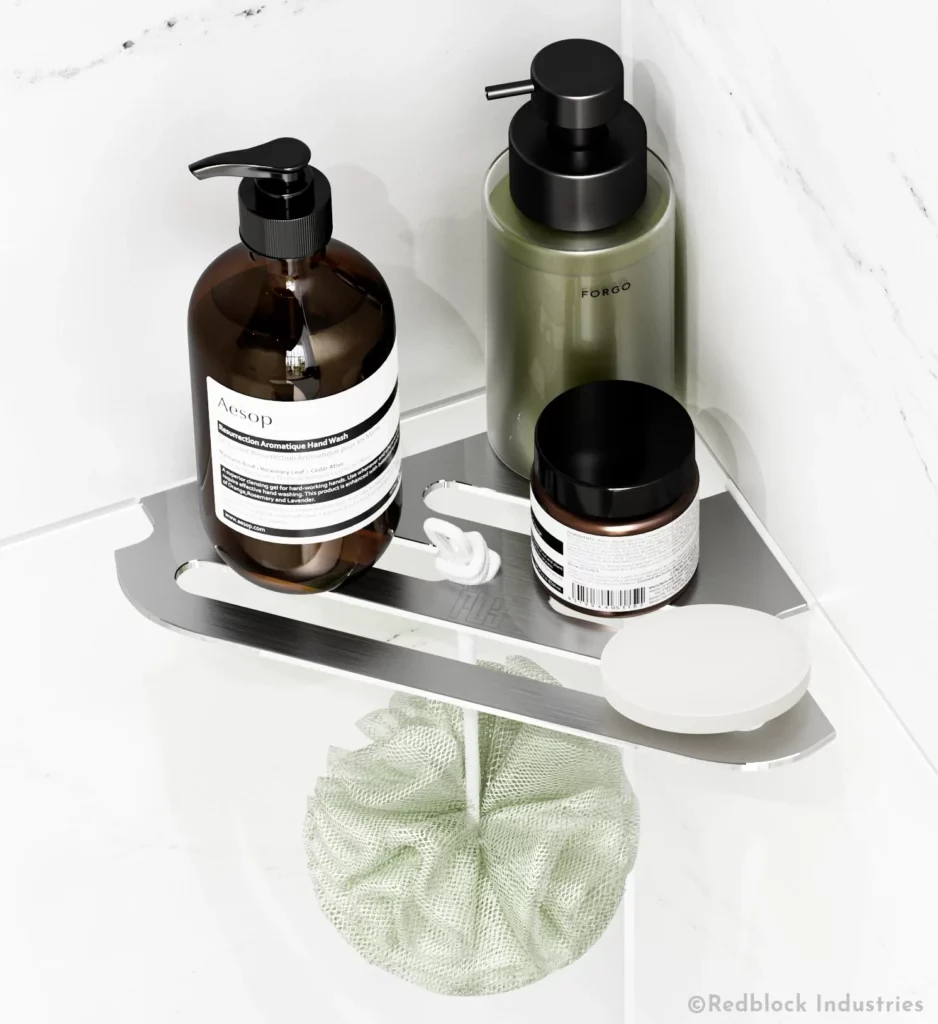
Shower Corner Shelves
There are many types of Corner shelves out there, but I believe that the best one out there is the Redblock Corner Shower Shelf. It's super strong, made from 3mm, super corrosion resistant, Marine Grade 316 stainless steel, and has plenty of slots for water draining.
This is also the only in-grout corner tile shower shelf that can be installed into non-square shower corners. However, if you're interested in seeing other corner shelf options, please check out my 9 Cool New Corner Shelf for Shower Options post.
Overview
If you're planning on installing shower shelf on already tiled wall, the Redblock rb3 corner shelf is ideal for this purpose. It's designed to be installed into the shower wall simply by removing a bit of grout at the install tab locations. That’s why it’s referred to as an "in grout" corner tile shower shelf. There are no brackets to install, no screws to drill through the wall, only two stainless steel tabs that get inserted into the grout line.
This shelf can also be installed into a newly tiled shower by installing spacers into the install tab locations before grouting. After grouting, simply remove the spacers and insert the shelf tabs (brackets) into the notches you’ve created in the grout line. The install tabs are 3mm thick, so it easily fits into 1/8″ (or larger) grout lines.
If your grout lines are 1/16″ wide, it’s still possible to install the shelf, but the grout line space needs to be widened out a bit. This means that a bit of tile will need to be removed from above the install tab/leg location (in addition to the grout), to allow the tabs to fit into the grout line. This should be quite easy to accomplish if the tiles are ceramic because they can be ground away with a sanding wheel (on a Dremel tool) to make them 1/8″ wide.
This shelf can also be installed onto virtually any shower wall tile (slate, porcelain, granite, or marble sheets) but the install notches must be cut or drilled out of the tile if there's no grout line to insert the tabs into. This can be a relatively easy task for a material like marble, but a bit more challenging for granite or porcelain. But it's certainly possible to install it into materials like granite, as long as you use the correct diamond drill bits and have a bit of patience.
Ad: The above two text links are Amazon affiliate links. See affiliate disclosure page for details.
Can you put Shelves Over Tiles?
Yes! These include suction, screw mount, and in-grout shelves. The suction type are easiest, but need to be re-secured regularly. Screw mount shelves need to be drilled into the wall. In-grout shelves only need to be inserted into the grout line between tiles, making them the best of all three.
For installing shower shelf on already tiled wall, you need the following tools and materials.
Measuring tape & Pencil
Grout Remover Tool
Shop Vacuum
Silicone sealer
Silicone Caulking Tool
Ad: The text links above are Amazon affiliate links. See affiliate disclosure page for details.
Step 1 - Determine Height
The first step of installing shower shelf on already tiled wall is to determine a good location for them. In other words, how high do you want your shelves (from the shower floor or tub) so they are easily accessible.
If you’re planning to install it on the wettest side of the shower (valve and shower head side), I usually recommend to my clients that it should be installed around chest height (around 48″).
This is based on a common preference to keep the shelves out of the primary “splash zone”. This way your shower items don’t get too drenched during showering, but are still within easy reach.
If you want to install two corner shower shelves, 48″ is also a pretty good height to start, but you may want to start a little lower if you’re planning to install three shelves, or the top one may get a bit too high to reach.
Of course if your planning to install on the opposite side of your shower (outside the splash zone), your lowest shelf can be lower… any height you want really.
If you want to install more than one, you should consider what you’re planning to store on your shelves to determine the distance between them. I generally install them 10″- 14″ apart, depending on tile size (distance between grout lines), and the homeowner’s preference.
Step 2 - Mark Out Install Location
The second step of installing shower shelf on already tiled wall is the marking out the install location(s). The shelf has two 2″ tabs (brackets) that insert into the grout line space, so you will need to mark these on the grout line to determine where the grout should be removed.
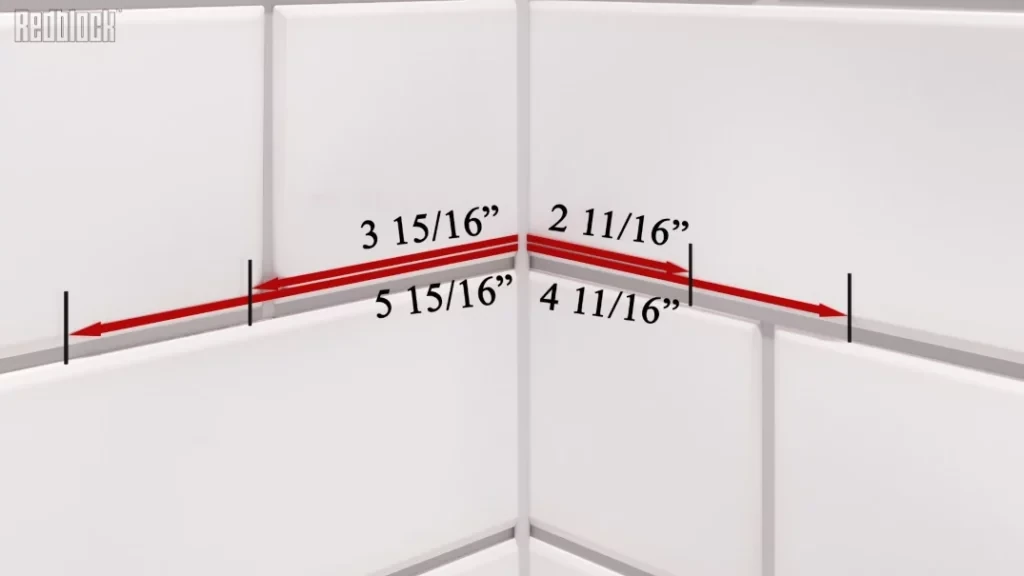
It's very well suited for installation into shower corners that are not square, but the exact install location will need to be adjusted if this is the case. As such, you should check your shower corner with a framing square before you mark out your install tab locations.
If the shower corner is more than 90 degrees, the shelf tab positions will be slightly closer to the corner. If the corner is less than 90 degrees, the install leg locations will be slightly further away from the corner. In my experience, even if the corner is super wonky, the most I’ve ever had to adjust the install location is 1/16″ one way or the other.
Assuming the shower corner is 90 degrees, the location of the grout cutout locations are:
Left installation leg: 3 15/16″ – 5 15/16″ from the corner.
Right installation leg: 2 11/16″ – 4 11/16″ from the corner.
Step 3 - Grout Removal
The third step of installing shower shelf on already tiled wall is grout removal. Because the rb3 corner shelf is an in-grout corner tile shower shelf, it requires that a bit of grout be removed in the two install tab locations.
The first grout removal step is to drill some pilot holes to 1/4″ depth. At least four or five pilot holes in the grout is a good idea. The more pilot holes, the easier it will be to remove the rest of the grout.
Be very careful not to drill deeper than 1/4″ because you may unintentionally drill through the waterproofing membrane.
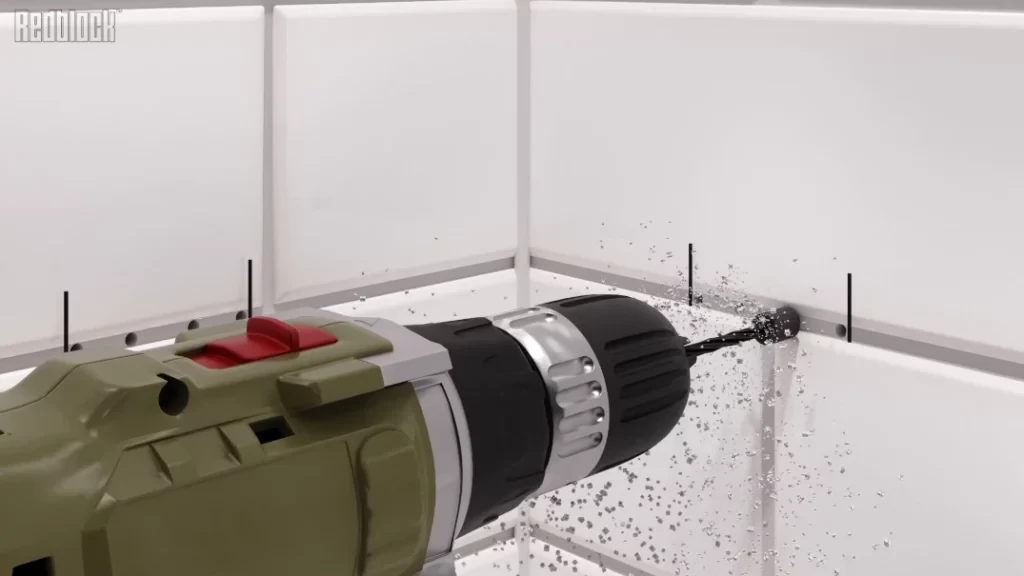
If you follow this pre-drilling strategy, you can easily remove the rest of the grout with a simple and inexpensive grout removal tool. You can buy this hand tool online or at any home improvement warehouse to remove the rest of the grout quickly and efficiently.
You can also use an oscillating tool, or a Dremel to remove the grout. Both of these methods are pretty darn fast at removing grout, but I wouldn’t recommend using them unless you’ve had some experience with this kind of tool (Ad: The text links above are Amazon affiliate links. See affiliate disclosure page for details).
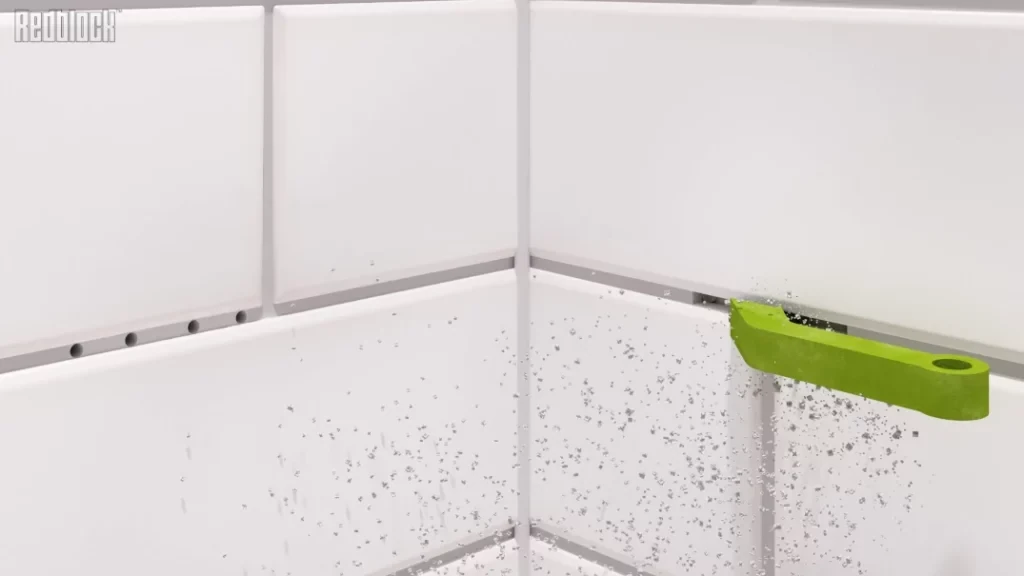
Step 4 - Clean Notches & Dry Fit
The fourth step of installing shower shelf on already tiled wall is the dry fit. After grout removal, be sure to clean out the notches thoroughly. I generally use my shop vac to make sure there is no debris left, and to keep any dust out of the air (Ad: The adjacent text link is an Amazon affiliate link. See affiliate disclosure page for details).
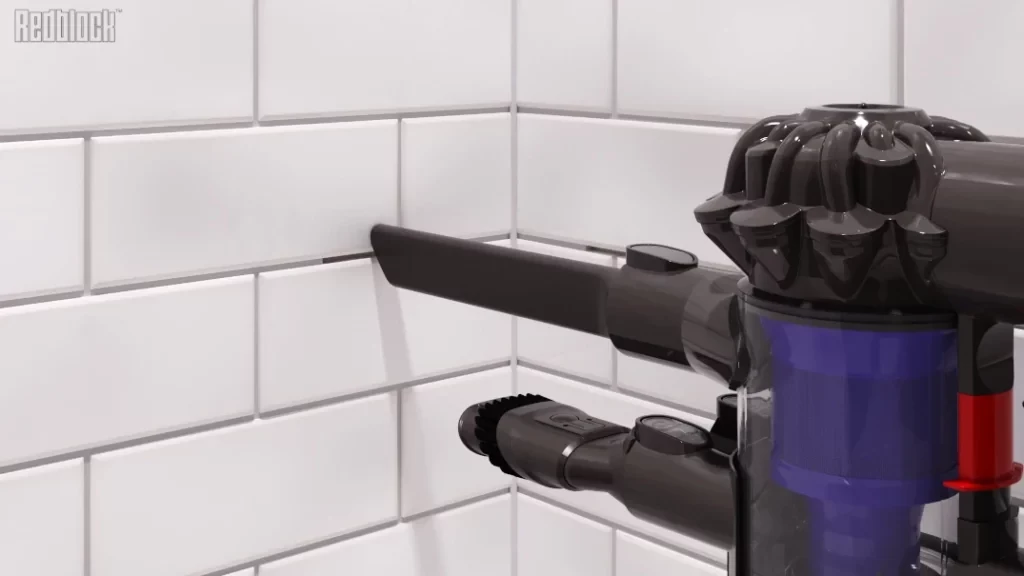
It’s also a good idea to look into the notches to make sure they are clear of debris. If it’s clear, you should do a quick “dry fit” so you can see it slide into each of the notches.
Always insert the right install tab/leg first and ensure it sinks into the notch at least 1/4″. You can also draw a pencil mark on the tab, or apply a strip of masking tape at the 1/4″ depth mark, to ensure that the tab/leg is seated properly into the notch.
There is an angle cut out of the leading edge of the left install leg, so it can easily swing into place after the right leg is placed. You’ll know that the left leg is seated properly when the angled section disappears just below the surface.
If the tabs insert properly into both notches, remove it again temporarily so you can do a final cleaning.
It’s also a good idea to wipe any dust off the tile face above and below the install notches. This will ensure the caulking adheres well to the tile above and below the shelf.
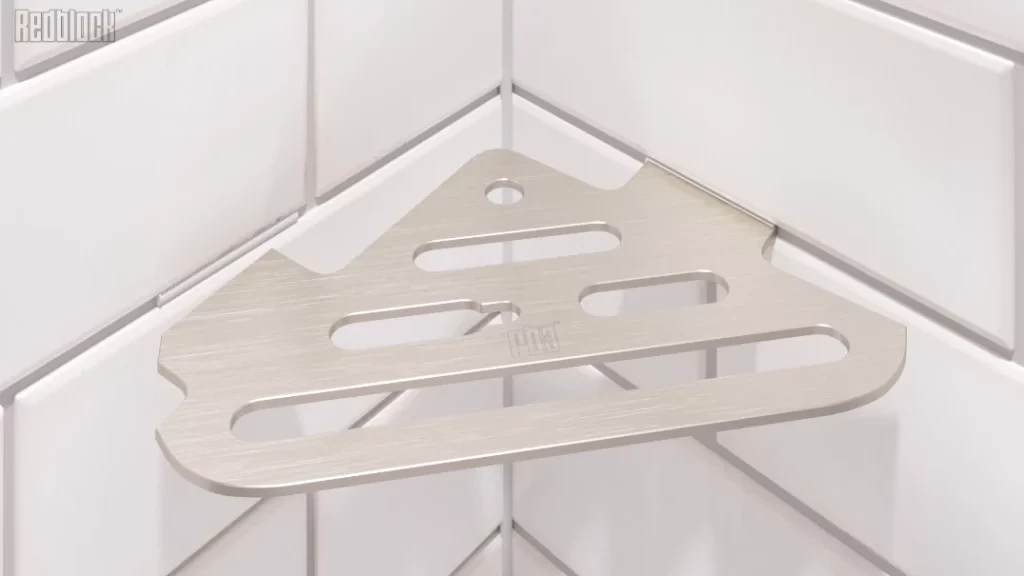
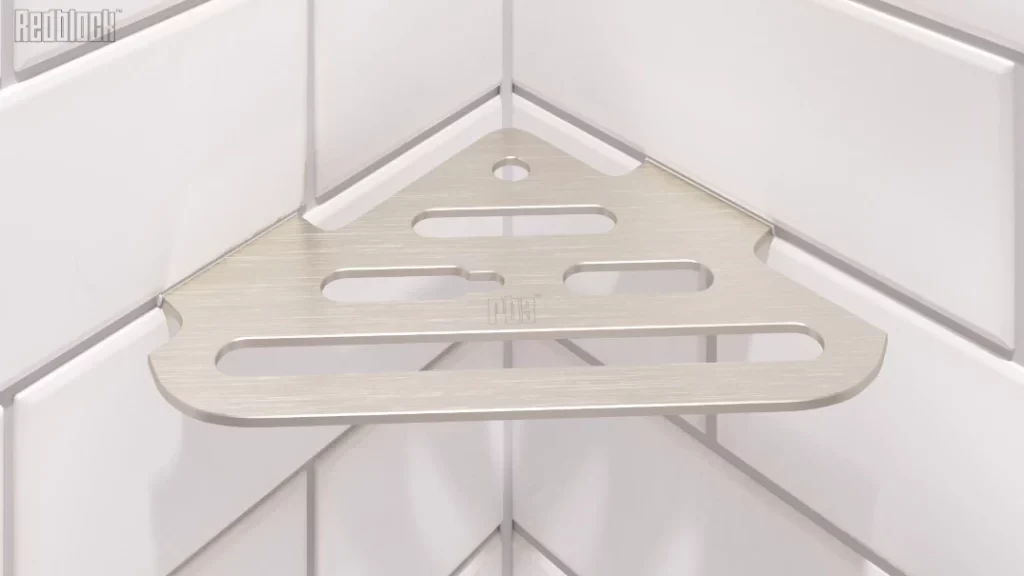
You'll notice that the install legs are the only section of the shelf that holds up these shelves. There are no brackets because none are needed. The specially engineered legs are super strong and solid. The shelf has been load tested at 11 lbs. with less than 1mm of deflection.
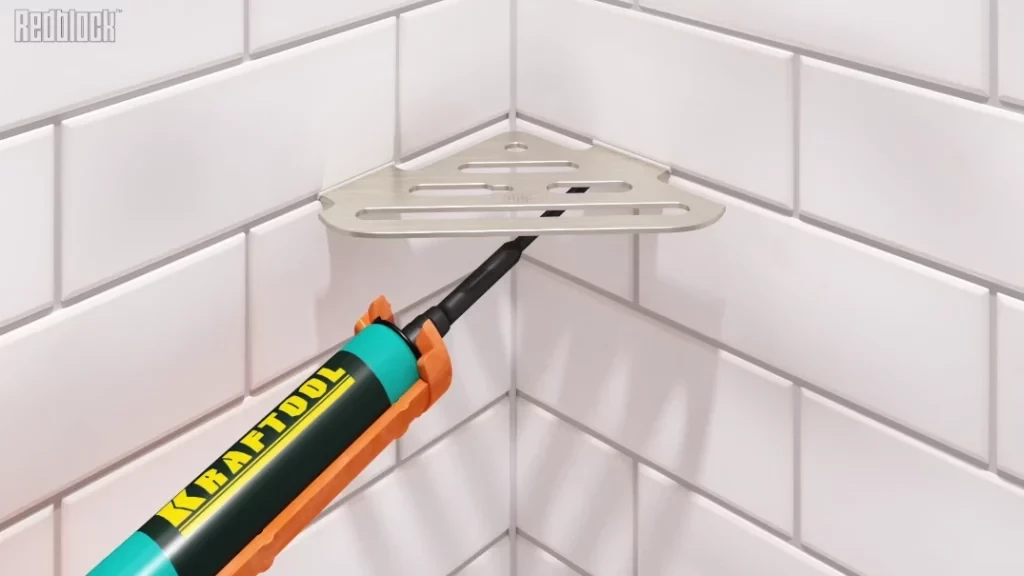
Step 5 – Apply Caulk, Install
The last step of installing shower shelf on already tiled wall is the installation. After the final cleaning, it’s time to apply silicone caulking into the install notches. This will "glue" the corner shelf firmly in place between the tile.
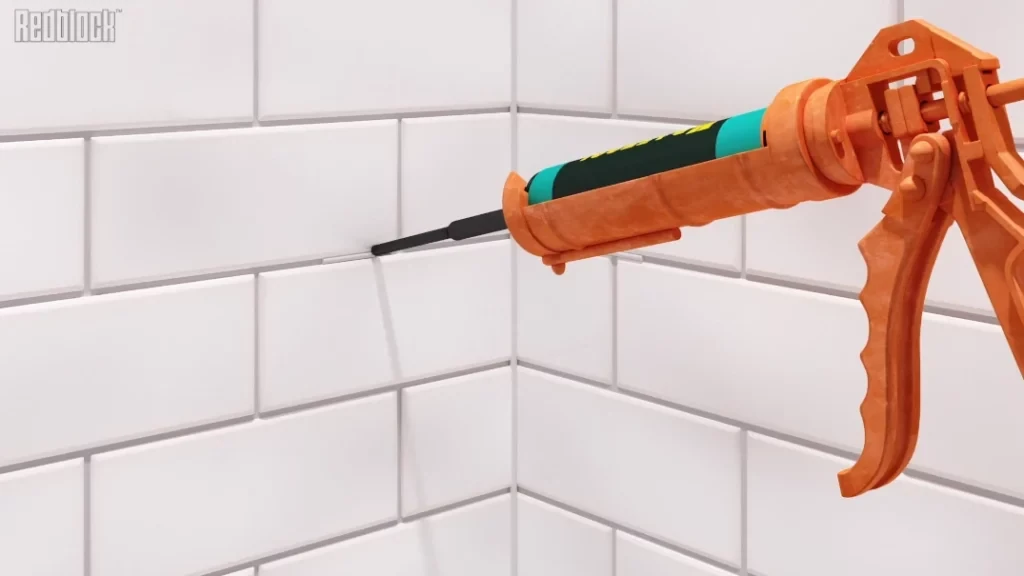
Be sure to apply a liberal, uninterrupted bead into both notches. Don’t be too worried about how much you apply here. The excess will squeeze out when the shelf is inserted into the grout line space.
Now simply insert the install tabs/legs into the notches, the same as you did during the dry fit, ensuring that you install right leg first.
Then finish by inserting the left install leg.
All you need to do now is clean up the excess caulking that squeezed out when you set it in place. You can do this with your finger if you feel comfortable with this (like I do), or you can use a silicone shaping/removal tool (Ad: The adjacent text link is an Amazon affiliate link. See affiliate disclosure page for details).
I usually also apply a very small bead of silicone caulking around the shelf install legs after I complete this step, but this is not necessary if enough caulking has squeezed out above and below the install tabs during installation. Just smooth out the excess with a shaping/removing tool or your finger.
Afterwards, you can use some denatured alcohol, or 90% (or higher) rubbing alcohol to remove any residue. This stuff is very effective, so be careful not to disturb the finished bead around the shelf legs while it's not fully cured.
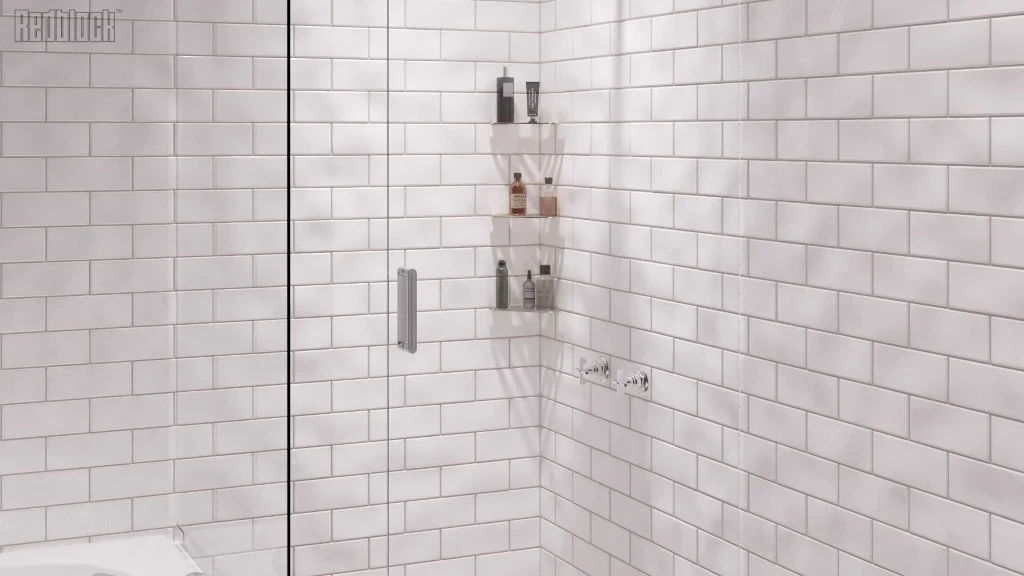
Congratulations!!… Your Redblock rb3 Corner Shower Shelf is Installed! Now you can pile whatever shower accessories you like on your new shelf including shampoo, body wash razors, moisturizers, etc.
If you’d like any additional info on this shelf, please visit our rb3 Corner Shelf Install Guide.
Wrap Up - Installing Shower Shelf on Already Tiled Wall
I hope I’ve demonstrated how easy it is to add more storage to your existing shower, by installing shower shelf on already tiled wall.
It installs quickly and easily into most existing tiled shower walls, and looks like it’s always been there… a beautiful, strong & permanent corner shower shelf solution!
Let me know in the comments section below if you have any questions at about the product or the technique. I'm always happy to help!


