

In this post I’ll explain everything you need to know about shower tile backer boards so you can decide which one is best for your shower remodel project and your budget.
I’ll discuss each type of board and how they compare in price and performance based on my personal experience as a bathroom remodel contractor. I even put it into a handy table!
I’ve also provided a bit of a background to the tile backer board story and some install tips at the end to keep you on track after you’ve decided on your board.
This is Steve from SKG Renovations with another addition to my shower remodel series.
Ok, let’s get into it!
Topics Covered:
Purpose of Shower Tile Backer Board
4 Types of Shower Wall Board
Comparing Shower Tile Backer Boards
Comparing Tile Backer Boards – A Deep Dive
Shower Backer Board Install Tips
Purpose of Shower Tile Backer Board
There is an understandable confusion about the function of tile backer board on the shower wall because all backer boards do not share the same performance characteristics.
In other words, different shower backer boards perform different functions yet they are all sold to the same group of people and they all claim to be the best solution for your shower wall.
What most people can agree on is that their main purpose is to provide a secure bonding surface for a waterproofing membrane and tile. But that’s where the clarity in purpose diverges somewhat.
What is Tile Backer Board ?
Traditional Tile Backer Board is made of aggregated Portland cement with fiberglass reinforcement. It serves as structural sheeting and a secure bonding surface for waterproofing membrane, thinset mortar and tile. Some newer boards are cementitious, while others contain silica sand, wood fiber, gypsum, fiberglass, or foam. Moisture and mold resistance are now common features, but foam boards also offer a complete shower waterproofing solution.
Shower Wall Board Problems
In the early days, gypsum wall board was created to replace the very labor-intensive lath and plaster walls, and became the dominant wall board in the 1950’s. It was used everywhere in the home including the shower.
Drywall was considered to be an adequate shower tile substrate because tile and grout was assumed to be mostly waterproof.
It wasn’t long before it was discovered that a significant amount of moisture passes through tile and grout, especially ceramic tile and unsealed cementitious grout.
Moisture behind the tile assembly caused a few major issues.
With no waterproofing membrane, the wallboard absorbed significant moisture, causing it to swell and became more flexible. This led to a cascade reaction of movement, grout line cracking, and more moisture entering the wallboard.
And with moisture and warmth also came mold growth and still further deterioration.
In other words, these early shower boards didn’t hold up well to the moisture exposure of a typical old-school shower.
Enter the Shower Tile Backer Board
In order to solve these problems, the cement tile backer board was created.
A cement based board dramatically reduced the deterioration of the backer by reducing moisture absorption and most importantly, reducing the expansion, contraction, and mold growth that occurred in the old drywall boards.
Less movement in this new cementitious board also meant less chance of grout line cracking, which meant that moisture had a tougher time seeping through and causing the cascade failure we talked about earlier.
Everything was good!…… Well maybe not so good.
The problem was (and still is) that this “solution” didn’t address the first problem of vapor transmission through the tile assembly, or the second problem of absorption and transmission of moisture through the tile board.
The cement backer board still got moist just like the drywall board did, but there was much less movement and deflection so the tile assembly remained mostly intact.
A huge win!
New Shower Board Confusion
Although the problem of swelling/ deflection in the backer board was largely solved, the negative implications of vapor/ moisture transmission through the shower wall were not fully understood for a long while after cement backer board was introduced.
Eventually they realized that with todays modern “air tight” homes, moisture that entered the structure was not dissipating as it was in older homes. Excessive moisture tended to become trapped in the shower wall causing some serious problems.
Eventually some great waterproofing products and strategies were introduced to address the moisture/ vapor transmission problem. And some tile backer boards also address this problem, while others only pretend to address it.
The swelling/ deflection problem is very different from the moisture transmission problem, and they needed to be addressed in different ways.
This makes it difficult to use only one product to address both, even with the high-tech products available today.
That brings us to the actual shower tile backer board products out there today.
How do these tile boards differ? What materials are they made from? What problems do they claim to solve and which do they actually solve?
Find out below!
4 Types of Shower Wall Board
- Cement board
- Fiber cement board
- Glass mat tile backer board
- Foam backer board (cement coated & membrane coated)
Cement Board
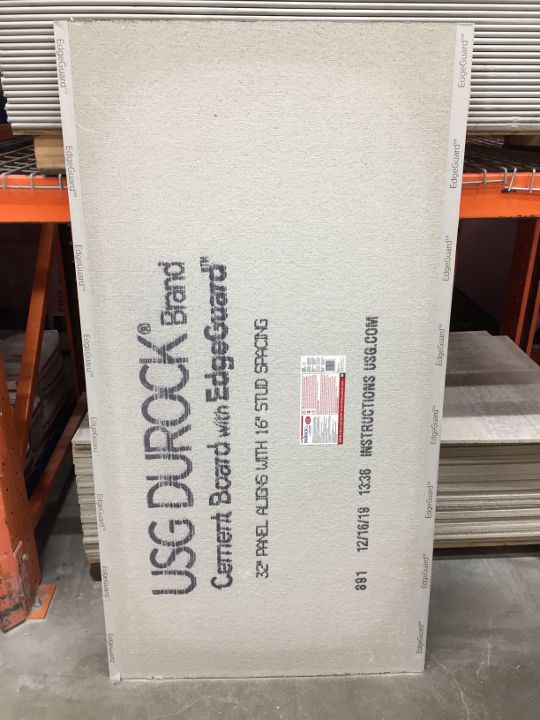
The newer versions of Cement tile backer board or Cementitious Backer Units (CBU’s), are very similar to the original cement backer board. They are all made with inorganic materials – lightly aggregated Portland cement with fiberglass reinforcement.
Cement board for showers are designed to be impact resistant, fire resistant as well as a rigid, efficient bonding substrate for tile.
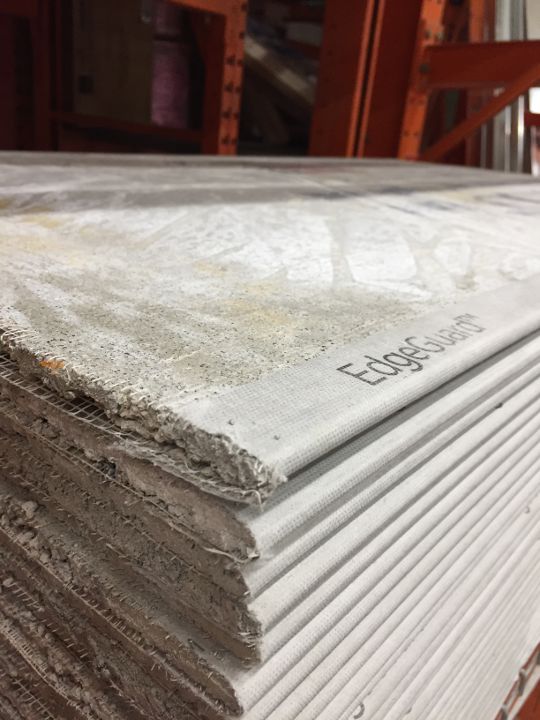
The modern versions of these shower boards often contain polymers with a finer fiberglass mesh on front and back, and wrapped around the long edges.
These boards are NOT moisture resistant, and in fact most absorb moisture quite readily. However, extra additives in these boards allow them to resist fungal growth and deterioration when exposed to water.
Cement boards are generally produced in only 1/2″ thicknesses because they would be too brittle and structurally unsound if they were made any thinner.
This is the least expensive shower tile backer board at around $10/board (3’x5′).
Examples of these shower boards include Durock Cement Board by USG, Wonderboard by Custom Building Products, and PermaBase by National Gypsum.
Fiber Cement Board
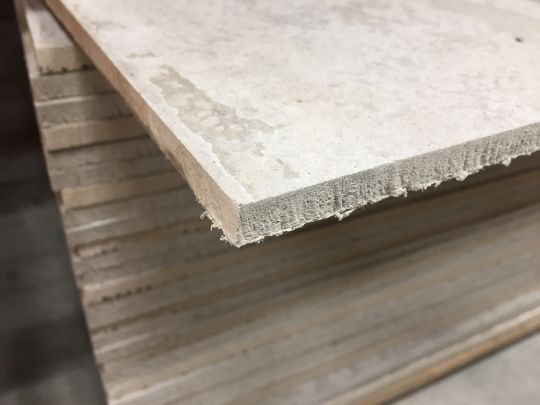
There are a few versions of fiber cement boards for showers, but they all utilize cellulose fibers (wood fibers) to make the board more flexible (less brittle).
Similar to cement board for showers, these boards are generally uniform in composition (not layered). Some boards incorporate a mixture of silica sand and cellulose fibers while others use gypsum and cellulose fibers.
They also have a uniform (non-layered) and dense composition, which allows these tile boards to be manufactured in 1/4″ and 1/2″ thicknesses.
All the fiber cement boards claim to resist compression, moisture and mold.
These shower boards can be very similar in price to cement board, or as much as 1.5x the cost of cement backer board.
Examples of these are Hardibacker by James Hardy and Fiberock by USG and Allura Fiber Cement Backerboard.
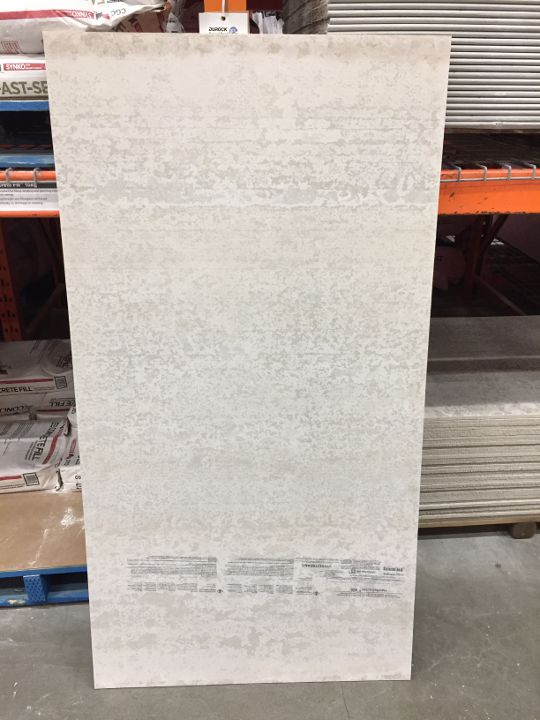
Glass Mat Gypsum Board
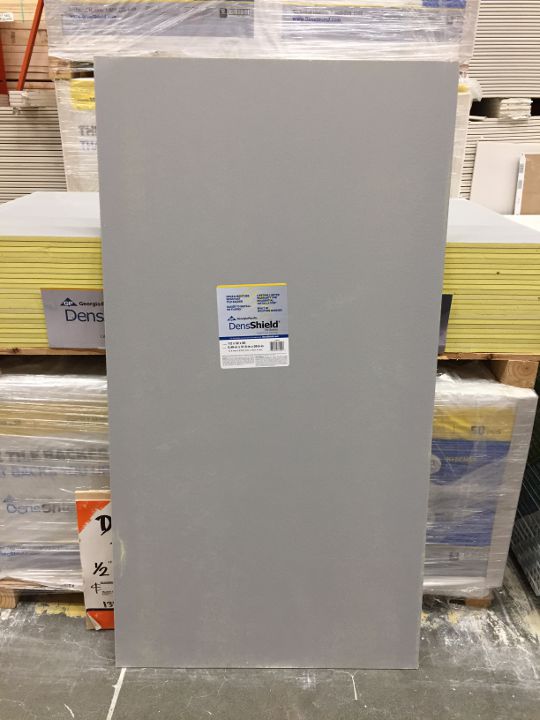
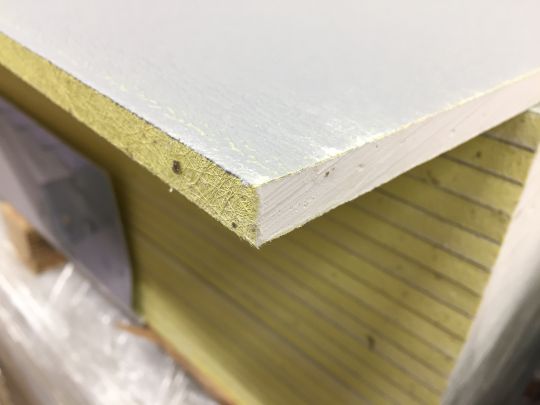
Glass Mat Gypsum board is a layered product composed of a gypsum inner core with a fiberglass layer on the front face and back face of the board.
Although these products look much like regular gypsum wall board they have an entirely water resistant, paper free (mostly fiberglass) surface, and a water resistant gypsum inner core.
Glass mat tile backer board only comes in a 1/2″ thickness, because it would not be structurally rigid enough if any thinner.
These shower boards can vary in price from some being similar to cement board, to as much as 1.5x the cost of cement backer board.
Examples of glass mat backer boards are GlasRoc by Certainteed, Denshield by Georgia Pacific, and Durock Glass-Mat Tile Backerboard by USG
Foam Backer Board
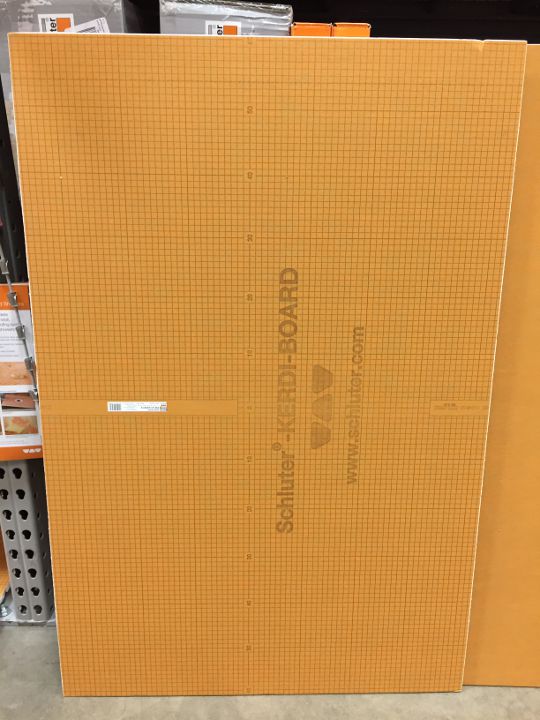
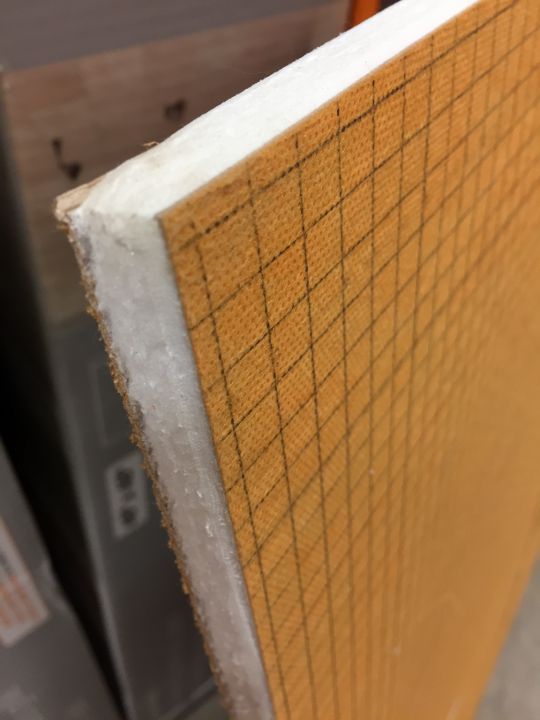
Most foam backer boards are made from extruded polystyrene foam, but a few are composed of high density polyisocyanurate closed-cell foam as well.
They are covered with a layer of reinforcement material (either fabric/ fleece or cement) on each side that’s also designed for bonding to thinset mortar.
These boards are up to 80% lighter than cement boards and are highly moisture resistant. In most cases, no additional waterproofing is required after installing these boards and sealing the seams and fasteners.
Most manufacturers of these boards make them in several thicknesses so they can be used to create structural assemblies like benches and partition walls. The minimum recommended thickness for the shower wall is 1/2″ because like some of the other boards, they become far too flexible at thicknesses below 1/2″.
Foam shower tile backer boards are generally about 4x the cost of cement board.
Examples of these tile boards include Kerdi Board by Schluter Systems, GoBoard by Johns Manville, and Wedi Building Board.
Comparing Shower Tile Backer Boards

NOTE: The section for “Structural Rigidity” of Glass Matt Backer Board contains a check, mark but you should keep in mind that Glass Matt Boards can be quite rigid, but only if the wall is flat. If they fracture from being distorted over an uneven wall, they can lose their structural integrity and water resistance.
Comparing Tile Backer Boards – A Deep Dive
The table above is a “quick and dirty” comparison of these boards but some further explanation may be required for those of you concerned about the details (like me 🙂 )
Keep in mind that this comparison will include the physical and functional differences in shower backer boards but also my opinions, based on my experience installing them and testing them.
Four Main Features
The four main features in modern shower tile backer boards are:
Secure Mortar Bonding
Structural Rigidity
Mold Resistant Tile Backer
Waterproof Tile Board for Showers
The confusing part is that the shower backer boards available on the market have a random assortment of these features, but none of the boards include all of these features.
It leaves the average DIY shower installer wondering which of these features is essential for your shower wall (if any), which are a load of BS (if any), and why isn’t there a shower board with all these features?
I have wondered these things myself.
Secure Mortar Bonding
The most obvious benefit of any shower tile backer board is to provide a secure bonding surface for your tile.
The original tile backer board (gypsum drywall board) absorbed moisture, which tended to cause delamination between the paper face and the gypsum core. This was the first of many problems with using drywall board as a shower tile backer.
Cement board and all other tile boards tend to have a pre-bonded, textured surface that thinset mortar can stick to very securely.
Structural Rigidity
Cementitious backer boards are still the only boards that guarantee high compression strength and unparalleled stiffness. This is important to limit movement and prevent your tile assembly from moving and cracking.
In my opinion, the glass mat shower backer boards (gypsum core) are stiff enough to support the average shower wall tile assembly, as long as the stud width does not exceed 16″ on center.
I would also like to stress that the rigidity of this type of tile board is quite minimal and may not withstand an impact from a large man falling against the shower wall without fracturing the grout.
Foam shower wall boards are even more vulnerable in this sense. They have generally very poor compression strength and rigidity.
If your shower wall studs are 16″ on center (max.), your tiles are larger format, you have installed a sheet waterproofing membrane, and there’s no accidental impacts against the shower wall during it’s service life, then your shower wall tile assembly should be ok (cement coated foam board will also help increase rigidity to a degree).
But that’s a lot of “ifs”.
In other words, if the finished tiled shower wall is left relatively untouched, it should all be perfectly fine. But if conditions are less than perfect, these boards can compress, and/or deflect between the studs, causing tile and grout line cracking.
Personally, I find these tile boards a bit too risky to install unless they are cement faced foam boards. The biggest brand of this type of backer board is Wedi. I have installed their products many times with great results.
Mold Resistant Tile Backer
In my opinion, this is kind of a BS “feature” that’s included in most tile backer boards these days.
A simple fact is….. a tile and wall assembly constructed according to “best practices” would not allow any mold to grow, so “mold resistance” would be unnecessary. No significant moisture would reach the backer board, and the little that does would never condense into water.
However, if the wall and tile assembly were not constructed correctly, or if the tiling contractor didn’t know what he/ she was doing, then a mold resistant tile board may be beneficial….. for awhile.
Excessive moisture would eventually cause any tile backer board to deteriorate even without the presence of mold. And if the right temperature / moisture level exists, mold will eventually grow.
I have seen several shower demolitions where the “mold resistant” tile backer board was infested with a blanket of toxic black mold after only a few years of service.
The benefit of foam shower backer boards is that moisture would not easily make it through the board so this would offer some protection against mold growth within the board and the stud cavity. But if moisture was condensing on the board’s face, it would not stop mold from growing under the tile.
Waterproof Tile Board for Showers
Most of the new generation tile backer boards are somewhat moisture resistant because of a dense surface coating (like Densheild), or a very dense, uniform consistency (like Hardiebacker). But none of these backer boards or the glass matt backer boards can inhibit enough moisture to be considered a true waterproofing membrane.
Foam backer boards are completely different than the other shower backer boards because their closed cell foam core inhibits moisture penetration. As such, these tile boards have been considered a waterproof tile board for showers. However, this is not the reality.
These backer boards, can inhibit a certain amount of moisture from moving through the board – enough for them to be considered a “waterproofing membrane”, but not a very good one.
Because this “waterproof tile board” can eliminate the need for an additional waterproofing membrane (in some cases), they have become quite popular with DIY installers and professionals alike.
Best Backer Board for Showers
The best backer board for showers (in my opinion) is the fiber cement board. My go-to FC board is HardieBacker.
I have to admit that FC board is the most difficult to work with, but I still like it the best because it’s been specifically engineered to do everything that tile backer board is supposed to do, and it does them all well. It’s basically cement board on steroids.
IMPORTANT NOTE: The dust produced from cutting most fiber cement boards is very dangerous to inhale, so be sure to use a good respirator when cutting or trimming this stuff (not just a crappy particulate mask).
All the other popular backer boards have basically been engineered to make the installers job easier, but these “benefits” come at a price.
The advantages of foam backer board are that it’s very light, and it’s water resistant. Both of these benefits are OK, but it’s “waterproofing” is kind of half-assed at only .36 perms for the 1/2″ sheet. It’s lightness also makes it too flexible for certain tile installations, and easy to damage.
Glass Matt backer board was designed to be as easy to cut as standard gypsum wall board (drywall). The problem is that this is the main reason it was created, not because it’s the best material to use as a backer board. Bottom line is, it’s OK in most situations if you install it correctly, but it does not compare to FC board.
Again, the best backer board for showers is fiber cement board mainly because it performs the very best compared to the other types. It is obviously not “waterproof” (like foam boards claim to be), but if your installing foam board on an outside shower wall, you’d probably be applying an additional membrane to increase it’s perm rating anyways.
Shower Backer Board Install Tips
Before you attach your tile backer board to the shower wall studs, the most important step you can take is to make sure that the wall studs are flat and plumb.
If you skip this step (most installers do), and the stud plane is not uniform (most are not), you will be creating tile lippage and tile registration problems, but you may also be compromising the water resistance and structure of your backer board.
Important, right?
Because it’s so important and also quite involved, I will be preparing a separate post outlining how to prepare your shower walls for tile backer board installation, so stay tuned!
If your shower wall studs are flat and plumb, there are a few hints below to help you correctly attach your shower backer board.
Cement Board and Fiber Cement Board
If you’re planning to install cement board or fiber cement board, you should pay particular attention to how they are fastened to your wall studs.
I would definitely recommend that you use only official tile backer board screws when installing any cementitious backer board, including fiber cement board.
One of the biggest problems with these products is that they can be quite brittle and can fracture easily if the wrong screws are used. Ordinary screws (even some coated screws) can also corrode if they are not designed for moisture exposure.
I always use Rock-On screws. These coated screws are corrosion resistant and can withstand the high alkalinity of a cement based shower backer board.
Another benefit of Rock-On screws is their high/ low thread configuration. These screws bite into wood like nobody’s business and the H/L thread also makes them perfect for steel studs.
As I mentioned cement board is quite brittle because it’s made up of primarily cement and aggregate, but it’s also very hard. If you use the Phillips head screws, you’ll have a tough time driving these screws in deep enough to make the screw head flush with the board surface.
And if you install the screws with a star-drive head you’ll definitely get it flush, but you’ll risk fracturing the board, especially at the edges and corners. The solution?
Countersinking of course.
You may be thinking how in the world do I counter sink into a cement board that’s so incredibly hard? I use a tile backer board countersinking bit designed specifically for this purpose that I use routinely when installing cement backer boards and fiber cement boards.
It recesses the screw head so it doesn’t get in the way when you’re installing your waterproofing membrane and tile. It also prevents fracturing the board or driving the screw in too far.
Glass Matt Tile Backer Boards
Because the core of this board is gypsum, the screw installation method used for drywall board is pretty much the same, but you should always use tile backer board screws instead of drywall screws.
Also similar to drywall board installation, you need to be very careful not to drive the screws in too far because if your screw breaks through the board face, it eliminates the holding power of the screw.
It’s best to use a driver bit with a stop collar when installing these screws.
This bit is designed to create a depression in the face of these boards just deep enough to flush the screw head with the board face.
Foam Shower Backer Boards
Installation of foam shower backer boards is quite a bit different again, compared with the other tile boards.
Because these boards have such a flimsy low density structure, you usually need to use only the fasteners recommended by the manufacturer to attach these boards. They usually include large washers to increase the surface area of the screw head.
Another big difference is that these boards function as both a shower backer board and a waterproofing membrane so all the fasteners must be covered with a sealer to maintain waterproofing integrity.
This is done by troweling a sealant over the screw heads (provided by the manufacturer), or applying a membrane “patch” over the screw heads with thinset mortar.
Wrap Up
Hopefully I’ve been successful in showing you the differences between these boards and you’ve been able to choose one that’s right for your project. I’ve also tried to give you a couple of good links and suggestions for installation.
If you’d like to ask me some specific questions about this post or tips on how I could improve it, please let me know in the comment section below. I can usually answer most questions the same day they’re posted. Or if you need some help on other bathroom remodel or shower remodel topics, please check out my shower remodel post.
Good luck with your project!
This post is for information purposes only and should NOT be interpreted as professional advice. You should always consult a licensed local contractor before undertaking any remodelling work in your home. Click here for my full Personal / Professional Disclosure.


Hi Tyler,
Thank you so much for your comment!
Although my blogging efforts can sometimes be burdensome, it’s comments like yours that really keep me going!
Good luck with your project!
Steve
Thank you for all your hard work in these articles ! The shower backer board one was literally perfect, it went through every detail and facts. I’ve been reading a lot of different articles online about this subject and when I read yours I knew my answer would be here. Definitely would have paid for this information at the beginning of my journey.
Thank you again for all that you’ve written in these pages !
Hi Denise,
Thank you for your comment!
You couldn’t go too far wrong installing any tile backer board, as long as it’s installed correctly.
The size of the tile isn’t really important because the tile, grout and thinset mortar become a single uniform layer after curing. In essence, one super heavy tile, so the downward (shear) force applied to the backer board is the same with a 48″x48″ tile or a 6″x6″ tile (assuming the same tile thickness).
I personally prefer using a cement board like Durock, or a composite board like Hardibacker, simply because these boards adds to the structural integrity and rigidity of the wall assembly.
Important side note:
I know it might seem like an easy DIY job because each tile covers so much wall area… much easier and much quicker, right?… Wrong!
In my experience, the larger the tile, the larger the trouble.
Unless the wall is PERFECTLY FLAT, the edges/corners of adjacent tiles will be very difficult to match. I’m talking about tile lippage… in a big way.
I am not saying that it’s impossible to accomplish for a DIY’er, but I’m saying that you better be prepared. The correct large format tile mortar, a thick enough mortar bed, levelling clips, back buttering, a rubber hammer. Check out my Tile Installation post for more info.
I’m sorry to say that I don’t think this is a DIY job.
I would suggest that you hire a professional tile installer for this job. And not just any tile installer… only somebody with experience installing these large format tiles.
Sorry for putting a damper on your DIY tile install plans. I just thought you should know what your getting yourselves into.
Good Luck!
Steve
Hello! Thank you for this informative post. We are considering installing large format tile in our (new construction) bathroom. The tile we’re looking at is 48″x48″ — each tile weighs 50 lbs. The shower is 60″x36″. We’re hoping to DIY the tile installation, but are a bit apprehensive about using such large tiles. Is there a particular backer board that is better suited than another, to support the size and weight of large tiles like this?
Hi Dave,
Thank you for your comment!
I appreciate that you’re trying your best to come up with a solution to this problem, but I would recommend against cutting out a strip of the backerboard.
Tile backer board is a significant structural element within the tile assembly, and there’s also likely a waterproofing membrane under the tile layer. For those reasons (and others) it’s not a good idea to cut a swath out of the backer board.
I’ve used two approaches to solve this problem:
The first is to simply leave the existing tiles in place and apply a new strip of tiles over the existing tiles.
Obviously, this technique only works if your existing tile mosaic strip is recessed enough (and your new tiles are thin enough) to allow the tile surface planes to match.
It’s definitely worth spending a bit of time looking for a tile with the right thickness (uniform thickness) because of the speed and ease of this technique.
There are specific thinsets (and tile surface treatments) that are engineered for bonding tile to tile. Ask you local tile wholesaler what they’d recommend.
If the above is not possible, it should only take a few hours of careful work to remove this strip of tile and clean out the residual mortar.
You would need to be careful not to damage the waterproofing membrane (assuming there is one).
As long as you only hand tools, the backer board should be safe during this process – it doesn’t take much force to separate these tiny tiles from the mortar or to scrape away the excess mortar.
I’ve used my trusty chisel to do this, but there are several tools and techniques one could use.
After the section is adequately cleaned, I would apply a bonding agent like diluted Weldbond to ensure good thinset (see my Tile Installation post).
I usually use Schluter Ditra (comes in two thicknesses), or stainless steel mesh, to raise mosaic tiles to match the adjacent tile plane but there are several other options. Again, you should ask you local tile wholesaler.
Good luck!
Steve
I have a decorative ring of tiles installed around my shower walls about shoulder high. It’s a row of 4 1x1in glass tiles.
The person who installed them had no idea what he was doing. By the time I realized this, it was basically too late. Apparently, he had never installed the thin decorative/mosaic tiles before. Thus, the tiles are recessed. I’m tired of looking at it. I’ve contracted a company to replace the tiles, because I don’t have the experience to do it myself with any degree of certainty that it will turn out well. The person I’m working with, who has 25 years of experience installing tiles is telling me that it will nearly possible to install new tiles in the ring. The reason he says is, my has decided she wants a row of 1 inch tiles, a row of 2 inch tiles and another 1 inch tiles. The guy I’m dealing with (who will not the person to actually install the new tiles) said it will take at least 3 days, one day for each row of tiles. Not sure why that is? Anyway, I’ve done a lot of research about backer boards and your article is the most informative I’ve read. Thank you for that. So my question is this, is it possible to cut 1 inch strips of a backer board to raise the thin 1×1 tiles, install the backer board strips around the ring in the wall where the 1×1 tiles will go, and then install all the tiles at one time? The 2×2 tiles are thicker and don’t need the backer board. To me that seems like the only way to accomplish leveling the decorative tiles with the existing wall tiles.
Additionally, with a backer board only 1 inch wide, what would be the best way to secure it to the wall? Do you think the backer board screw would damage the 1 inch strip? Since it’s such a small strip and probably won’t affect the underlying wall, could the strips just be installed using quick set instead?
Your opinion would be great appreciated.
Hi Dale,
Thank you for your comment!
You have run into one of the most common shower remodel issues… non-plumb and non-square shower walls. I’m sure it’s as frustrating for you as it always is for me.
To answer your questions:
1. I always tile the back wall (long wall) in a shower alcove first. Because this wall is the largest, it requires the most time for tile setting and it’s the most visible. As such, you don’t want to have to worry about anything other than keeping your tiles properly spaced and level during this relatively long and fiddly process.
Even if the side walls of your alcove are significantly out-of-plumb, the tiles on the R & L sides of the back wall won’t likely require angle cuts (or even clean edges) because they will often be covered by the side wall tiles. I explain this in greater detail in my shower tile install post if you’d like to check it out.
2. I always prefer cementitious tile backer board to the foam stuff every time because it creates a more rigid and unified sub-structure, but there are times when I use foam board. In your situation – especially if the washer/ dryer is connected to the wall, or if the floor is not concrete, I would definitely choose cement backer or Hardibacker. This would of course involve an extra step – applying a waterproofing membrane (especially on the outside wall). See my waterproofing membrane post for my recommendations.
As for the preferred type of tile for hard water, you can check out my shower tile install post for that too.
Good luck with your project!
Steve
Hello Steve, Thank you sir for covering this topic so well. Easy to read, conversational, and detailed where needed and I appreciate that. I have a couple questions. One regarding best backer board use when tiling my Delta 17″ tub/shower combo. Also a question for which tiles to set first (end walls or side wall).
some background…
I installed all of the plumbing for total accessibility from the ‘other side of the stub wall for future servicing should that need arise.) Currently I have my exposed studs covered at the bottom with a 6 inch tall HD self adhesive 1/16 ” rubber membrane attached to the bottom inside lip of the tub. I then covered that with HD plastic sheeting, also from the bottom of the tub lip, over the 6″ membrane, and up to the ceiling. Not pretty to look at but perfectly watertight and usable to shower with until the tile gets installed (Wife insists we don’t stop here; – ). My need to tile came to light when I tried to install the Delta 3 piece surround I purchased when I bought the tub. I discovered that the tubs 60″ side wall was not vertical and was leaning over the tub. That gap would not allow the left end surround section (with plumbing) and the right end(exterior wall) surround sections to mate up properly to the side surround section creating Big gaps at the bottom. I ruled out shimming the wall. Fortunately each wall surface is flat to itself.)
1. Would it be best to thin set the angle cut the end walls tiles first and then thin set the long side wall tiles (row by row going up) tight against the end wall tiles to help cover the angle cuts and present a smoother corner transition on the two corners surfaces? I’m planning to use 12″x24″ inch tiles set vertically.
2. On the other side of the 60″ tub side wall is my laundry room and the washer and dryer are against that same wall. Would it be prudent to use 1/2″ cement board on all three walls over using flexible Kerdi board to help stiffen the walls and help hold the cement and grout together should/When the washer decides to go dancing? Or is there a reason I’m not seeing something that would suggest otherwise? My plan is to leave the membrane and plastic in place under the backer but trim it up a tad to just above the bottom edge of the backer and tile?
oh yeah. One more. Our city water here is very hard and we do not use a softener. Which kind of tile surface do you recommend for this type of water? Smooth and glossy tile or something else? Any thoughts on future cleaning of these tiled surfaces would be great.
Hi Edie,
With a semi-rigid, solid surface material like this, I would generally say that the backer board material doesn’t matter.
I don’t think you need to worry about the weight of the product.
Regardless of the backer material, the silicon adhesion will significantly reduce the weight that bears down on the shower base.
And if you follow the install directions, the silicon contact between the backer and the Onyx board will be extensive, so the risk of de-lamination is very low as long as you apply a bonding agent to the backer board surface before installation (to ensure good silicon adhesion). Diluted Weldbond works great for this.
Good luck!
Steve
edie 11_12_2022
I am remodeling old bathroom. I am placing onyx brand solid sheet wall panels and base. what is your recommendation on backer board. I can say 38×38 low profile base weighs 103 pounds and 38×84 inch walls are heavier yet. I would appreciate any suggestions. thanks.
Hi Thelo,
Thank you for your comment!
The first is basically an exterior stucco/ plaster finishing technique. I have seen similar methods used in showers in the (distant) past but this was decades ago.
The second is an under-tile waterproofing technique engineered specifically for modern showers. It’s been lab and field tested extensively for many years, and has become “best practice” in the industry.
Needless to say, I would go with the second option but with a couple of modifications.
I would not apply any membrane on the studs before backer board install. Any semi-permeable membrane like “black paper” will only serve as a condensation surface.
Secondly, I would not use a liquid waterproofing membrane over the tile backer board. A good “sheet” waterproofing membrane such as Kerdi DS, Wedi Subliner Dry, or Durock sheet membrane would be preferable. There is nothing basically wrong with Aquadefense but most liquid membranes do not compare with these sheet membranes in terms of their perm rating.
Thirdly, I would insulate the stud cavities behind your backer board as thoroughly as possible (if it’s an outside wall). If you have a 3 1/2″ stud depth, I would seriously consider spray foam insulation in these cavities to increase R-value and decrease moisture transmission. Here’s more info from my waterproofing post.
That’s my two bits! I hope it helps!
Steve.
Good day,
I have heard from several contractors saying fluting wall is the best for the shower wall.
Is that right?
my understanding the way they do it using a black paper on the studs than install Steel Lath on it and start a layer of mason mortar mix wait until dries than another layer again wait until dries than thin-set mortar on top and the marble tile and grout and call it done.
other said black paper on the studs 1/2 hardy backer board than coat it with (Mapelastic Aquadefense Liquid Membrane) than thin-set and marble tile and grout.
two different ways and each saying this is the best way. who to believe I don’t know.
your advice highly appreciated
Hi Angela,
Thank you for your comment!
It is not easy (or advisable) to remove the niche unless you are planning on removing some wall tile around the niche because the waterproofing membrane around the niche will need to be repaired when the niche is replaced. And if the tile backer board (under the wall tile) is a foam board like Kerdi Board, this will not be possible either.
It is also not a good idea to attempt to remove the tile in a niche like Kerdi SN because you will essentially destroy it. Foam board and foam niches are not durable enough to be used twice.
It may be possible however, to remove the foam niche and the tiles around the niche, but only if a cementitious backer board (CBU) was installed under the wall tiles. You would still need to be fairly careful removing the wall tile but CBU’s are very hard and quite durable.
Sorry for the bad news. Good luck!
Steve
Hello! I am wondering how easy it is to remove a Schluter Kerdi shower niche and replace it, or if it’s possible to replace the grouted tiles in the niche itself, along the sides and back, without damaging the integrity of the waterproofing?
Hi Andy,
Thank you for your comment!
First of all, you should not have installed your backer board before installing the pan. The installation of this pan is difficult and messy enough even when you follow their directions.
As you’ve already noticed, the side walls are 1/2″ thick so only in the best case scenario will your backer board meet flush with the side walls of this pan, which is totally unrealistic.
I would suggest that you install the pan flush with the back wall and one of the side walls. If the side wall you choose is not perfectly perpendicular to the back wall, you will have to make it so beforehand.
After install, only the other side wall will need to be furred out to make the backer flush with the pan side wall.
If this wall is perfectly parallel to the side wall of you pan, you can simply install 1/4″ Hardibacker or 1/8″ panel board (depending on the gap) to furr out the stud wall enough to allow your 1/2′ backer to be flush with the pan.
More likely you will need to use a combination of shims, construction adhesive, 1/4″ hardibacker (or panel board), & your 1/2″ tile backer board, to get this wall parallel and flush. This is a very fiddly process so you’ll need to exercise some patience. Don’t worry too much if your finished wall is a bit proud or slightly recessed from the shower pan side wall. You can adjust your tile mortar thickness to accommodate.
I hope that helps. Good luck with it!
Steve
Steve,
I’m ready to install a Tile Redi shower pan for my project. Before it arrived, I hung backer board around the top of the enclosure, leaving the last bit for after the pan is installed. Now that it’s here, it seems to be thicker around the walls than my backer board. Do I need thicker backer board to match the thickness of the shower pan walls in order to avoid uneven wall tile at the base where the pan meets the wall?
Thanks for the assist!
Hi Jody,
Thank you for your comment!
This is a marketing tactic more than anything else, since “waterproof” only means that liquid water will not flow through it – not a very impressive claim.
The only measure that means anything when it comes to shower wall waterproofing membranes is “water vapor permeance”. A product’s vapor permeance rating (perm rating) represents how much water vapor will pass through it under controlled conditions.
Since I can’t seem to find any reference to “perm rating” in any of the promo material or specifications, I am going to guess that its perm rating is too low to consider it a “waterproofing membrane”.
My advice would be to always install a waterproofing membrane over your tile backer board, unless you’re installing a foam board product like Wedi Board or Kerdi Board.
Btw, foam backer boards have a low enough perm rating to be considered true “waterproofing membranes”, that is why these products can serve as both a backer board AND a waterproofing membrane.
Good luck with your project!
Steve
I am doing research on these boards at our local Lowe’s store and found one brand (Hardieboard) with a version that says it is “100% waterproof cement board”. It claims to have “hydro defense technology” (trademarked). Do you believe that this is actually waterproof? Your article states that foam backer board is the only waterproof backer board. Any thoughts?
Hi Rick,
Thanks for your comment!
It does sound like a fun project. Firstly, I would say that if you plan to create your own mortar/cement shower pan, it’s very important to install a drain assembly that is compatible with your waterproofing membrane. This is a great video by Schluter systems that shows you how to do this with the Kerdi drain (which is a great option).
As for your backer board… I wouldn’t hesitate using 1/2′ Wedi foam backer board on the walls as long as your studs are 16″ on center (or less), and you are not installing tiles smaller than 6″ (long side). Any other 1/2″ cement, fiber, or glass matt boards are also great options. For waterproofing, I always prefer a sheet membrane over a liquid. Even with your thorough insulating efforts, it would still be much safer to use a low perm sheet membrane like Wedi Subliner Dry or Kerdi DS. If you install the Wedi wall boards, you will not need any additional waterproofing on the walls but the shower floor will still require it, of course.
The water resistant drywall is usually OK for the ceiling as long as it’s sealed and painted well. Wedi Board would also work great, even if you decide to tile the ceiling. It’s always a good idea to waterproof the wall-to-ceiling margin, whichever board you decide to use.
Good Luck!
Steve
Steve,
I am finishing a basement of a 18 year old Michigan home. The basement walls are poured cement. I used 2″ thick (R10) 4×8′ Owens Corning 250 XPS and spray foam where needed BEHIND my framing around the entire basement, along with the same 2″ XPS plus spray foam, caulk, and a thick layer of spun rock wool in the rim joints. I framed this bathroom with fir to provide additional strength and water resistance, just in case. The plan is to build the bathroom with universal design in mind to perhaps allow ageing parents to rehab there if ever necessary. Plus, my wife and I are both in our late 50s so we could perhaps use this some day also. Anyway, the sloped curb-less shower size is roughly 78×48″ with plans for a 36″ glass door opening (and a total 78″ (36″+42″) glass wall into the shower area. Three walls will be tiled, and the 48″ wall near the entry farthest from the shower heads is an outside wall. As much as I would appreciate the ease of use carrying this into the basement, I am a bit leary of using any of the soft and lightweight materials (Wedi, Schluter, etc) as a backer board, as I am concerned about possible compression from a wheelchair or walker, or falls, being a potential problem. My plan was to use some form of 1/2″ cement board and Redguard with their membrane mesh (in corners) on all three tiled walls and all 4 corners. Because I plan to build a traditional mortar/cement shower pan, I presume this needs to be coated with Redguard also. I am still trying to decide what would be best for the ceiling over the shower? The rest of the bathroom framing is covered with purple board, but the shower ceiling remains open. What backer board do you suggest that I use for the ceiling? Would 1/2″ Schluter or Wedi be rigid enough for the ceiling over the shower, or perhaps a 1/2″ fiberglass option might be better? Or maybe I should just stick with a cement board… perhaps doubling 1/4″ sheets since I will be installing these alone? This shower is not a steam shower and there will be an appx. 12″ opening above the glass wall with a heady-duty exhaust fan centered in the purple-boarded ceiling. Am I missing anything obvious/important? This is the 3rd basement and bathroom I have built, but the first one with a shower. Should be fun! THANKS in advance!
Hi Dan,
Thank you for your comment!
If I understand you correctly, your outside wall is brick (masonry) and there is no stud wall on the inside of your bathroom. If this is correct, there’s no insulation on this wall, which is a big problem. Another problem is that masonry happens to be a very effective moisture condensation surface.
One of the biggest problems on any outside bathroom wall is lack of insulation. If there’s no insulation, moisture from the shower will condense on the masonry wall behind your backer board, no matter which backer board or waterproofing membrane you install, especially in the colder months.
The way I would deal with this problem is to first cover the masonry wall with sheets of polystyrene foam insulation (I would suggest 1″) from floor to ceiling, sealing all the seams with polyurethane (no gaps). I would then build a stud wall in front of this foam wall and fully insulate this with regular insulation.
A slightly easier but more expensive way would be to build your new stud wall against the masonry, then hire an insulation contractor to apply spray foam insulation between the studs. This method is superior because the foam effectively manages moisture penetration, as well as providing a much better R value per inch.
If you do either of these options, it wouldn’t matter which backer board you choose. It’s always important to apply a good waterproofing membrane over your backer board regardless. In other words, you can repair your masonry wall for structural reasons, but it’s not a good idea to rely on this kind of treatment (Durabond) to address any of your shower waterproofing issues, in my opinion.
Good Luck with your project!
Steve.
My home was built in the early 1950s and has brick and plaster on the exterior wall. What kind of backer board should be installed over that? Some of the plaster has deteriorated and suggestions have been made to use Durabond to repair it. Is that wise? Your posts are very helpful.
Hi Addy,
Thank you for your comment!
Yes, blocking at the seams is super important with these boards so it’s great that you’ve already taken care of that. Blocking is also great to reduce stud deflection in general, so it’s a great practice no matter what board you are installing.
I think a horizontal brace (blocking) at the center of each board between every stud, should do the trick (assuming you’re installing 3×5 boards horizontally) . That means that your blocking is 16″ apart vertically, which is ideal. I would also suggest that you make sure your blocking is flush with the stud face so you can screw one fastener into the center of each piece of blocking.
Good luck with your project!
Steve
Hi Steve!
After a ton of research, and the desire not to handle cement backerboard since I’ll be installing my bathroom by myself, I settled on GoBoard, mostly because of availability at my local Lowes. The appeal was that it’s lightweight, and 100% waterproof.
Then I came across this article, particularly about your concern for the board’s deflection. I can’t argue with that—I’ve had similar concerns. You can’t have something that light-weight and not have any compromises. I did proactively add blocking to studs where all the GoBoard seams will meet, so that will definitely address deflection issues there.
I am still concerned about the center of the board, particularly between the studs, even at 16″ apart. Do you recommend additional blocking? If so, how much additional blocking per sheet? Thanks in advance!